C++ QT进阶_qt 进阶培训-程序员宅基地
技术标签: qt C/C++、Java/Scala
前言
- 为什么会有这篇文章呢?为什么学QT呢?
- 学了c/c++,除了会刷几道leetcode,用二分法解个方程,尝试深搜走地图,用线性筛找个素数······;难道C++的应用就是为了ACM吗?不,个人觉得并不是,这不是自己的初衷!于是乎,开始学习数据结构,网络编程,系统编程,web前端(html、css、JavaScript)······
- 因为学了c++还没找到一个好的应用,感觉很糟!如果您想了解
为什么学习qt,请点击链接查看:《为什么 qt 成为 c++ 界面编程的第一选择?》 - 推荐一个详细的学习笔记:《Qt 5 基础教程》
- 推荐一个B站榜首视频教程:《最新QT从入门到实战完整版|传智教育》
- 推荐一个51CTO榜首视频教程:《C++QT5跨平台界面编程原理和实战大全视频课程》
- 本文基于《【达内】2021年QT图形框架,编程开发全套教程》学习记录所得!
本文主要将记录以下五部分:
- 父窗口
- 信号和槽
- 面向对象Qt编程
- Qt设计师
- Qt创造器
00 QT 环境搭建
QT源码和SDK下载
- https://download.qt.io/archive/qt/
- http://www.qt.io/
- http://download.qt.io/
- http://www.ffmpeg.club/qt
- 推荐的一个安装教程:QT5.14.2安装
01 父窗口
- QWidget
- QMainWindow(主窗口)//QWidget的直接子类
- QDialog(对话框)//QWidget的直接子类


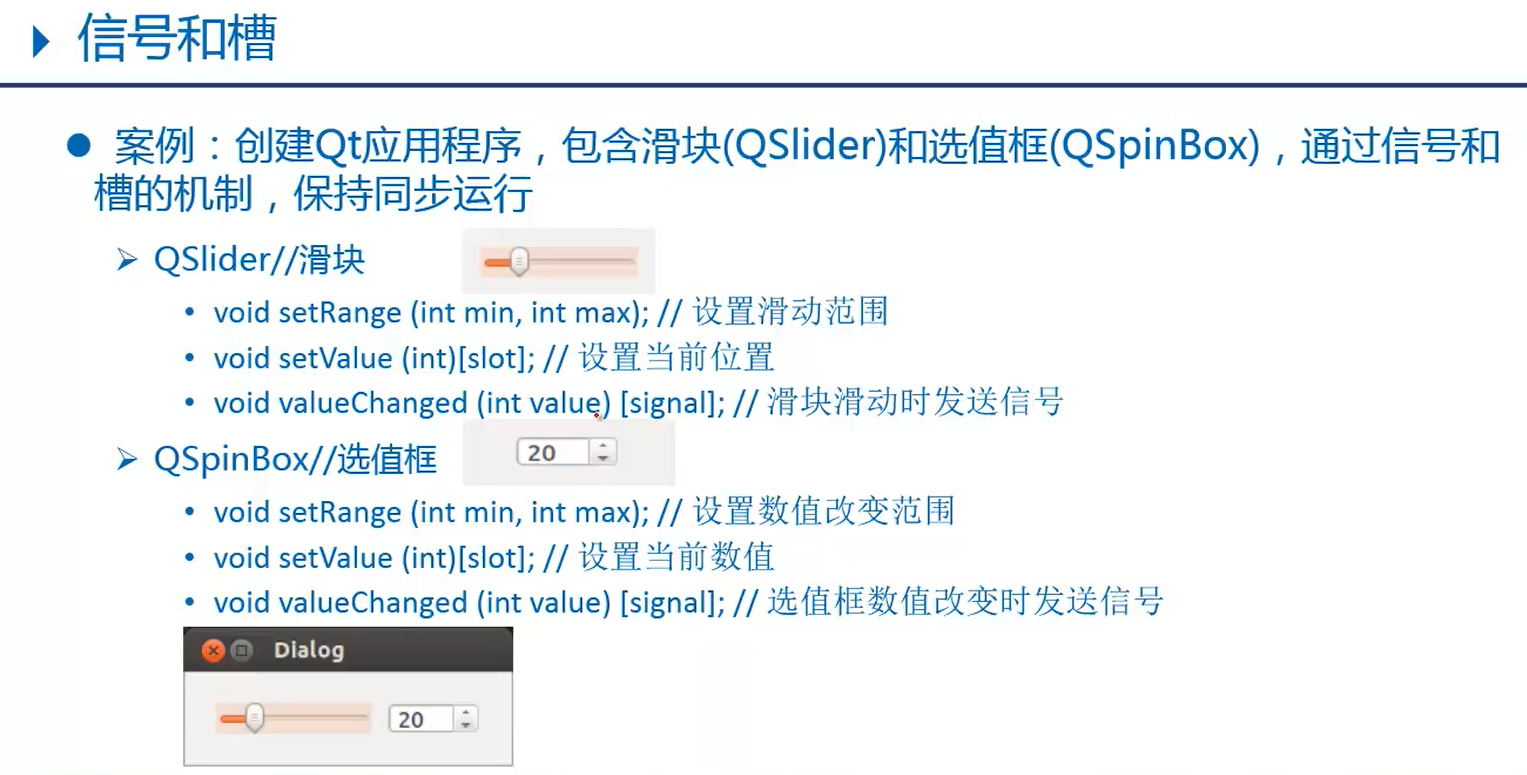
02 信号和槽(实现QSlider与QSpinBox)
1.1 初始代码
#include <QApplication>
#include <QSlider>
#include <QSpinBox>
#include <QMainWindow>
#include <QObject>
int main(int argc, char *argv[])
{
QApplication a(argc, argv);
QMainWindow myMainWindow;
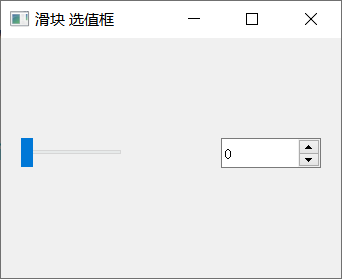
myMainWindow.setWindowTitle("滑块 选值框");
myMainWindow.resize(340,240);
//创建水平滑块,依附于myMainWindow
QSlider myslider(Qt::Horizontal,&myMainWindow);
myslider.move(20,100);
myslider.setRange(0,200);
//创建选值框,依附于myMainWindow
QSpinBox myspinbox(&myMainWindow);
myspinbox.move(220,100);
myspinbox.setRange(0,200);
//显示框内所有元素
myMainWindow.show();
//滑动滑块,让选值框内数值随之改变
//QObject::connect(&myslider,SIGNAL(valueChanged(int)),&myspinbox,SLOT(setValue(int)));
QObject::connect(&myslider,&QSlider::valueChanged,&myspinbox,&QSpinBox::setValue);
//选值框数值改变,让滑块随之滑动
//QObject::connect(&myspinbox,SIGNAL(valueChanged(int)),&myslider,SLOT(setValue(int)));
QObject::connect(&myspinbox,static_cast<void (QSpinBox::*)(int)>(&QSpinBox::valueChanged),&myslider,&QSlider::setValue);
return a.exec();
}
1.2 运行结果
1.3 改进思想
- 此处应该使用
水平布局器<QHBoxLayout>来优化,还有使用面向对象思维来完成封装!
03 面向对象的QT编程
3.1 加法计算器
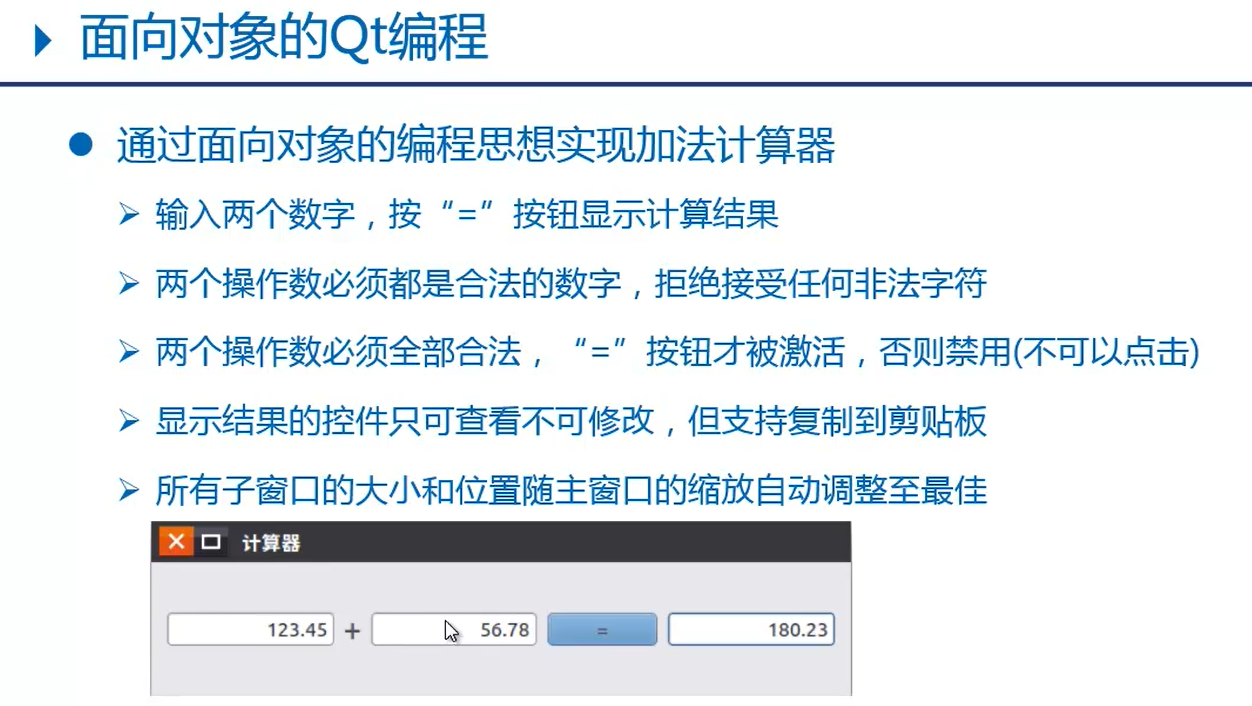
3.1.1 calculatordialog.h
#ifndef __CALCULATORDIALOG_H
#define __CALCULATORDIALOG_H

#include <QDialog>//父窗口类之一
#include <QLabel>//标签
#include <QPushButton>//按钮
#include <QLineEdit>//行编辑控件
#include <QHBoxLayout>//水平布局器
#include <QDoubleValidator>//验证器
class CalculatorDialog:public QDialog
{

    Q_OBJECT //moc
public:
    CalculatorDialog(void);
public slots:
    //使能等号按钮的槽操作数
    void enableButton(void);
    //计算结果和显示的槽函数
    void calcClicked(void);
private:
    QLineEdit* m_editX;//左操作数
    QLineEdit* m_editY;//右操作数
    QLineEdit* m_editZ;//显示结果
    QLabel* m_label;//"+"
    QPushButton* m_button;//"="
};

#endif // CALCULATORDIALOG_H
3.1.2 calculatordialog.cpp
#include "calculatordialog.h"
//构造函数
CalculatorDialog::CalculatorDialog(void)
{

    //界面初始化
    setWindowTitle("计算器");
    //左操作数,this指针即为当前父窗口指针
    m_editX = new QLineEdit(this);
    //设置文本对齐:右对齐
    m_editX->setAlignment(Qt::AlignRight);
    //设置数字验证器,只能输入数字形式内容
    m_editX->setValidator(new QDoubleValidator(this));
    //右操作数
    m_editY = new QLineEdit(this);
    m_editY->setAlignment(Qt::AlignRight);
    m_editY->setValidator(new QDoubleValidator(this));
    //显示结果
    m_editZ = new QLineEdit(this);
    m_editZ->setAlignment(Qt::AlignRight);
    m_editZ->setReadOnly(true);//设置只读
    //"+"
    m_label = new QLabel("+",this);
    //"="
    m_button = new QPushButton("=",this);
    m_button->setEnabled(false);//设置禁用

    //创建布局器 : 自动调用每个控件的大小和位置
    QHBoxLayout* layout = new QHBoxLayout(this);
    //按水平方向,依次将控件添加到布局器中
    layout->addWidget(m_editX);
    layout->addWidget(m_label);
    layout->addWidget(m_editY);
    layout->addWidget(m_button);
    layout->addWidget(m_editZ);
    //设置布局器
    setLayout(layout);

    //信号和槽函数连接
    //左右操作数文本改变时,发送信号 textChanged()
    connect(m_editX,SIGNAL(textChanged(QString)),
            this,SLOT(enableButton(void)));
    connect(m_editY,SIGNAL(textChanged(QString)),
            this,SLOT(enableButton(void)));
    //点击按钮发送,发送信号clicked
    connect(m_button,SIGNAL(clicked(void)),
            this,SLOT(calcClicked(void)));
}
//使能等号按钮的槽操作数
void CalculatorDialog::enableButton(void){

    bool bXOK, bYOK;
    //text():获取输入文本(QString)
    //toDouble():QString转换为double,参数保存转换是否设置禁用
    m_editX->text().toDouble(&bXOK);
    m_editY->text().toDouble(&bYOK);
    //当左右操作数都输入了有效数据,则使能等号按钮,否则设置禁用
    m_button->setEnabled(bXOK && bYOK);
}
//计算结果和显示的槽函数
void CalculatorDialog::calcClicked(void){

    double res = m_editX->text().toDouble() +
            m_editY->text().toDouble();
    //number():将double转换为QString
    QString str = QString::number(res);
    //显示字符串形式结果
    m_editZ->setText(str);
}
3.1.3 main.cpp
#include "calculatordialog.h"
#include <QApplication>

int main(int argc, char *argv[])
{

    QApplication app(argc, argv);

    CalculatorDialog calc;
    calc.show();
    return app.exec();
}
2.1.4 运行结果

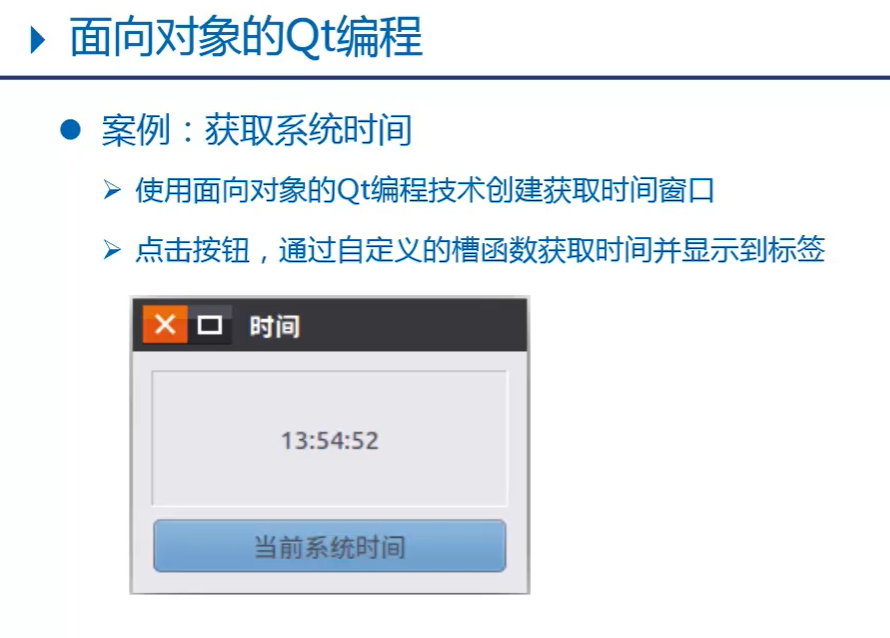
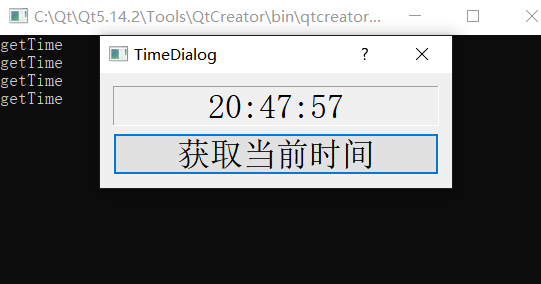
3.2 获取系统时间
3.2.1 timedialog.h
#ifndef __TIMEDIALOG_H
#define __TIMEDIALOG_H

#include <QDialog>
#include <QLabel>
#include <QPushButton>
#include <QVBoxLayout>//垂直布局器
#include <QTime>//时间
#include <QDebug>//打印调试

class TimeDialog : public QDialog{

    Q_OBJECT //moc
public:
    //构造函数
    TimeDialog(void);
signals:
    //自定义信号函数 只需声明 不能写定义
    void mySignal(const QString&);
public slots:
    //获取系统时间的槽函数
    void getTime(void);
private:
    QLabel* m_label;//显示时间label
    QPushButton* m_button;//获取时间button
};
#endif // TIMEDIALOG_H
3.2.2 timedialog.cpp
#include "timedialog.h"

TimeDialog::TimeDialog(void)
{

    //初始化界面

    //显示时间
    m_label = new QLabel(this);
    //设置label边框消息:凹陷面板
    m_label->setFrameStyle(QFrame::Panel|QFrame::Sunken);
    m_label->setAlignment(Qt::AlignHCenter|Qt::AlignVCenter);
    //设置label的字体大小
    QFont font;
    font.setPointSize(20);
    m_label->setFont(font);

    //获取系统时间的按钮
    m_button = new QPushButton("获取当前时间");
    m_button->setFont(font);

    //创建垂直布局器
    QVBoxLayout* layout = new QVBoxLayout(this);
    layout->addWidget(m_label);
    layout->addWidget(m_button);
    //设置布局器
    setLayout(layout);

    //信号和槽函数连接
    connect(m_button,SIGNAL(clicked(void)),
            this,SLOT(getTime(void)));
    //通过自定义信号,出发label的setText槽函数执行
    connect(this,SIGNAL(mySignal(QString)),
            m_label,SLOT(setText(QString)));
}
//获取系统时间的槽函数
void TimeDialog::getTime(void){

    qDebug("getTime");
    qDebug() << "getTime";
    //获取当前系统时间
    QTime time = QTime::currentTime();
    //将时间对象转换为字符串
    QString str = time.toString("hh:mm:ss");
    /*//显示时间
    m_label->setText(str);*/
    //emit:是Qt关键字,标记当前是发射信号
    /*emit*/ mySignal(str);//发射信号
}
3.2.3 main.cpp
#include "timedialog.h"

#include <QApplication>

int main(int argc, char *argv[])
{

    QApplication a(argc, argv);
    TimeDialog w;
    w.show();
    return a.exec();
}
3.2.4 运行结果
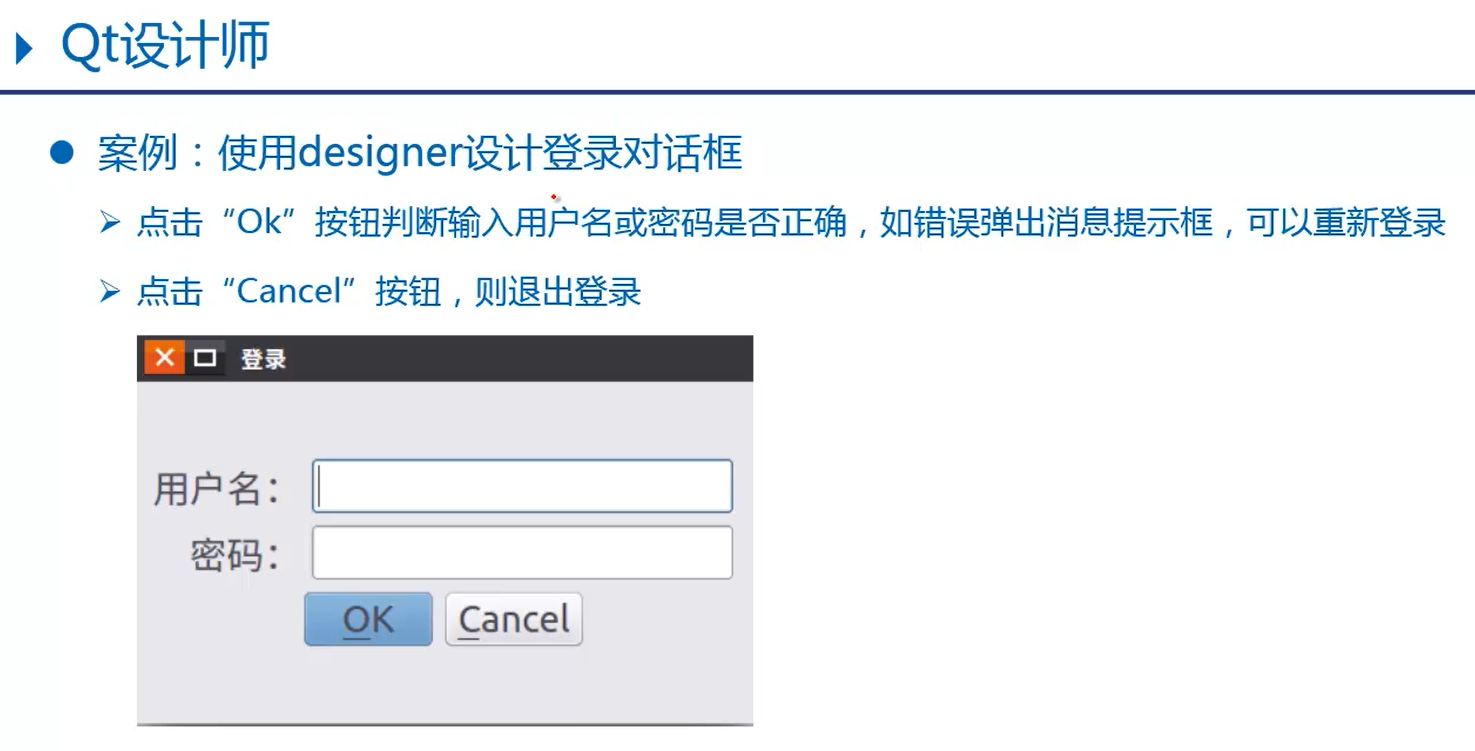
04. QT设计师
UIC
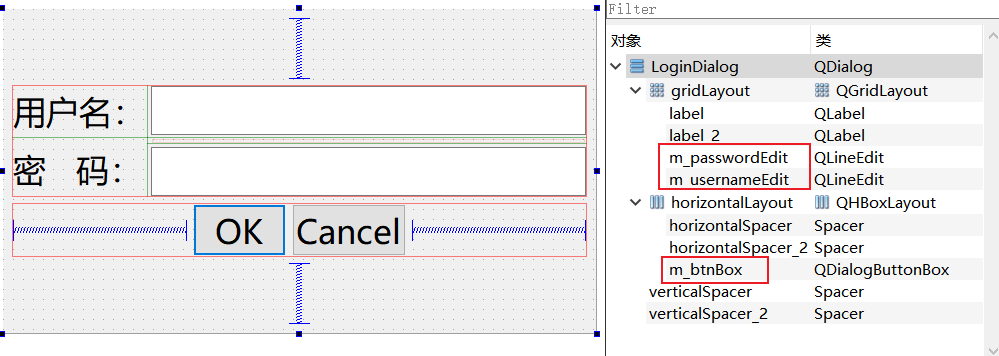
4.1 使用designer设计登录对话框
4.1.1 logindialog.ui
<?xml version="1.0" encoding="UTF-8"?>
<ui version="4.0">
 <class>LoginDialog</class>
 <widget class="QDialog" name="LoginDialog">
  <property name="geometry">
   <rect>
    <x>0</x>
    <y>0</y>
    <width>593</width>
    <height>324</height>
   </rect>
  </property>
  <property name="font">
   <font>
    <family>微软雅黑</family>
    <pointsize>20</pointsize>
   </font>
  </property>
  <property name="windowTitle">
   <string>登录</string>
  </property>
  <property name="sizeGripEnabled">
   <bool>false</bool>
  </property>
  <layout class="QVBoxLayout" name="verticalLayout">
   <item>
    <spacer name="verticalSpacer">
     <property name="orientation">
      <enum>Qt::Vertical</enum>
     </property>
     <property name="sizeHint" stdset="0">
      <size>
       <width>20</width>
       <height>54</height>
      </size>
     </property>
    </spacer>
   </item>
   <item>
    <layout class="QGridLayout" name="gridLayout">
     <item row="0" column="0">
      <widget class="QLabel" name="label_2">
       <property name="text">
        <string>用户名:</string>
       </property>
      </widget>
     </item>
     <item row="0" column="1">
      <widget class="QLineEdit" name="m_usernameEdit"/>
     </item>
     <item row="1" column="0" rowspan="2">
      <widget class="QLabel" name="label">
       <property name="text">
        <string>密   码:</string>
       </property>
      </widget>
     </item>
     <item row="2" column="1">
      <widget class="QLineEdit" name="m_passwordEdit">
       <property name="echoMode">
        <enum>QLineEdit::Password</enum>
       </property>
      </widget>
     </item>
    </layout>
   </item>
   <item>
    <layout class="QHBoxLayout" name="horizontalLayout">
     <item>
      <spacer name="horizontalSpacer">
       <property name="orientation">
        <enum>Qt::Horizontal</enum>
       </property>
       <property name="sizeHint" stdset="0">
        <size>
         <width>40</width>
         <height>20</height>
        </size>
       </property>
      </spacer>
     </item>
     <item>
      <widget class="QDialogButtonBox" name="m_btnBox">
       <property name="layoutDirection">
        <enum>Qt::LeftToRight</enum>
       </property>
       <property name="standardButtons">
        <set>QDialogButtonBox::Cancel|QDialogButtonBox::Ok</set>
       </property>
      </widget>
     </item>
     <item>
      <spacer name="horizontalSpacer_2">
       <property name="orientation">
        <enum>Qt::Horizontal</enum>
       </property>
       <property name="sizeHint" stdset="0">
        <size>
         <width>40</width>
         <height>20</height>
        </size>
       </property>
      </spacer>
     </item>
    </layout>
   </item>
   <item>
    <spacer name="verticalSpacer_2">
     <property name="orientation">
      <enum>Qt::Vertical</enum>
     </property>
     <property name="sizeHint" stdset="0">
      <size>
       <width>20</width>
       <height>53</height>
      </size>
     </property>
    </spacer>
   </item>
  </layout>
 </widget>
 <resources/>
 <connections/>
</ui>
4.1.2 logindialog.h
#ifndef LOGINDIALOG_H
#define LOGINDIALOG_H

#include <QDialog>
#include <QMessageBox>//消息提示框
#include <QDebug>//打印提示

QT_BEGIN_NAMESPACE
namespace Ui {
     class LoginDialog; }
QT_END_NAMESPACE

class LoginDialog : public QDialog
{

    Q_OBJECT

public:
    //LoginDialog(QWidget *parent = nullptr);
    LoginDialog(void);
    ~LoginDialog();
public slots:
    //处理ok按钮的槽函数
    void onAccepted(void);
    //处理Cancel按钮的槽函数
    void onRejected(void);
private:
    Ui::LoginDialog *ui;
};
#endif // LOGINDIALOG_H
4.1.3 logindialog.cpp
#include "logindialog.h"
#include "ui_logindialog.h"
LoginDialog::LoginDialog(void): ui(new Ui::LoginDialog)
{
//界面初始化
ui->setupUi(this);
//信号和槽连接
//点击OK发送信号accepted
connect(ui->m_btnBox,SIGNAL(accepted(void)),
this,SLOT(onAccepted(void)));
//点击Cancel发送信号rejected
connect(ui->m_btnBox,SIGNAL(rejected(void)),
this,SLOT(onRejected(void)));
}
//处理ok按钮的槽函数
void LoginDialog::onAccepted(void){
//terna/123456:提示登录成功,否则提示失败
if(ui->m_usernameEdit->text() == "terna" &&
ui->m_passwordEdit->text() == "123456"){
qDebug() << "登录成功";
close();//关闭登录窗口
}else{
//创建消息提示框
QMessageBox msgBox(
QMessageBox::Critical,//图标
"Error",//标题
"用户名或密码错误",//提示消息
QMessageBox::Ok,//按钮
this);//父窗口
//显示消息提示框,并进入事件循环
msgBox.exec();
}
}
//处理Cancel按钮的槽函数
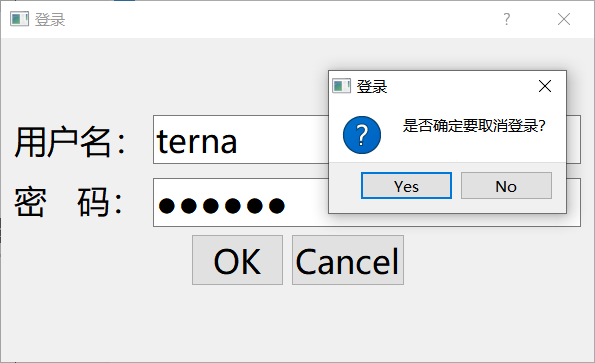
void LoginDialog::onRejected(void){
QMessageBox msgBox(
QMessageBox::Question,
"登录",
"是否确定要取消登录?",
QMessageBox::Yes|QMessageBox::No,
this);
//显示消息提示框,并进入事件循环,点击Yes或No时候都会退出循环
//但是返回结果不同,如果点击Yes则退出登录对话框
if(msgBox.exec() == QMessageBox::Yes){
close();
}
}
LoginDialog::~LoginDialog()
{
delete ui;
}
4.1.4 main.cpp
#include "logindialog.h"

#include <QApplication>

int main(int argc, char *argv[])
{

    QApplication a(argc, argv);
    LoginDialog w;
    w.show();
    return a.exec();
}
4.1.5 运行结果
05.QT创造器
后记
进阶笔记到此结束
智能推荐
防火墙双机热备实验_防火墙的双机热备技术实验报告-程序员宅基地
文章浏览阅读805次,点赞2次,收藏2次。防火墙双机热备实验拓扑图以及其中的配置命令如下:当将命令配置好后,在浏览器中登陆防火墙:FW4:https://192.168.0.1:8443FW2:https://192.168.0.2:8443现在是将FW4作为主状态,FW4作为备状态:进行连通性测试:现在将FW4的G1/0/0端口关闭之后,可以看到主、备状态的转变:这样就完成了双机热备实验。菜菜的代码,希望能够帮助到你哟!..._防火墙的双机热备技术实验报告
Qt5(C++)调用python3脚本(带输入输出参数)_qt c++ 调用python中含参数的接口-程序员宅基地
文章浏览阅读6.9k次,点赞14次,收藏60次。本例中的环境: Qt 5 9.0(编译器为32位mingw或32位msvc均可),python3.5.4 -32bit1 前期准备1.1 准备测试用的python文件(取名不要为test.py即可)def show(): print("hello!")def sum(a,b): return (a+b)def main(): show() print(s..._qt c++ 调用python中含参数的接口
linux下codecoverage工具gcov/lcov使用_genhtml: error: cannot read-程序员宅基地
文章浏览阅读8.7k次,点赞3次,收藏12次。gcov是linux下进行代码覆盖测试的工具,随着gcc一起发布。lcov是gcov的图形化前端工具,根据gcov生成的内容,处理成一颗完整的html树,包括概述、覆盖率百分百、图标等轻便直观的内容。下面使用gcov和lcov进行一个简单的demo测试。1.用gcov选项编译c/c++文件test.cpp#include using namespace std;int main()_genhtml: error: cannot read
FeignClient设置动态Url_@feignclient url-程序员宅基地
文章浏览阅读1.4w次,点赞2次,收藏15次。SpringCloudOpenFeign 动态Url1. 需求描述2. 实现方案3. 细节分析1. 需求描述一般情况下,微服务内部调用都是通过注册中心,eureka,zookeeper,nacos等实现动态调用,但是对于一些外部http调用,对于不在同一微服务内,不在同一注册中心的服务调用,可以考虑SpringCloudOpenFeign,而且可以实现动态URL,通过参数动态控制。2. 实现方案服务端正常springboot项目,也不一定是springboot项目,只要正常提供RESTFul接口就可_@feignclient url
docker将数据从宿主机挂载到容器中的三种方式_docker 如何挂载宿主机文件夹到容器里-程序员宅基地
文章浏览阅读3.4k次。docker将数据从宿主机挂载到容器中的三种方式1、volumes:Docker管理宿主机文件系统的一部分(/var/lib/docker/volumes) 保存数据的最佳方式。将容器数据持久化到宿主机,docker自己来管理的一个位置;volumes特点:当容器停止或被移除时,该卷依然存在;当明确删除卷时,卷才会被删除多个容器之间共享数据;多个容器可以同时挂载相同的卷将容器的数据存储在远程主机或其他存储上将数据从一台docker主机迁移到另一台时,先停止容器,然后备份卷的目录/usr/_docker 如何挂载宿主机文件夹到容器里
jetson nano调试指南2-源码编译_jetson nano内核编译-程序员宅基地
文章浏览阅读442次。1、可以参考L4T Development Guide (downloadable version)此文档,2、解压代码3、使用ubuntu系统(我这使用ubuntu18.04),解压源代码按一下路径tar -xf Tegra210_Linux_R32.3.1_aarch64.tbz2tar -xjf public_sources.tbz2#build rootfscd Linux_for_Tegra/rootfs/tar xpf ../../Tegra_Linux_Sam_jetson nano内核编译
随便推点
2024年华中杯数学建模C题思路与论文助攻_华中杯c题论文2024-程序员宅基地
文章浏览阅读700次,点赞3次,收藏3次。2024年华中杯数学建模C题思路与论文助攻_华中杯c题论文2024
Linux系统本地的客户端DNS的配置文件-程序员宅基地
文章浏览阅读2.7k次。Linux系统本地的客户端DNS的配置文件1、/etc/resolv.conf设置linux本地的客户端DNS的配置文件,DNS可以实现域名和IP相互解析。setup "network configuration " “DNS configuration” 就是修改 /etc/resolv.confvim编辑模式:yy p 复制2、总结:(1)linux客户端DNS可以在网卡配置文...
UML入门概念_uml静态模型-程序员宅基地
文章浏览阅读511次。UML(Unified Modeling Language),统一建模语言。图形化的语言表.它可以帮助我们在OOAD过程中标识元素、构建模块、分析过程并可通过文档说明系统中的重要细节使用软件:startUml1.面向对象是一种系统建模技术。面向对象编程是按照oo的方法学来开发编程的过程。通过系统分析内在对象来描述或建模一个系统。2.基本概念。a.对象是一个客观存在的,唯一的实体。 是面..._uml静态模型
数据分析--Excel数据可视化(图表)_多维度分析数据用什么图表-程序员宅基地
文章浏览阅读7.5k次,点赞3次,收藏59次。Excel组成元素Excel图表类型与用途_多维度分析数据用什么图表
iOS App沙盒模型文件目录详解Swift版_swift 沙盒文件目录-程序员宅基地
文章浏览阅读6.8k次。本文会比较全面的介绍iOS App沙盒模型的文件夹及其使用场景,以及通过swift取得这些文件夹的方法iOS 中的沙盒机制介绍iOS 中的沙盒机制(SandBox)是一种安全体系。每个 iOS 应用程序都有一个单独的文件系统(存储空间),而且只能在对应的文件系统中进行操作,此区域被称为沙盒。所有的非代码文件都要保存在此,例如属性文件 plist、文本文件、图像、图标、媒体资源等。iPhone沙箱模_swift 沙盒文件目录
Debezium同步之oracle数据到Kafka的同步_oracle通过debezuim 同步到kafka confluent-程序员宅基地
文章浏览阅读1.2k次。目录 一、概述 二、设置oracle2.1 与 Oracle 安装类型的兼容性2.2 准备数据库2.3 重做日志大小2.4 为连接器创建用户2.5 备用数据库2.6 故障转移数据库 三、部署3.1 Debezium Oracle 连接器配置3.2 可插拔与不可插拔数据库3.3 添加连接器配置 一、概述Debezium 的 Oracle 连接器捕获并记录发生在 Oracle 服务器上的数据库中的行级更改,包括在连接器运行..._oracle通过debezuim 同步到kafka confluent