01-mysql安装篇(rpm方式安装+二进制方式安装)_mysql rpm安装-程序员宅基地
技术标签: # 数据库--mysql 运维 Linux 专栏 linux mysql安装 mysql # 网络安全/运维 数据库
01-mysql安装篇(rpm方式安装+二进制方式安装)

一、rpm方式安装
1、检查是否安装了mariadb
[root-mysql ~]# rpm -qa|grep mariadb
mariadb-libs-5.5.68-1.el7.x86_64
[root-mysql ~]#
卸载清除: rpm -e 文件名
[root-mysql ~]# rpm -e mariadb-libs-5.5.68-1.el7.x86_64 --nodeps
[root-mysql ~]#
[root-mysql ~]# rpm -qa|grep mariadb
[rootdb-mysql ~]#
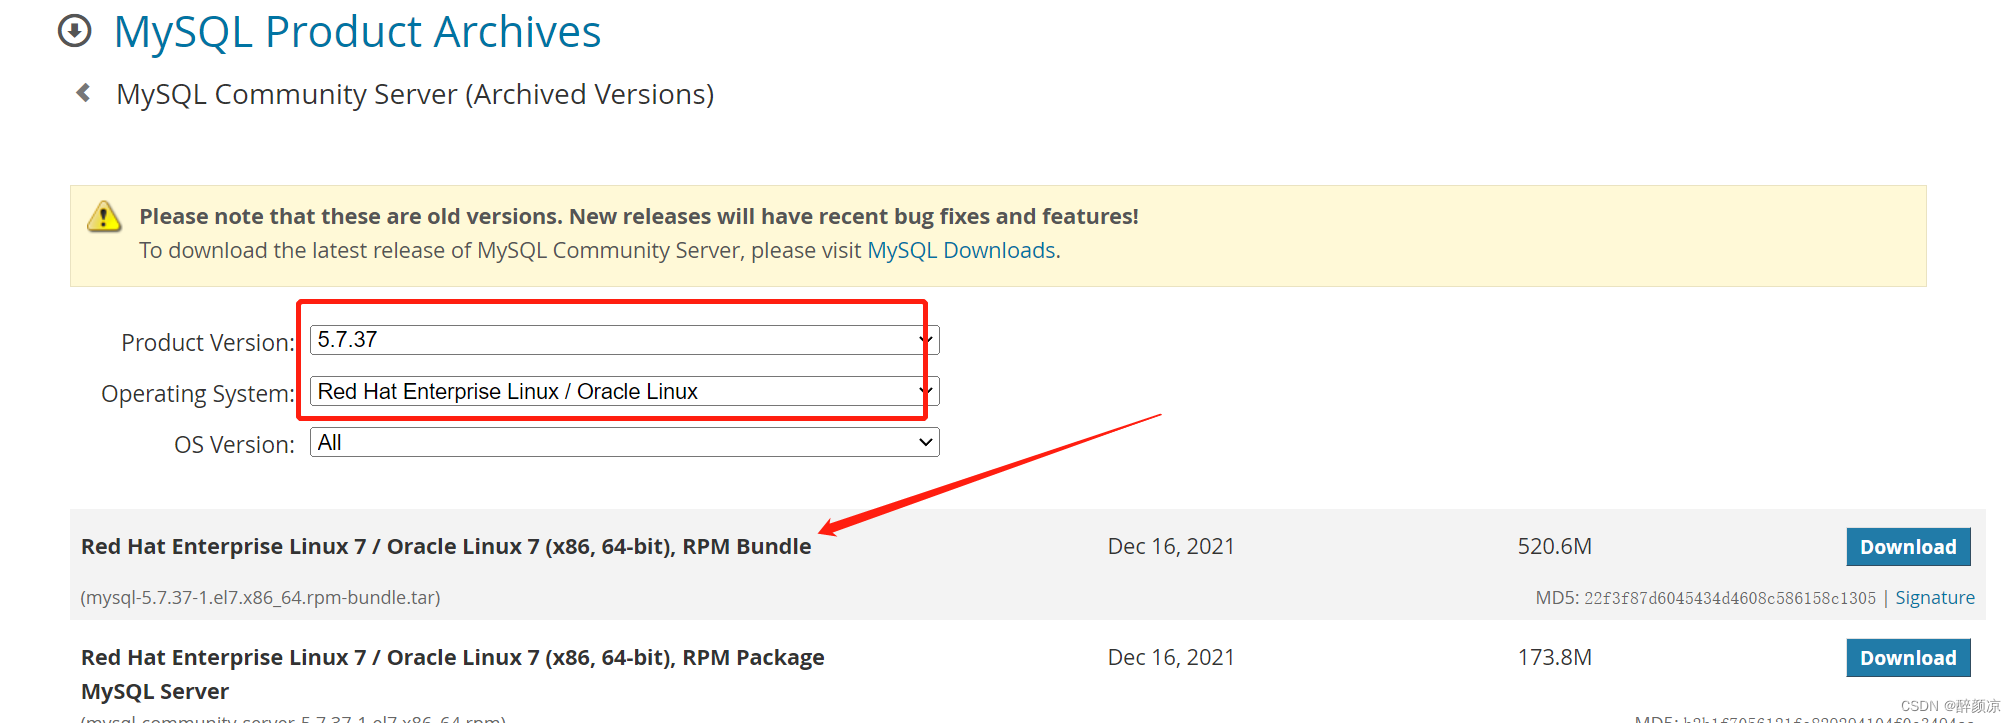
2、下载mysql
官网地址:https://downloads.mysql.com/archives/community/
3、上传解压
[root-mysql ~]# mkdir mysql-bundle
[root-mysql mysql-bundle]# tar -xvf mysql-5.7.37-1.el7.x86_64.rpm-bundle.tar
mysql-community-client-5.7.37-1.el7.x86_64.rpm
mysql-community-common-5.7.37-1.el7.x86_64.rpm
mysql-community-devel-5.7.37-1.el7.x86_64.rpm
mysql-community-embedded-5.7.37-1.el7.x86_64.rpm
mysql-community-embedded-compat-5.7.37-1.el7.x86_64.rpm
mysql-community-embedded-devel-5.7.37-1.el7.x86_64.rpm
mysql-community-libs-5.7.37-1.el7.x86_64.rpm
mysql-community-libs-compat-5.7.37-1.el7.x86_64.rpm
mysql-community-server-5.7.37-1.el7.x86_64.rpm
mysql-community-test-5.7.37-1.el7.x86_64.rpm
[root-mysql mysql-bundle]#
4、安装
## 安装mysql所依赖的包
[root-mysql mysql-bundle]# rpm -ivh mysql-community-common-5.7.37-1.el7.x86_64.rpm
warning: mysql-community-common-5.7.37-1.el7.x86_64.rpm: Header V4 RSA/SHA256 Signature, key ID 3a79bd29: NOKEY
Preparing... ################################# [100%]
Updating / installing...
1:mysql-community-common-5.7.37-1.e################################# [100%]
[root-mysql mysql-bundle]# rpm -ivh mysql-community-libs-5.7.37-1.el7.x86_64.rpm
warning: mysql-community-libs-5.7.37-1.el7.x86_64.rpm: Header V4 RSA/SHA256 Signature, key ID 3a79bd29: NOKEY
Preparing... ################################# [100%]
Updating / installing...
1:mysql-community-libs-5.7.37-1.el7################################# [100%]
[root-mysql mysql-bundle]# rpm -ivh mysql-community-client-5.7.37-1.el7.x86_64.rpm
warning: mysql-community-client-5.7.37-1.el7.x86_64.rpm: Header V4 RSA/SHA256 Signature, key ID 3a79bd29: NOKEY
Preparing... ################################# [100%]
Updating / installing...
1:mysql-community-client-5.7.37-1.e################################# [100%]
[root-mysql mysql-bundle]#
## 安装mysql服务
[root-mysql mysql-bundle]# rpm -ivh mysql-community-server-5.7.37-1.el7.x86_64.rpm
warning: mysql-community-server-5.7.37-1.el7.x86_64.rpm: Header V4 RSA/SHA256 Signature, key ID 3a79bd29: NOKEY
error: Failed dependencies:
net-tools is needed by mysql-community-server-5.7.37-1.el7.x86_64
[root-mysql mysql-bundle]#
报错:error: Failed dependencies:
net-tools is needed by mysql-community-server-5.7.37-1.el7.x86_64
解决:
[root-mysql mysql-bundle]# yum install -y net-tools
[root-mysql mysql-bundle]# yum install -y perl
[root-mysql mysql-bundle]# yum install -y libaio
## 再次安装mysql服务
[root-mysql mysql-bundle]# rpm -ivh mysql-community-server-5.7.37-1.el7.x86_64.rpm
warning: mysql-community-server-5.7.37-1.el7.x86_64.rpm: Header V4 RSA/SHA256 Signature, key ID 3a79bd29: NOKEY
Preparing... ################################# [100%]
Updating / installing...
1:mysql-community-server-5.7.37-1.e################################# [100%]
[root-mysql mysql-bundle]#
5、检查安装
[root-mysql mysql-bundle]# rpm -qa|grep mysql
mysql-community-common-5.7.37-1.el7.x86_64
mysql-community-libs-5.7.37-1.el7.x86_64
mysql-community-client-5.7.37-1.el7.x86_64
mysql-community-server-5.7.37-1.el7.x86_64
[root-mysql mysql-bundle]#
6、开启mysql服务
[root-mysql mysql-bundle]# systemctl start mysqld
[root-mysql mysql-bundle]# systemctl status mysqld
● mysqld.service - MySQL Server
Loaded: loaded (/usr/lib/systemd/system/mysqld.service; enabled; vendor preset: disabled)
Active: active (running) since Thu 2022-12-22 10:48:53 CST; 9s ago
Docs: man:mysqld(8)
http://dev.mysql.com/doc/refman/en/using-systemd.html
Process: 2190 ExecStart=/usr/sbin/mysqld --daemonize --pid-file=/var/run/mysqld/mysqld.pid $MYSQLD_OPTS (code=exited, status=0/SUCCESS)
Process: 2140 ExecStartPre=/usr/bin/mysqld_pre_systemd (code=exited, status=0/SUCCESS)
Main PID: 2194 (mysqld)
CGroup: /system.slice/mysqld.service
└─2194 /usr/sbin/mysqld --daemonize --pid-file=/var/run/mysqld/mysqld.pid
Dec 22 10:48:50 centos01 systemd[1]: Starting MySQL Server...
Dec 22 10:48:53 centos01 systemd[1]: Started MySQL Server.
[root-mysql mysql-bundle]#
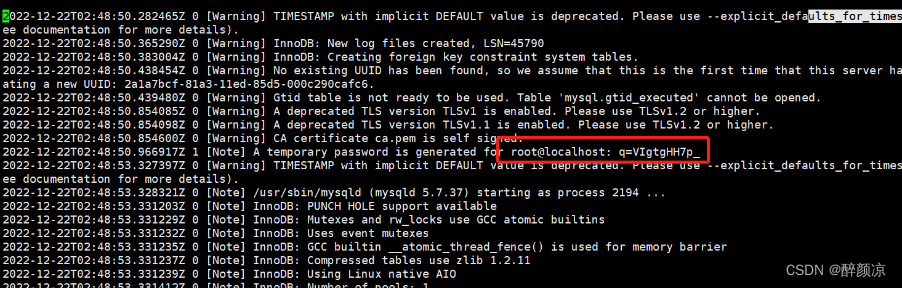
7、登陆mysql
第一次启动mysql,会自动生成一个随机密码,可在/var/log/mysqld.log中查看。
[root-mysql ~]# grep "password" /var/log/mysqld.log
2022-12-22T02:48:50.966917Z 1 [Note] A temporary password is generated for root: q=VIgtgHH7p_
2022-12-22T02:54:05.987706Z 2 [Note] Access denied for user 'root'@'localhost' (using password: YES)
2022-12-22T02:54:14.598377Z 3 [Note] Access denied for user 'root'@'localhost' (using password: NO)
2022-12-22T02:54:27.747247Z 4 [Note] Access denied for user 'root'@'localhost' (using password: YES)
[root-mysql ~]#
8、修改密码设置规则(简单型-学习用)
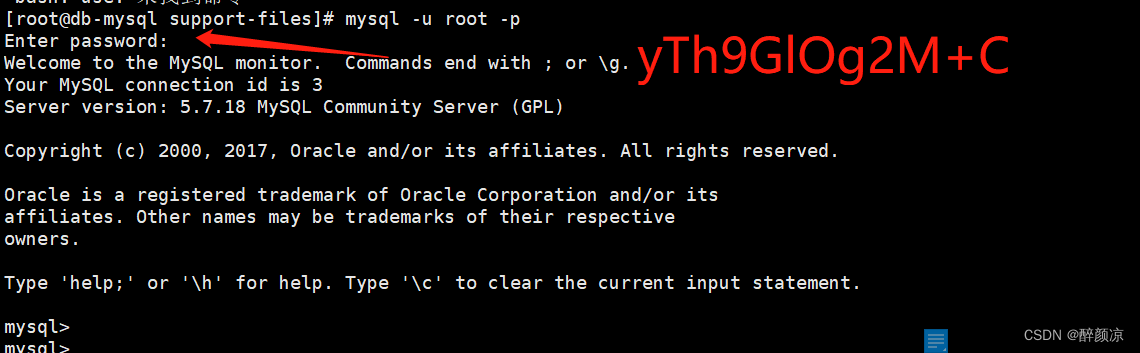
[root mysql-bundle]# mysql -u root -p
Enter password:
ERROR 1045 (28000): Access denied for user 'root'@'localhost' (using password: YES)
[root mysql-bundle]# mysql -u root -p
Enter password:
Welcome to the MySQL monitor. Commands end with ; or \g.
Your MySQL connection id is 6
Server version: 5.7.37
Copyright (c) 2000, 2022, Oracle and/or its affiliates.
Oracle is a registered trademark of Oracle Corporation and/or its
affiliates. Other names may be trademarks of their respective
owners.
Type 'help;' or '\h' for help. Type '\c' to clear the current input statement.
mysql> set global validate_password_policy=LOW;
Query OK, 0 rows affected (0.00 sec)
mysql> set global validate_password_length=4;
Query OK, 0 rows affected (0.00 sec)
mysql> set global validate_password_mixed_case_count=0;
Query OK, 0 rows affected (0.00 sec)
mysql> set global validate_password_number_count=0;
Query OK, 0 rows affected (0.00 sec)
mysql> set global validate_password_special_char_count=0;
Query OK, 0 rows affected (0.00 sec)
mysql>
9、修改密码
mysql> alter user root identified by '123456';
Query OK, 0 rows affected (0.00 sec)
10、授权远程登陆
mysql> grant all privileges on *.* to 'root'@'%' identified by '123456' with grant option;
Query OK, 0 rows affected, 1 warning (0.00 sec)

mysql>
测试:

11、启停mysql命令
## 启动 mysql 服务
[root-mysql ~]# systemctl start mysqld
## 关闭
[root-mysql ~]# systemctl stop mysqld
## 重启
[root-mysql ~]# systemctl restart mysqld
## 状态查看
[root-mysql ~]# systemctl status mysqld
## 设置开机自启
[root-mysql ~]# systemctl enable mysqld
12、rpm方式安装说明
## rpm方式重要文件路径说明
主要文件默认路径如下:
配置文件路径:/etc/my.cnf
数据存储目录:/var/lib/mysql
错误日志存储路径:/var/log/mysqld.log
socket文件路径:/var/lib/mysql/mysql.sock
参数可以通过/etc/my.cnf参数配置文件查看和自定义。
二、二进制方式安装V5.7.18
1、上传解压
[root-mysql mysql-tar]# tar -zxvf mysql-5.7.18-linux-glibc2.5-x86_64.tar.gz

2、创建安装目录
[root-mysql mysql-tar]# mkdir /usr/local/mysql
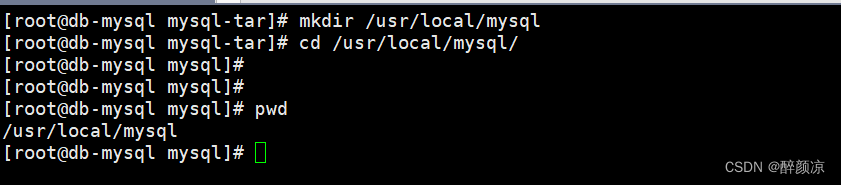
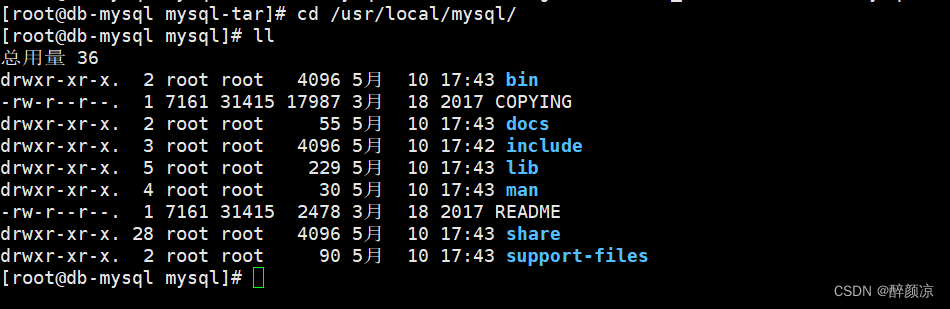
3、拷贝解压后的文件至安装目录/usr/local/mysql/
[root-mysql ~]# mv mysql-5.7.18-linux-glibc2.5-x86_64/* /usr/local/mysql/

4、创建相关目录
[root-mysql mysql]# mkdir /usr/local/mysql/data
[root-mysql mysql]#
[root-mysql mysql]# mkdir /usr/local/mysql/log
[root-mysql mysql]#
[root-mysql mysql]# touch /usr/local/mysql/log/mysqld.log
[root-mysql mysql]#
[root-mysql mysql]#

5、创建mysql组和用户
[root-mysql mysql]# groupadd mysql
[root-mysql mysql]#
[root-mysql mysql]# useradd -r -g mysql mysql
[root-mysql mysql]#
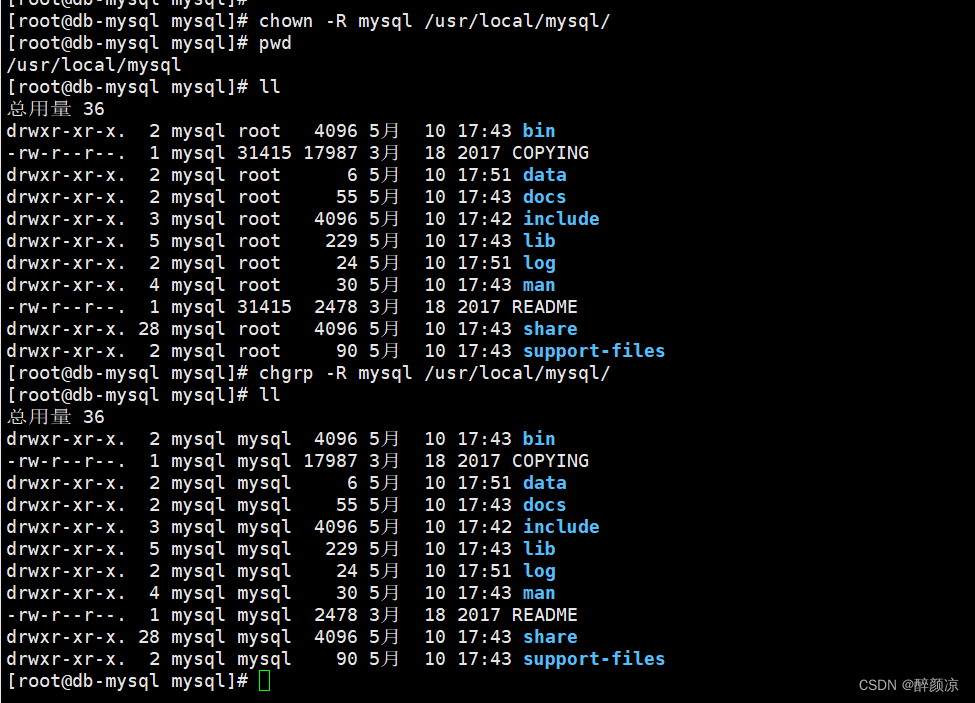
6、更改安装目录归属
[root-mysql mysql]# chown -R mysql /usr/local/mysql/
[root-mysql mysql]# chgrp -R mysql /usr/local/mysql/
或者使用:
[root-mysql mysql]# chown -R mysql:mysql /usr/local/mysql
7、初始化MySQL
[root-mysql mysql]# ./bin/mysqld --user=mysql --basedir=/usr/local/mysql/ --datadir=/usr/local/mysql/data --initialize

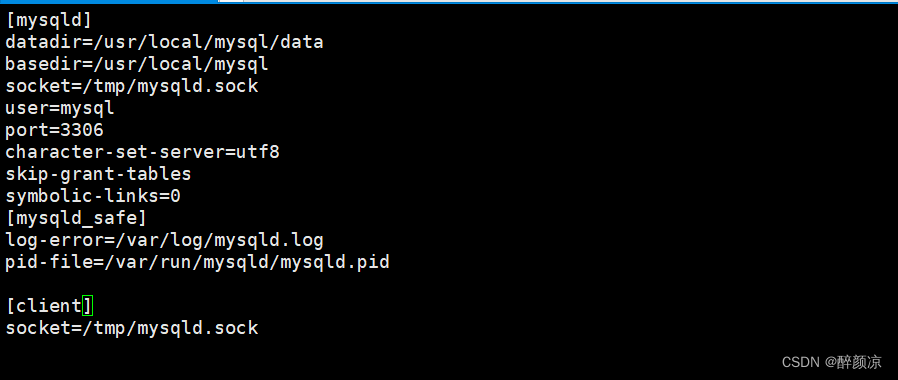
8、 配置MySQL
[root-mysql mysql]# vi /etc/my.cnf
[mysqld]
datadir=/usr/local/mysql/data
basedir=/usr/local/mysql
socket=/tmp/mysqld.sock
user=mysql
port=3306
character-set-server=utf8
skip-grant-tables
symbolic-links=0
[mysqld_safe]
log-error=/var/log/mysqld.log
pid-file=/var/run/mysqld/mysqld.pid

[client]
socket=/tmp/mysqld.sock
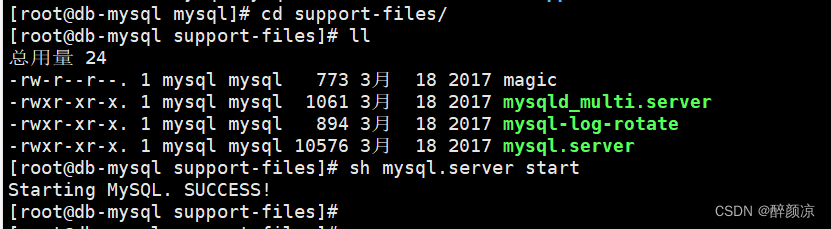
9、启动MySQL
[root-mysql mysql]# cd support-files/
[root-mysql support-files]# sh mysql.server start
Starting MySQL. SUCCESS!
[root-mysql support-files]#
查看MySQL服务是否启动成功
[root-mysql support-files]# sh mysql.server status
SUCCESS! MySQL running (2294)
[root-mysql support-files]#
10、配置环境变量
[root-mysql support-files]# vi /etc/profile
export PATH=$PATH:/usr/local/mysql/bin
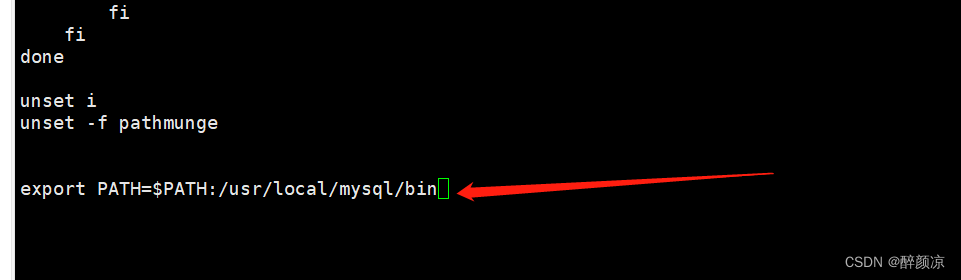
使配置生效
[root-mysql support-files]# source /etc/profile
11、允许root账号远程访问
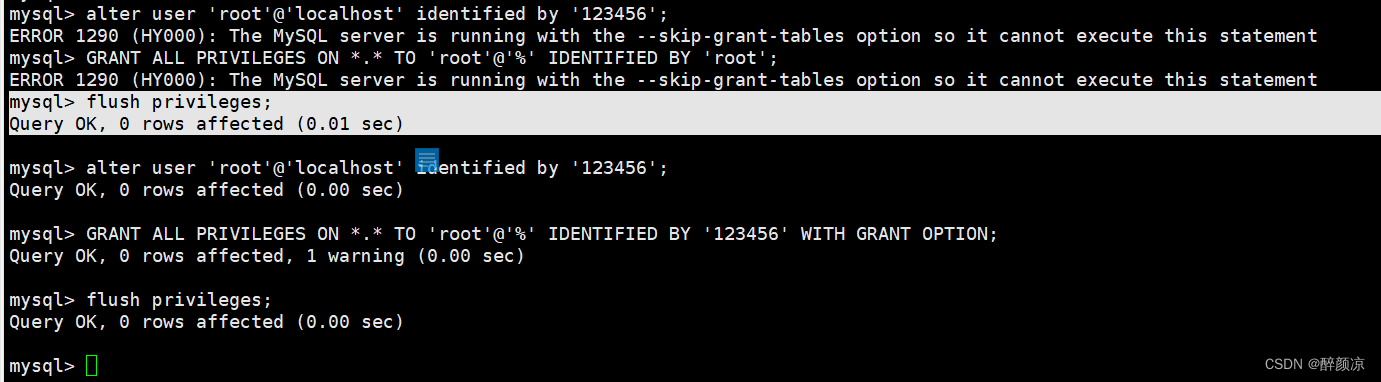
[root-mysql support-files]# mysql -u root -p
修改mysql数据库密码报错:
ERROR 1290 (HY000): The MySQL server is running with the --skip-grant-tables option so it cannot execute this statement.
解决:先刷新权限表
mysql> flush privileges;
Query OK, 0 rows affected (0.01 sec)
##修改密码
 alter user root@localhost identified by '123456';

 ##root账号远程访问
 grant all privileges on *.* to 'root'@'%' identified by '123456' with grant option;
12、设置mysql服务开机自启
[root-mysql mysql]# systemctl status mysqld
报错: Unit mysqld.service could not be found.
[root-mysql mysql]# find / -name mysql.server
/usr/local/mysql/support-files/mysql.server
[root-mysql mysql]# cp /usr/local/mysql/support-files/mysql.server /etc/init.d/mysqld
[root-mysql mysql]# systemctl enable mysqld
mysqld.service is not a native service, redirecting to /sbin/chkconfig.
Executing /sbin/chkconfig mysqld on
[root-mysql mysql]# systemctl status mysqld
● mysqld.service - LSB: start and stop MySQL
Loaded: loaded (/etc/rc.d/init.d/mysqld; bad; vendor preset: disabled)
Active: inactive (dead)
Docs: man:systemd-sysv-generator(8)
[root-mysql mysql]#
13、mysql服务启动
[root-mysql mysql]# systemctl start mysqld
[root-mysql mysql]# systemctl status mysqld
● mysqld.service - LSB: start and stop MySQL
Loaded: loaded (/etc/rc.d/init.d/mysqld; bad; vendor preset: disabled)
Active: active (exited) since 三 2023-05-10 18:28:08 CST; 2s ago
Docs: man:systemd-sysv-generator(8)
Process: 10873 ExecStart=/etc/rc.d/init.d/mysqld start (code=exited, status=0/SUCCESS)
5月 10 18:28:08 db-mysql systemd[1]: Starting LSB: start and stop MySQL...
5月 10 18:28:08 db-mysql mysqld[10873]: Starting MySQL SUCCESS!
5月 10 18:28:08 db-mysql systemd[1]: Started LSB: start and stop MySQL.
5月 10 18:28:08 db-mysql mysqld[10873]: 2023-05-10T10:28:08.620811Z mysqld_safe A mysqld process already exists
[root-mysql mysql]#
智能推荐
前端开发之vue-grid-layout的使用和实例-程序员宅基地
文章浏览阅读1.1w次,点赞7次,收藏34次。vue-grid-layout的使用、实例、遇到的问题和解决方案_vue-grid-layout
Power Apps-上传附件控件_powerapps点击按钮上传附件-程序员宅基地
文章浏览阅读218次。然后连接一个数据源,就会在下面自动产生一个添加附件的组件。把这个控件复制粘贴到页面里,就可以单独使用来上传了。插入一个“编辑”窗体。_powerapps点击按钮上传附件
C++ 面向对象(Object-Oriented)的特征 & 构造函数& 析构函数_"object(cnofd[\"ofdrender\"])十条"-程序员宅基地
文章浏览阅读264次。(1) Abstraction (抽象)(2) Polymorphism (多态)(3) Inheritance (继承)(4) Encapsulation (封装)_"object(cnofd[\"ofdrender\"])十条"
修改node_modules源码,并保存,使用patch-package打补丁,git提交代码后,所有人可以用到修改后的_修改 node_modules-程序员宅基地
文章浏览阅读133次。删除node_modules,重新npm install看是否成功。在 package.json 文件中的 scripts 中加入。修改你的第三方库的bug等。然后目录会多出一个目录文件。_修改 node_modules
【】kali--password:su的 Authentication failure问题,&sudo passwd root输入密码时Sorry, try again._password: su: authentication failure-程序员宅基地
文章浏览阅读883次。【代码】【】kali--password:su的 Authentication failure问题,&sudo passwd root输入密码时Sorry, try again._password: su: authentication failure
整理5个优秀的微信小程序开源项目_微信小程序开源模板-程序员宅基地
文章浏览阅读1w次,点赞13次,收藏97次。整理5个优秀的微信小程序开源项目。收集了微信小程序开发过程中会使用到的资料、问题以及第三方组件库。_微信小程序开源模板
随便推点
Centos7最简搭建NFS服务器_centos7 搭建nfs server-程序员宅基地
文章浏览阅读128次。Centos7最简搭建NFS服务器_centos7 搭建nfs server
Springboot整合Mybatis-Plus使用总结(mybatis 坑补充)_mybaitis-plus ruledataobjectattributemapper' and '-程序员宅基地
文章浏览阅读1.2k次,点赞2次,收藏3次。前言mybatis在持久层框架中还是比较火的,一般项目都是基于ssm。虽然mybatis可以直接在xml中通过SQL语句操作数据库,很是灵活。但正其操作都要通过SQL语句进行,就必须写大量的xml文件,很是麻烦。mybatis-plus就很好的解决了这个问题。..._mybaitis-plus ruledataobjectattributemapper' and 'com.picc.rule.management.d
EECE 1080C / Programming for ECESummer 2022 Laboratory 4: Global Functions Practice_eece1080c-程序员宅基地
文章浏览阅读325次。EECE 1080C / Programming for ECESummer 2022Laboratory 4: Global Functions PracticePlagiarism will not be tolerated:Topics covered:function creation and call statements (emphasis on global functions)Objective:To practice program development b_eece1080c
洛谷p4777 【模板】扩展中国剩余定理-程序员宅基地
文章浏览阅读53次。被同机房早就1年前就学过的东西我现在才学,wtcl。设要求的数为\(x\)。设当前处理到第\(k\)个同余式,设\(M = LCM ^ {k - 1} _ {i - 1}\) ,前\(k - 1\)个的通解就是\(x + i * M\)。那么其实第\(k\)个来说,其实就是求一个\(y\)使得\(x + y * M ≡ a_k(mod b_k)\)转化一下就是\(y * M ...
android 退出应用没有走ondestory方法,[Android基础论]为何Activity退出之后,系统没有调用onDestroy方法?...-程序员宅基地
文章浏览阅读1.3k次。首先,问题是如何出现的?晚上复查代码,发现一个activity没有调用自己的ondestroy方法我表示非常的费解,于是我检查了下代码。发现再finish代码之后接了如下代码finish();System.exit(0);//这就是罪魁祸首为什么这样写会出现问题System.exit(0);////看一下函数的原型public static void exit (int code)//Added ..._android 手动杀死app,activity不执行ondestroy
SylixOS快问快答_select函数 导致堆栈溢出 sylixos-程序员宅基地
文章浏览阅读894次。Q: SylixOS 版权是什么形式, 是否分为<开发版税>和<运行时版税>.A: SylixOS 是开源并免费的操作系统, 支持 BSD/GPL 协议(GPL 版本暂未确定). 没有任何的运行时版税. 您可以用她来做任何 您喜欢做的项目. 也可以修改 SylixOS 的源代码, 不需要支付任何费用. 当然笔者希望您可以将使用 SylixOS 开发的项目 (不需要开源)或对 SylixOS 源码的修改及时告知笔者.需要指出: SylixOS 本身仅是笔者用来提升自己水平而开发的_select函数 导致堆栈溢出 sylixos