分布式任务调度,定时任务的处理方案_springcloud定时任务解决方案-程序员宅基地
技术标签: java spring cloud
方案一:使用异步任务+定时任务可以结合使用,实现在指定时间或周期内异步执行任务的功能(单单使用定时任务会阻塞主线程)
适用场景:
Spring 定时任务是 Spring 框架提供的一种轻量级的任务调度方案,它的特点是简单易用、轻量级。Spring 定时任务的执行是在单个节点上进行的,如果需要分布式任务调度,需要自己实现相应的解决方案。
使用步骤
1.导入依赖版本自己控制
<dependencies>
    <dependency>
        <groupId>org.springframework.boot</groupId>
        <artifactId>spring-boot-starter-web</artifactId>
    </dependency>

    <dependency>
        <groupId>org.springframework.boot</groupId>
        <artifactId>spring-boot-starter</artifactId>
    </dependency>

    <dependency>
        <groupId>org.springframework.boot</groupId>
        <artifactId>spring-boot-starter-task</artifactId>
    </dependency>
</dependencies>
2.启动类加上@EnableScheduling
3.编写业务
cron表达式在线生成
https://cron.qqe2.com/
import lombok.extern.slf4j.Slf4j;
import org.springframework.scheduling.annotation.Async;
import org.springframework.scheduling.annotation.EnableAsync;
import org.springframework.scheduling.annotation.EnableScheduling;
import org.springframework.scheduling.annotation.Scheduled;
import org.springframework.stereotype.Component;
/**
 * 定时任务
 *      1、@EnableScheduling 开启定时任务
 *      2、@Scheduled  开启一个定时任务
 *      3、自动配置类 TaskSchedulingAutoConfiguration
 *
 * 异步任务
 *      1、@EnableAsync 开启异步任务功能
 *      2、@Async 给希望异步执行的方法上标注
 *      3、自动配置类 TaskExecutionAutoConfiguration 属性绑定在TaskExecutionProperties
 *
 */
@Slf4j
@Component
public class HelloSchedule {

    /**
     * 1、Spring中6位组成,不允许第7位的年
     * 2、在周几的位置,1-7代表周一到周日; MON-SUN
     * 3、定时任务不应该阻塞。默认是阻塞的
     *      1)、可以让业务运行以异步的方式,自己提交到线程池
     *              CompletableFuture.runAsync(()->{
     *                  xxxxService.hello();
     *              },executor);
     *      2)、支持定时任务线程池;设置 TaskSchedulingProperties;
     *              spring.task.scheduling.pool.size=5
     *      3)、让定时任务异步执行
     *          异步任务;
     *     解决:使用异步+定时任务来完成定时任务不阻塞的功能;

    @Async
    @Scheduled(cron = "* * * ? * 5")//表达式
    public void hello()  {
        log.info("执行业务...");
    }
}
方案二:引入中间件xxl-job
XXL-Job 是一个基于 Spring 的分布式任务调度框架,它的特点是分布式、可靠性高、易于管理。XXL-Job 提供了任务调度、执行、报警、日志等完整的功能,支持任务失败重试、任务失败告警等机制,能够保证任务执行的高可靠性和稳定性。同时,XXL-Job 的任务执行是分布式的,可以将任务分发到多个节点执行,提高任务执行效率。
使用 XXL-Job 需要在项目中引入 XXL-Job 的相关依赖,并进行相关配置。同时,XXL-Job 还提供了一个可视化的任务管理平台,可以方便地管理和监控任务的执行情况。
XXL-Job 的使用场景一般是执行复杂的分布式定时任务,例如:订单超时未支付处理、大数据分析等。如果只是执行简单的定时任务,则可以使用 Spring 定时任务。
使用步骤
A.本地安装
码云:https://gitee.com/xuxueli0323/xxl-job
1.下载项目 2.导入里面的数据库 3.启动服务
B.虚拟机安装
要在 Linux 系统上使用 Docker 部署 XXL-Job,可以按照以下步骤进行操作:
1.拉取 XXL-Job 镜像:可以从 Docker Hub 上拉取 XXL-Job 镜像,执行以下命令:
docker pull xuxueli/xxl-job-admin:latest # 拉取 XXL-Job Admin 镜像
docker pull xuxueli/xxl-job-executor:latest # 拉取 XXL-Job Executor 镜像
2.创建 XXL-Job 容器:
a. 创建 XXL-Job Admin 容器:
docker run -d --name xxl-job-admin -p 8080:8080 xuxueli/xxl-job-admin
这个命令将会创建一个名为 xxl-job-admin 的容器,并且将容器的 8080 端口映射到宿主机的 8080 端口,使得我们可以通过浏览器访问到 XXL-Job 的管理界面。
b. 创建 XXL-Job Executor 容器:
docker run -d --name xxl-job-executor
-e PARAMS=“–xxl.job.admin.address=http://xxl-job-admin:8080/xxl-job-admin”
xuxueli/xxl-job-executor
这个命令将会创建一个名为 xxl-job-executor 的容器,并且将 XXL-Job Admin 的地址配置到容器中,使得 Executor 能够与 Admin 进行通信。
至此,XXL-Job 在 Docker 中的部署就完成了。通过浏览器访问 http://ip:8080/xxl-job-admin/,即可进入 XXL-Job 的管理界面。
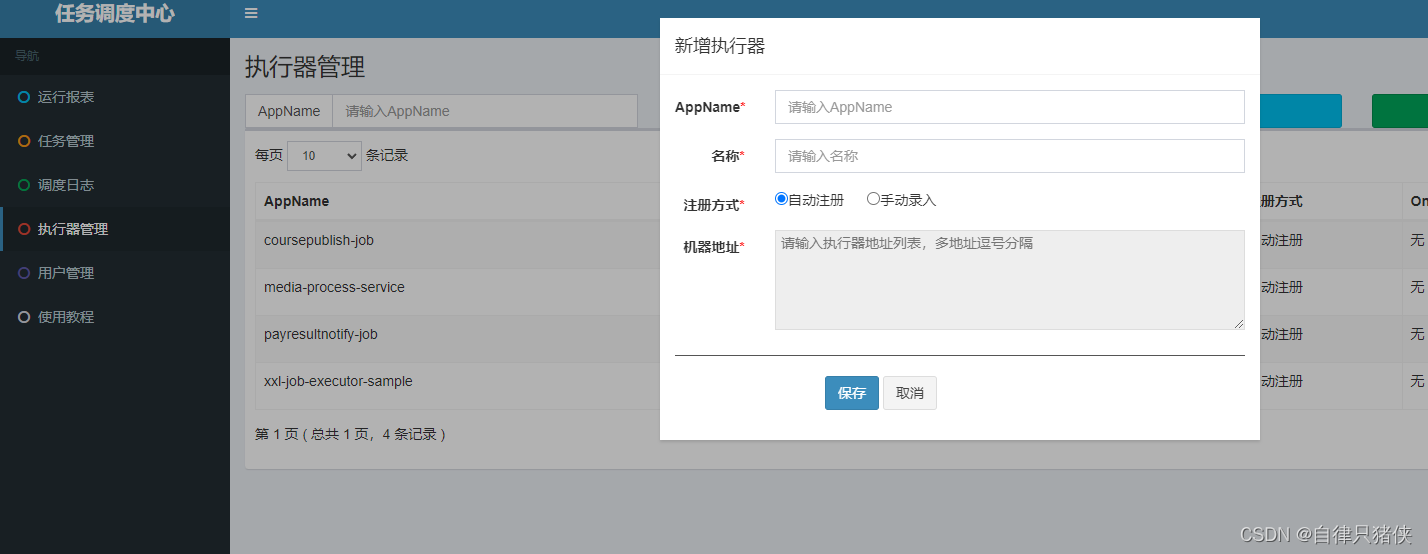
那么如何使用xxl-job进行任务调度呢
1.进入管理界面,新增执行器
2.在需要添加任务调度的服务中添加依赖
    <dependency>
        <groupId>com.xuxueli</groupId>
        <artifactId>xxl-job-core</artifactId>
    </dependency>
3.配置yml,改ip和hander
xxl:
  job:
    admin:
      addresses: http://----ip---/xxl-job-admin
    executor:
      appname: #你在管理页面命名的hander
      address:
      ip:
      port: 9999
      logpath: /data/applogs/xxl-job/jobhandler
      logretentiondays: 30
    accessToken: default_token
4.复制配置文件,文件在xxl-job项目的 xxl-job-2.3.1\xxl-job-executor-samples\xxl-job-executor-sample-springboot\src\main\java\com\xxl\job\executor\core\config 的XxlJobConfig
package com.xuecheng.media.config;


import com.xxl.job.core.executor.impl.XxlJobSpringExecutor;
import org.slf4j.Logger;
import org.slf4j.LoggerFactory;
import org.springframework.beans.factory.annotation.Value;
import org.springframework.context.annotation.Bean;
import org.springframework.context.annotation.Configuration;

/**
 * xxl-job config
 *
 * @author xuxueli 2017-04-28
 */
@Configuration
public class XxlJobConfig {

    private Logger logger = LoggerFactory.getLogger(XxlJobConfig.class);

    @Value("${xxl.job.admin.addresses}")
    private String adminAddresses;

    @Value("${xxl.job.accessToken}")
    private String accessToken;

    @Value("${xxl.job.executor.appname}")
    private String appname;

    @Value("${xxl.job.executor.address}")
    private String address;

    @Value("${xxl.job.executor.ip}")
    private String ip;

    @Value("${xxl.job.executor.port}")
    private int port;

    @Value("${xxl.job.executor.logpath}")
    private String logPath;

    @Value("${xxl.job.executor.logretentiondays}")
    private int logRetentionDays;


    @Bean
    public XxlJobSpringExecutor xxlJobExecutor() {

        logger.info(">>>>>>>>>>> xxl-job config init.");
        XxlJobSpringExecutor xxlJobSpringExecutor = new XxlJobSpringExecutor();
        xxlJobSpringExecutor.setAdminAddresses(adminAddresses);
        xxlJobSpringExecutor.setAppname(appname);
        xxlJobSpringExecutor.setAddress(address);
        xxlJobSpringExecutor.setIp(ip);
        xxlJobSpringExecutor.setPort(port);
        xxlJobSpringExecutor.setAccessToken(accessToken);
        xxlJobSpringExecutor.setLogPath(logPath);
        xxlJobSpringExecutor.setLogRetentionDays(logRetentionDays);

        return xxlJobSpringExecutor;
    }

    /**
     * 针对多网卡、容器内部署等情况,可借助 "spring-cloud-commons" 提供的 "InetUtils" 组件灵活定制注册IP;
     *
     *      1、引入依赖:
     *          <dependency>
     *             <groupId>org.springframework.cloud</groupId>
     *             <artifactId>spring-cloud-commons</artifactId>
     *             <version>${version}</version>
     *         </dependency>
     *
     *      2、配置文件,或者容器启动变量
     *          spring.cloud.inetutils.preferred-networks: 'xxx.xxx.xxx.'
     *
     *      3、获取IP
     *          String ip_ = inetUtils.findFirstNonLoopbackHostInfo().getIpAddress();
     */


}
成功的标志

配置已经完成,那么如何使用呢?其实使用跟spring自带的定时任务很像
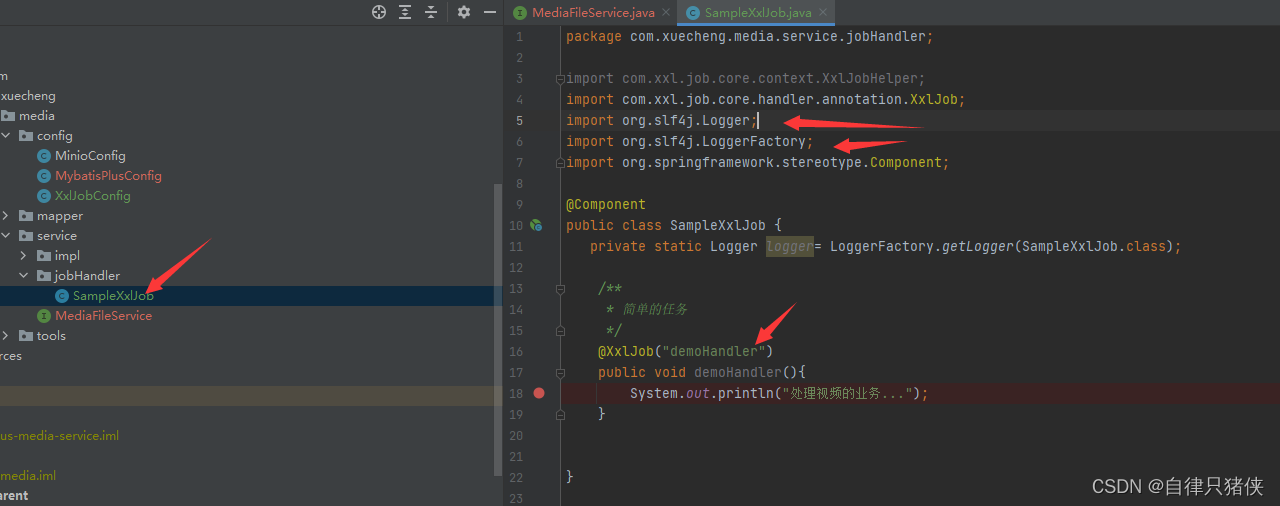
1.在服务中定义任务,一般写在service层
2.登上xxl-job的admin配置cron和spring的定时任务是一样的,但是提供了更人性化,和更丰富的功能.
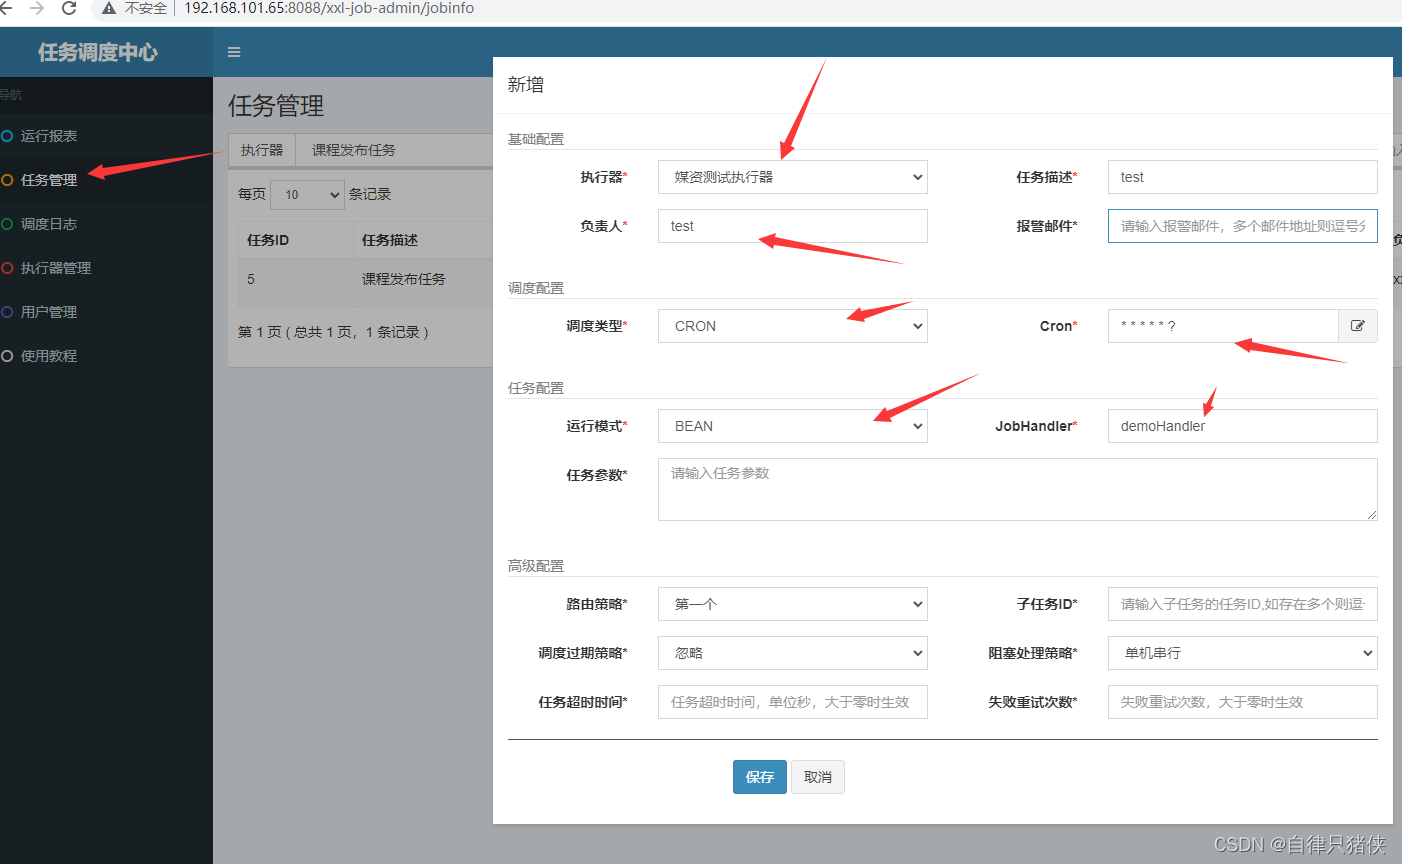
自己自定义配置任务的执行周期和策略
方案三:elastic-job
elastic-job和xxl-job都是适合使用分布式任务调用的框架,两者的比较可以自行搜索,在这里只解释用法
1.下载zookeeper,elastic-job是以zk为注册中心,Elastic-Job 使用 ZooKeeper 来实现分布式任务的协调和调度机制,通过 ZooKeeper 来管理任务的运行状态、分片策略、任务节点等信息,从而实现分布式任务的动态调度和高可用性。因此,在使用 Elastic-Job 之前,需要先部署和配置好 ZooKeeper。
这里讲解普通下载不是docker,docker玩法可自学,也可直接下载到本地
1.1.上传,将zookeeper-3.4.11.tar.gz上传到/usr/local/software目录下
1.2.解压文件到指定目录
tar -zxvf /usr/local/software/zookeeper-3.4.11.tar.gz -C /usr/local/
1.3.拷贝配置文件
cp /usr/local/zookeeper-3.4.11/conf/zoo_sample.cfg /usr/local/zookeeper-3.4.11/conf/zoo.cfg
1.4.启动
/usr/local/zookeeper-3.4.11/bin/zkServer.sh start
1.5.检查进程是否开启
jps
需要查看到QuorumPeerMain进程
2.导入依赖
        <dependency>
            <groupId>com.dangdang</groupId>
            <artifactId>elastic-job-lite-spring</artifactId>
            <version>2.1.5</version>
        </dependency>
<!--     job和zk连接的工具包-->
        <dependency>
            <groupId>org.apache.curator</groupId>
            <artifactId>curator-recipes</artifactId>
            <version>2.10.0</version>
        </dependency>
        <dependency>
            <groupId>org.apache.curator</groupId>
            <artifactId>curator-framework</artifactId>
            <version>2.10.0</version>
        </dependency>
        <dependency>
            <groupId>com.google.guava</groupId>
            <artifactId>guava</artifactId>
            <version>18.0</version>
        </dependency>
3.配置yml
elasticjob:
  zookeeper-url: 192.168.200.128:2181
  group-name: shop-job-group
jobCron:
  initSeckillProduct: 0 0/1 * * * ?
  userCache: 0 0/1 * * * ?
4.导入工具类
mport com.dangdang.ddframe.job.api.simple.SimpleJob;
import com.dangdang.ddframe.job.config.JobCoreConfiguration;
import com.dangdang.ddframe.job.config.JobTypeConfiguration;
import com.dangdang.ddframe.job.config.dataflow.DataflowJobConfiguration;
import com.dangdang.ddframe.job.config.simple.SimpleJobConfiguration;
import com.dangdang.ddframe.job.lite.config.LiteJobConfiguration;
import org.apache.commons.lang.StringUtils;

/**
 * Created by lanxw
 * 工具类,用于创建LiteJobConfiguration对象
 */
public class ElasticJobUtil {

    /**
     * 创建作业核心配置信息和Lite作业根配置信息(用于分片执行任务)
     *
     * @param jobClass               作业实现类
     * @param cron                   作业触发时间表达式
     * @param shardingTotalCount     分片总数
     * @param shardingItemParameters 分片参数,按照什么进行分片,
     *                               如有3个分片 且 shardingItemParameters="0=10,1=12,2=14",
     *                               那么会有三个线程执行execute方法 调用shardingContext.getShardingParameter() 分别对应着 10 12 14
     * @param dataflowType           是否为数据流作业类型
     * @return Lite作业配置信息
     */
    public static LiteJobConfiguration createJobConfiguration(final Class<? extends SimpleJob> jobClass,
                                                              final String cron,
                                                              final int shardingTotalCount,
                                                              final String shardingItemParameters,
                                                              boolean dataflowType) {

        // 定义作业核心配置
        JobCoreConfiguration.Builder jobCoreConfigurationBuilder = JobCoreConfiguration.newBuilder(jobClass.getSimpleName(), cron, shardingTotalCount);
        if(!StringUtils.isEmpty(shardingItemParameters)){

            jobCoreConfigurationBuilder.shardingItemParameters(shardingItemParameters);
        }
        JobTypeConfiguration jobConfig = null;
        if(dataflowType){

            // 创建数据流作业配置
            jobConfig = new DataflowJobConfiguration(jobCoreConfigurationBuilder.build(),jobClass.getCanonicalName(),true);
        }else {

            // 创建简单作业配置
            jobConfig = new SimpleJobConfiguration(jobCoreConfigurationBuilder.build(), jobClass.getCanonicalName());
        }
        // 定义Lite作业根配置,允许重写覆盖方法的配置
        LiteJobConfiguration simpleJobRootConfig = LiteJobConfiguration.newBuilder(jobConfig).overwrite(true).build();
        return simpleJobRootConfig;
    }

    /**
     * 创建默认的简单作业配置信息(执行简单的任务)
     *
     * @param jobClass 作业实现类
     * @param cron     作业触发时间表达式
     * @return Lite作业配置信息
     */
    public static LiteJobConfiguration createDefaultSimpleJobConfiguration(final Class<? extends SimpleJob> jobClass, final String cron) {

        return createJobConfiguration(jobClass,cron,1,null,false);
    }

    /**
     * 创建默认的数据流作业配置信息
     *
     * @param jobClass 作业实现类
     * @param cron     作业触发时间表达式
     * @return Lite作业配置信息
     */
    public static LiteJobConfiguration createDefaultDataFlowJobConfiguration(final Class<? extends SimpleJob> jobClass, final String cron) {

        return createJobConfiguration(jobClass,cron,1,null,true);
    }
}
5.配置注册中心zk
/**
 * Created by lanxw
 * 注册中心配置对象ZK
 */
@Configuration
public class RegistryCenterConfig {

    @Bean(initMethod = "init")
    public CoordinatorRegistryCenter createRegistryCenter(@Value("${elasticjob.zookeeper-url}") String zookeeperUrl, @Value("${elasticjob.group-name}") String groupName) {

        //zk的配置
        ZookeeperConfiguration zookeeperConfiguration = new ZookeeperConfiguration(zookeeperUrl,groupName);
        //设置zk超时时间
        zookeeperConfiguration.setSessionTimeoutMilliseconds(100);
        //创建注册中心
        CoordinatorRegistryCenter zookeeperRegistryCenter = new ZookeeperRegistryCenter(zookeeperConfiguration);
        return zookeeperRegistryCenter;
    }
}
6.写任务类,execute就是任务执行逻辑
/**
 * 商品上架的定时任务
 */
@Component
@Setter
@Getter
@RefreshScope//该 Bean 的配置可以在运行时被动态刷新,即可以从配置中心获取最新的配置值。
@Slf4j
public class InitSeckillProductJob implements SimpleJob {

    @Value("${jobCron.initSeckillProduct}")
    private String cron;

    @Autowired
    private SeckillProductFeignAPI seckillProductFeignAPI;

    @Autowired
    private StringRedisTemplate stringRedisTemplate;

    @Override
    public void execute(ShardingContext shardingContext) {

        log.info("秒杀商品上架任务正在执行。。。");
        //远程调用秒杀服务
        String time = shardingContext.getShardingParameter();
        Result<List<SeckillProductVo>> listResult = seckillProductFeignAPI.queryByTimeForJob(Integer.parseInt(time));
        if (listResult==null||listResult.hasError()){

            //通知管理员,秒杀服务有问题
            return;
        }
        List<SeckillProductVo> data = listResult.getData();
        //删除redis里的旧秒杀数据
        String key= JobRedisKey.SECKILL_PRODUCT_HASH.getRealKey(time);
        stringRedisTemplate.delete(key);
        for (SeckillProductVo vo : data) {

            stringRedisTemplate.opsForHash().put(key,String.valueOf(vo.getId()), JSON.toJSONString(vo));
        }
        log.info("秒杀商品上架任务执行完成。。。");
    }
}
7.任务注册和分片指定的逻辑等,可以到官网查看用法
@Configuration
public class BusinessJobConfig {

    @Bean(initMethod = "init")
    public SpringJobScheduler initUserCacheJob(CoordinatorRegistryCenter registryCenter, UserCacheJob userCacheJob){

        LiteJobConfiguration jobConfiguration = ElasticJobUtil.createDefaultSimpleJobConfiguration(userCacheJob.getClass(), userCacheJob.getCron());
        SpringJobScheduler springJobScheduler = new SpringJobScheduler(userCacheJob, registryCenter,jobConfiguration );
        return springJobScheduler;
    }

    @Bean(initMethod = "init")
    public SpringJobScheduler initSPJob(CoordinatorRegistryCenter registryCenter, InitSeckillProductJob initSeckillProductJob){

        //创建配置
        LiteJobConfiguration jobConfiguration = ElasticJobUtil.createJobConfiguration(
                initSeckillProductJob.getClass(),
                initSeckillProductJob.getCron(),
                3, "0=10,1=12,2=14",false);
        SpringJobScheduler springJobScheduler = new SpringJobScheduler(initSeckillProductJob, registryCenter,jobConfiguration );
        return springJobScheduler;
    }
}
这样任务即可根据您的配置文件yml的cron表达式执行代码
智能推荐
使用nginx解决浏览器跨域问题_nginx不停的xhr-程序员宅基地
文章浏览阅读1k次。通过使用ajax方法跨域请求是浏览器所不允许的,浏览器出于安全考虑是禁止的。警告信息如下:不过jQuery对跨域问题也有解决方案,使用jsonp的方式解决,方法如下:$.ajax({ async:false, url: 'http://www.mysite.com/demo.do', // 跨域URL ty..._nginx不停的xhr
在 Oracle 中配置 extproc 以访问 ST_Geometry-程序员宅基地
文章浏览阅读2k次。关于在 Oracle 中配置 extproc 以访问 ST_Geometry,也就是我们所说的 使用空间SQL 的方法,官方文档链接如下。http://desktop.arcgis.com/zh-cn/arcmap/latest/manage-data/gdbs-in-oracle/configure-oracle-extproc.htm其实简单总结一下,主要就分为以下几个步骤。..._extproc
Linux C++ gbk转为utf-8_linux c++ gbk->utf8-程序员宅基地
文章浏览阅读1.5w次。linux下没有上面的两个函数,需要使用函数 mbstowcs和wcstombsmbstowcs将多字节编码转换为宽字节编码wcstombs将宽字节编码转换为多字节编码这两个函数,转换过程中受到系统编码类型的影响,需要通过设置来设定转换前和转换后的编码类型。通过函数setlocale进行系统编码的设置。linux下输入命名locale -a查看系统支持的编码_linux c++ gbk->utf8
IMP-00009: 导出文件异常结束-程序员宅基地
文章浏览阅读750次。今天准备从生产库向测试库进行数据导入,结果在imp导入的时候遇到“ IMP-00009:导出文件异常结束” 错误,google一下,发现可能有如下原因导致imp的数据太大,没有写buffer和commit两个数据库字符集不同从低版本exp的dmp文件,向高版本imp导出的dmp文件出错传输dmp文件时,文件损坏解决办法:imp时指定..._imp-00009导出文件异常结束
python程序员需要深入掌握的技能_Python用数据说明程序员需要掌握的技能-程序员宅基地
文章浏览阅读143次。当下是一个大数据的时代,各个行业都离不开数据的支持。因此,网络爬虫就应运而生。网络爬虫当下最为火热的是Python,Python开发爬虫相对简单,而且功能库相当完善,力压众多开发语言。本次教程我们爬取前程无忧的招聘信息来分析Python程序员需要掌握那些编程技术。首先在谷歌浏览器打开前程无忧的首页,按F12打开浏览器的开发者工具。浏览器开发者工具是用于捕捉网站的请求信息,通过分析请求信息可以了解请..._初级python程序员能力要求
Spring @Service生成bean名称的规则(当类的名字是以两个或以上的大写字母开头的话,bean的名字会与类名保持一致)_@service beanname-程序员宅基地
文章浏览阅读7.6k次,点赞2次,收藏6次。@Service标注的bean,类名:ABDemoService查看源码后发现,原来是经过一个特殊处理:当类的名字是以两个或以上的大写字母开头的话,bean的名字会与类名保持一致public class AnnotationBeanNameGenerator implements BeanNameGenerator { private static final String C..._@service beanname
随便推点
二叉树的各种创建方法_二叉树的建立-程序员宅基地
文章浏览阅读6.9w次,点赞73次,收藏463次。1.前序创建#include<stdio.h>#include<string.h>#include<stdlib.h>#include<malloc.h>#include<iostream>#include<stack>#include<queue>using namespace std;typed_二叉树的建立
解决asp.net导出excel时中文文件名乱码_asp.net utf8 导出中文字符乱码-程序员宅基地
文章浏览阅读7.1k次。在Asp.net上使用Excel导出功能,如果文件名出现中文,便会以乱码视之。 解决方法: fileName = HttpUtility.UrlEncode(fileName, System.Text.Encoding.UTF8);_asp.net utf8 导出中文字符乱码
笔记-编译原理-实验一-词法分析器设计_对pl/0作以下修改扩充。增加单词-程序员宅基地
文章浏览阅读2.1k次,点赞4次,收藏23次。第一次实验 词法分析实验报告设计思想词法分析的主要任务是根据文法的词汇表以及对应约定的编码进行一定的识别,找出文件中所有的合法的单词,并给出一定的信息作为最后的结果,用于后续语法分析程序的使用;本实验针对 PL/0 语言 的文法、词汇表编写一个词法分析程序,对于每个单词根据词汇表输出: (单词种类, 单词的值) 二元对。词汇表:种别编码单词符号助记符0beginb..._对pl/0作以下修改扩充。增加单词
android adb shell 权限,android adb shell权限被拒绝-程序员宅基地
文章浏览阅读773次。我在使用adb.exe时遇到了麻烦.我想使用与bash相同的adb.exe shell提示符,所以我决定更改默认的bash二进制文件(当然二进制文件是交叉编译的,一切都很完美)更改bash二进制文件遵循以下顺序> adb remount> adb push bash / system / bin /> adb shell> cd / system / bin> chm..._adb shell mv 权限
投影仪-相机标定_相机-投影仪标定-程序员宅基地
文章浏览阅读6.8k次,点赞12次,收藏125次。1. 单目相机标定引言相机标定已经研究多年,标定的算法可以分为基于摄影测量的标定和自标定。其中,应用最为广泛的还是张正友标定法。这是一种简单灵活、高鲁棒性、低成本的相机标定算法。仅需要一台相机和一块平面标定板构建相机标定系统,在标定过程中,相机拍摄多个角度下(至少两个角度,推荐10~20个角度)的标定板图像(相机和标定板都可以移动),即可对相机的内外参数进行标定。下面介绍张氏标定法(以下也这么称呼)的原理。原理相机模型和单应矩阵相机标定,就是对相机的内外参数进行计算的过程,从而得到物体到图像的投影_相机-投影仪标定
Wayland架构、渲染、硬件支持-程序员宅基地
文章浏览阅读2.2k次。文章目录Wayland 架构Wayland 渲染Wayland的 硬件支持简 述: 翻译一篇关于和 wayland 有关的技术文章, 其英文标题为Wayland Architecture .Wayland 架构若是想要更好的理解 Wayland 架构及其与 X (X11 or X Window System) 结构;一种很好的方法是将事件从输入设备就开始跟踪, 查看期间所有的屏幕上出现的变化。这就是我们现在对 X 的理解。 内核是从一个输入设备中获取一个事件,并通过 evdev 输入_wayland