Ansible-剧本与变量-程序员宅基地
技术标签: ansible
对于运维小伙伴来讲,Ansible并不陌生,配置简单,上手容易,只要掌握几个基本的模块就可以解决好多运维中重复的事,但是对于处理更为高级的功能和更大、更复杂的项目时,管理和维护Ansible Playbook或高效使用将变得更加困难。
下面的的playbook是一个k8s安装环境初始化的剧本,其实现方式简单,是在k8s集群中所有节点都需要做的一些处理,实现如下功能
- 配置
firewall,selinux,配置hosts - 关闭
swap - 配置
yum源 - 安装
docker-ce,导入缺少的镜像,配置docker加速 - 安装k8s相关包:
kubelet、kubeadm、kubectl - 启动
kubelet服务
- name: init k8s
  hosts: all
  tasks:
    # 关闭防火墙
    - shell: firewall-cmd --set-default-zone=trusted
    # 关闭selinux
    - shell: getenforce
      register: out
    - debug: msg="{
   {out}}"
    - shell: setenforce 0
      when: out.stdout != "Disabled"
    - replace:
        path: /etc/selinux/config
        regexp: "SELINUX=enforcing"
        replace: "SELINUX=disabled"
    - shell: cat /etc/selinux/config
      register: out
    - debug: msg="{
   {out}}"
    - copy:
        src: ./hosts
        dest: /etc/hosts
        force: yes
   # 关闭交换分区
    - shell: swapoff -a
    - shell: sed -i '/swap/d' /etc/fstab
    - shell: cat /etc/fstab
      register: out
    - debug: msg="{
   {out}}"
    # 配置yum源
    - shell: tar -cvf /etc/yum.tar /etc/yum.repos.d/
    - shell: rm -rf /etc/yum.repos.d/*
    - shell: wget ftp://ftp.rhce.cc/k8s/* -P  /etc/yum.repos.d/
    # 安装docker-ce
    - yum:
        name: docker-ce
        state: present
    # 配置docker加速
    - shell: mkdir /etc/docker
    - copy:
        src: ./daemon.json
        dest: /etc/docker/daemon.json
    - shell: systemctl daemon-reload
    - shell: systemctl restart docker
    # 配置属性,安装k8s相关包
    - copy:
        src: ./k8s.conf
        dest: /etc/sysctl.d/k8s.conf
    - shell: yum install -y kubelet-1.21.1-0 kubeadm-1.21.1-0 kubectl-1.21.1-0 --disableexcludes=kubernetes
    # 缺少镜像导入
    - copy:
        src: ./coredns-1.21.tar
        dest: /root/coredns-1.21.tar
    - shell: docker load -i /root/coredns-1.21.tar
    # 启动服务
    - shell: systemctl restart kubelet
    - shell: systemctl enable kubelet
如果搭建的集群节点很多,那么使用ansible要方便很多,但是上面的剧本没有使用角色,所有的操作都耦合在一起,所以看起来不是特别清晰,可读性差,而且一些可变的变量也没有抽离出来。复用性差,也没有考虑失败回滚的问题,大部分的操作是通过shell模块来完成的,尤其是对一些文件的操作,shell模块不满足幂等性。
高效的使用Ansible不仅仅在于功能或工具的使用,对于实践方法和项目组织更重要,对于剧本的编写规范,有以下三点:
保持简单井然有序经常测试
保持简单
Ansible 的一大优势是简洁性。使用playbook保持简单,我们就能更加轻松地使用、修改和理解它们。
保持 Playbook 的可读性
- 确保
playbook有恰当注释且易于阅读。合理地使用垂直空白和注释。 - 始终为
play和任务提供有意义的名称,明确play或任务的用途。 - 对于剧本编写文件格式,
YAML它非常适合表述⼀系列的字典和数组。 - 对于难以在
Ansible Playbook中表述⼀些复杂的控制结构或条件,可以通过模板和Jinja2过滤器巧妙地处理变量中的数据。 - 使用原生
YAML语法,而不是“折叠”的语法,以下示例不是推荐的格式:
- hosts: node1,node2
  tasks:
    - yum: name=httpd state=present
    - copy: content="RHCE Test" dest=/var/www/html/index.html force=yes
    - service: name=httpd state=restarted enabled=yes
    - service: name=firewalld state=restarted enabled=yes
    - firewalld: service=http state=enabled permanent=yes immediate=yes
使用现有的模块
- 编写新
playbook时,从基础playbook开始,并尽可能使用静态清单。 - 在构建设计时,将
debug模块用作测试或存根。 - 在
playbook按预期工作后,使用import或include将playbook分成较小的逻辑组件。 - 尽量使用
Ansible中包含的特殊用途模块,而不是command、shell、raw这样的通用模块。使用为特定任务设计的模块可以轻松地使Playbook 具有幂等性,且易于维护。
遵循标准样式
编写Ansible项目时,应考虑和同时遵循标准的样式:遵循统一的标准有助于提高可维护性和可读性。
- 缩进多少个空格
- 如何使用
垂直空白 - 如何命名任务剧本角色和变量
- 应对什么进行注释
- 如何注释
井然有序
Ansible项目的组织和Playbook的运行方式有助于维护、故障排除和审计。
遵循变量命名约定
因为 Ansible 具有相对扁平的命令空间,所以变量名非常重要。应使用描述性变量且应阐明内容,如 apache_tls_port ,在角色中给最好能给角色变量添加前缀,如myapp_apache_tls_port 。
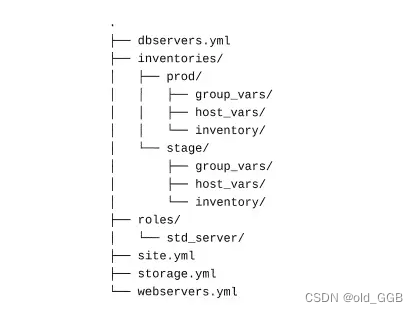
标准化项目结构
在文件系统上构建 Ansible 项目时,请使用统一的模式,推荐的示例:在这里插入图片描述
Playbook 结构的一大优势在于,可以将较⼤的playbook分成较小的⽂件,使其更易阅读,而较小的子playbook 可能会包含可以独立运行的、适合特定用途的 play。
使用动态清单
动态清单支持从⼀个真实的中央来源集中管理主机和组,并确保清单自动更新。动态清单一般与云提供商、容器和虚拟机管理系统结合使用。
如果无法使用动态清单,则其它工具可以动态构建组或其他信息。group_by 模块根据事实动态生成组成员资格,该组成员资格对 playbook 的其余部分有效。
# Create nested groups
- group_by:
    key: el{
   { ansible_distribution_major_version }}-{
   { ansible_architecture }}
    parents:
      - el{
   { ansible_distribution_major_version }}

TASK [group_by] ****************************************************************************************************
task path: /root/ansible/group_by.yaml:5
[WARNING]: Invalid characters were found in group names but not replaced, use -vvvv to see details
changed: [192.168.26.82] => {
    "add_group": "el7-x86_64",
    "changed": true,
    "parent_groups": [
        "el7"
    ]
}
changed: [192.168.26.81] => {
    "add_group": "el7-x86_64",
    "changed": true,
    "parent_groups": [
        "el7"
    ]
}
充分利用组
主机可以是多个组的成员,可以按以下特征将主机划分不同的种类:
- 地理位置
- 环境
- 站点或服务
将角色用于可重复使用的内容
- 角色可以是
playbook保持简单,能够通过重复利用项目间的通用代码来减少工作量。 - 通过
变量使角色成为可配置的通同角色,以便在将它们用于⼀组不同的playbook时无需对其进行编辑。 - 使用
ansible-galaxy init命令来初始化角色的目录结构。 - RHEL 中的
redhat-system-roles软件提供的角色受到官方支持。 - 也可以通过
Ansible Galaxy提供的角色,但是注意其质量和安全。 - 将角色保存在项目的
roles子目录中。
集中运行 Playbook
使用一个专用的控制节点来控制对系统的访问和审计 Ansible 活动,让所有的 Ansible Playbook 都从上面运行。
系统管理员仍应在系统上拥有自己的账户,以及用于连接受管主机的凭据,并在需要时可以进行权限提升。当系统管理员离职时,因从受管主机的authorized_keys文件中删除其 SSH 密钥,同时撤销其 sudo 权限。也可以考虑使用红帽 Ansible Tower 作为中央控制节点。
经常测试
在开发过程中、任务运行时以及Playbook投入使用后,应经常测试 Playbook 和 task
测试任务的结果
如果需要确认任务是否成功,请验证任务的结果,而不要信任模块的返回代码
- start web server
  service:
    name: httpd
    status: started
- name: Check web site from web server
  uri:
    ur1: http://{
   { ansible_fqdn}}
    return_content: yes
  register: example_webpage
  failed_when: example_webpage. status !=200
使用 Block/Rescue 来恢复或回滚
block 指令可用于对任务进行分组,与 rescue 指令结合使用时,可帮助从错误和故障中恢复。
---
- name: block test
  hosts: node1
  tasks:
    - block:
        - debug: msg="vg myvg not found"   #提示卷组没找到
        - debug: msg="create vg myvg .. .."   #做其他操作(比如创建这个卷组...)
      when: ('myvg' not in ansible_lvm.vgs)   #当卷组myvg不存在时
      rescue:
        - debug: msg="creating failed .. .."     #block失败时提示创建卷组失败
      always:
        - shell: vgscan          #列出卷组信息
          register: list         #保存到名为list的变量
        - debug: msg={
   {list.stdout_lines}}     #提示卷组扫描结果
使用最新的 Ansible 版本开发 Playbook
即使不在⽣产中使用最新版本的 Ansible,也应该定期针对 Ansible 的最新版本测试 playbook。这将避免在Ansible 模块和功能不断演变时出现的问题。
如果 playbook 在运行时显示警告或弃用消息,应注意它们并做出相应的调整。通常,Ansible 中的某⼀功能已弃用或有变化,则该项目会在删除或更改功能之前提早四个小版本提供弃用通知。
使用测试工具
使用 ansible-playbook --syntax-check 命令进行语法检测。
┌──[[email protected]]-[~/ansible]
└─$ansible-playbook group_by.yaml --syntax-check

playbook: group_by.yaml
┌──[[email protected]]-[~/ansible]
└─$echo 22 >> group_by.yaml
┌──[[email protected]]-[~/ansible]
└─$ansible-playbook group_by.yaml --syntax-check
ERROR! We were unable to read either as JSON nor YAML, these are the errors we got from each:
JSON: No JSON object could be decoded

Syntax Error while loading YAML.
  could not find expected ':'

The error appears to be in '/root/ansible/group_by.yaml': line 11, column 1, but may
be elsewhere in the file depending on the exact syntax problem.

The offending line appears to be:


22
^ here
使用 ansible-playbook --check 命令,检查模式,针对check_mode中的实际受管主机运行 Playbook(不会改变主机状态),以查看Playbook执行的更改。此项检查不能保证完全准确性,因为 playbook 可能需要实际运行⼀些任务,playbook 中的后续任务才能正常运行。可能有⼀些标记有check_mode: no指令的任务。这些任务即使在检查模式中也会运行。
tasks:
  - name: This task will always make changes to the system
    ansible.builtin.command: /something/to/run --even-in-check-mode
    check_mode: no

  - name: This task will never make changes to the system
    ansible.builtin.lineinfile:
      line: "important config"
      dest: /path/to/myconfig.conf
      state: present
    check_mode: yes
    register: changes_to_important_config
一个Demo
下面我们来看一个完整的Demo,这个Demo做的事很简单,但是剧本编写清晰,在三台机器部署一个web服务,其中一台机器用haproxy作为负载,剩下的两台机器提供web能力(安装http服务并部署APP),剧本中创建了四个角色,用于描述四种行为:
- 安装配置负载均衡器
- 安装配置web服务器
- 部署服务到web服务器
- LB、HTTP 服务的firewall配置
配置、清单、主剧本文件编写
编写一个ansible.cfg 配置文件,这个不多讲,指定主机清单文件位置和ssh用户,配置sudo 提权方式。
[defaults]
inventory=inventory
remote_user=devops

[privilege_escalation]
become=True
become_method=sudo
become_user=root
become_ask_pass=False
inventory 主机清单文件,定义两个分组,
- 作为LB的机器为
servera - 提供web能力的机器为
serverb和serverc
[lb_servers]
servera.lab.example.com

[web_servers]
server[b:c].lab.example.com
site.yml为定义的实际执行的主剧本,这里通过,这里通过import_playbook模块来引入一个外部的调用角色的模块。一般情况下,当一个playbook很长很复杂,可以通过对剧本进行拆分。通过模块化的方式将多个playbook组合为一个完整的playbook,或者把文件中的任务列表插入到play中.
嗯,简单介绍下,ansible 可以使用两种方式实现剧本的模块化:
包含内容:动态操作(include_task),在playbook运行期间,Ansible会在内容到达时处理包含的内容导入内容: 静态包含(import_task,import_playbook),在playbook运行之前,Ansible在最初解析的时候预处理导入的内容
和Java web体系中的Jsp脚本有些类似,通过include指令和include动作引入文件
我们可以看到,site.yml执行的三个剧本都是通过导入的方式。
- name: Deploy HAProxy
  import_playbook: deploy_haproxy.yml

- name: Deploy Web Server
  import_playbook: deploy_apache.yml

- name: Deploy Web App
  import_playbook: deploy_webapp.yml
执行顺序为,创建LB、创建web Serve,部署 web app,这里把剧本行为抽象为角色,然后在deploy_*里面调用角色,实现了行为和剧本的解耦。
调用角色剧本编写
看一下导入的执行角色的剧本deploy_haproxy.yml
- name: Ensure HAProxy is deployed
  hosts: lb_servers
  force_handlers: True

  roles:
    # The "haproxy" role has a dependency
    # on the "firewall" role. The
    # "firewall" role requires a
    # "firewall_rules" variable be defined.
    - role: haproxy
      firewall_rules:
        # Allow 80/tcp connections
        - port: 80/tcp
通过剧本执行LB角色,并且定义·变量firewall_rules,声明开放的端口协议,这里有一个force_handlers,我们看一下,剧本中handlers用于任务处理(布雷),可以设置一个或一块任务,但是他不会主动执行,需要通过notify通知触发(引爆),还有一些需要注意的点:
- 每个剧本中
handlers任务只会执行一次,即使收到多个任务的触发通知 handlers组的每一个任务都要设置名称(name)handlers的层次与tasks平级- 其他任务在必要时,使用
notify语句通知handlers任务名 - 仅当发起
notify的任务的执行状态为changed时,handlers任务才会被执行
看一个Demo
---
- name: handlers test
  hosts: node5
  tasks:
      - lvol: lv=vo001 size=100M vg=search   #创建逻辑卷vo001
      notify: mkfs     #如果changed则通知格式化(否则无需格式化)
  handlers:
    - name: mkfs     #定义格式化操作处理
      filesystem: dev=/dev/search/vo001 fstype=xfs force=yes
...
那么这里的force_handlers即强制执行的意思,当触发他的通知对应的任务执行失败,但是handlers任然会执行,
deploy_apache.yml
- name: Ensure Apache is deployed
  hosts: web_servers
  force_handlers: True

  roles:
    # The "apache" role has a dependency
    # on the "firewall" role. The
    # "firewall" role requires a
    # "firewall_rules" variable be defined.
    - role: apache
      firewall_rules:
        # Allow http requests from any
        # internal zone source.
        - zone: internal
          service: http

        # Add servera, the load balancer,
        # to the internal zone.
        - zone: internal
          source: "172.25.250.10"
deploy_webapp.yml
- name: Ensure Web App is deployed
  hosts: web_servers
  vars:
    - webapp_version: v1.0

  roles:
    - role: webapp
这里需要说明下,vars定义的变量属于剧本变量,而在roles下面的变量为角色变量
自定义角色编写
我们来看一下角色,一共有四个角色,其中三个在上面的deplay_*.yaml 文件中被调用,firewall角色被apache和haproxy依赖调用
- apache http web服务器部署
- firewall 防火墙部署配置
- haproxy LB部署配置
- wen app 能力部署
┌──[[email protected]]-[/home/student/DO447/labs/development-practices/roles]
└─$ls
apache  firewall  haproxy  webapp
关于角色这里我们简单的回顾下
ansible 中的role指的是,为了方便复杂任务(包含大批量任务操作、模板、变量等资源)的重复使用,降低playbook剧本编写难度,而预先定义好的一套目录结构。
针对每一个角色,ansible会到固定的目录去调取特定的数据,关于角色在剧本中的使用,可以看看上面 deplay_*.yaml
角色内一般不指定hosts: 清单主机列表,而是交给调用此角色的剧本来指定,当然测试除外,具体看下
haproxy 角色
haproxy 角色 在剧本中负责LB 相关行为,简单看一下目录结构
┌──[[email protected]]-[/home/student/DO447/labs/development-practices/roles]
└─$cd haproxy/ #角色根目录
┌──[[email protected]]-[/home/student/DO447/labs/development-practices/roles/haproxy]
└─$tree
.
├── defaults      #定义变量的缺省值,优先级较低
│   └── main.yml
├── handlers      #定义handlers处理任务
│   └── main.yml
├── meta          #定义作者、版本、兼容性、依赖项等描述信息
│   └── main.yml
├── tasks         #任务入口,最主要的文件
│   └── main.yml
├── templates     #存放模板文件
│   └── haproxy.cfg.j2
└── tests  # 用于角色测试
    ├── inventory
    └── test.yml

6 directories, 7 files
当然,这里的角色目录并不是最全的,正常的角色中还会有vars目录用于定义变量,相对于defaults优先级更高,files目录存放一些静态文件,README.md文件用于描述自述信息,我们通过init命令生成一个角色看一下目录
┌──[[email protected]]-[~/ansible/roles]
└─$ansible-galaxy init demo
- Role demo was created successfully
┌──[[email protected]]-[~/ansible/roles]
└─$ls
demo
┌──[[email protected]]-[~/ansible/roles]
└─$tree
.
└── demo
    ├── defaults
    │   └── main.yml
    ├── files
    ├── handlers
    │   └── main.yml
    ├── meta
    │   └── main.yml
    ├── README.md
    ├── tasks
    │   └── main.yml
    ├── templates
    ├── tests
    │   ├── inventory
    │   └── test.yml
    └── vars
        └── main.yml

9 directories, 8 files
┌──[[email protected]]-[~/ansible/roles]
└─$
嗯,回到我们的haproxy来看一下 defaults目录下的yaml文件用于定义一些缺省的变量。
┌──[[email protected]]-[/home/student/DO447/labs/development-practices/roles/haproxy]
└─$cat defaults/main.yml
# Log-level for HAProxy logs
log_level: info

# Port exposed to clients
port: 80

# Name for the default backend
backend_name: app

# Port backend is exposed to
backend_port: 80

# The appservers variable is a list
# of backend servers that provide
# the web service that is proxied
# haproxy.  Each server must define:
# name, address, port. Below is
# and example structure:
# appservers:
#   - name: serverb.lab.example.com
#     ip_address: 1.2.3.4
#     port: 5000
#   - name: serverc.lab.example.com
#     ip_address: 1.2.3.5
#     port: 5000
# The default is no defined backend servers.
appservers: []

# Socket used to communicate with haproxy service. DO NOT CHANGE
socket: /var/run/haproxy.sock
handlers这个目录用于定义需要处理被激活的任务。这里定义了两个任务,都用到了Service模块
- 重新启动haproxy服务
- 重新加载haproxy服务配置文件
┌──[[email protected]]-[/home/student/DO447/labs/development-practices/roles/haproxy]
└─$cat handlers/main.yml
---
# handlers file for haproxy

- name: restart haproxy
  service:
    name: haproxy
    state: restarted

- name: reload haproxy
  service:
    name: haproxy
    state: reloaded
看下meth元数据,作者信息,版本,以及通过dependencies我们可以看到该角色依赖角色firewall
┌──[[email protected]]-[/home/student/DO447/labs/development-practices/roles/haproxy]
└─$cat meta/main.yml
galaxy_info:
  author: Ophelia Dunham
  description: A role to ensure deployment of HAProxy
  company: Example, Inc.
。。。。
  license: license (GPLv2, CC-BY, etc)

  min_ansible_version: 2.4
。。。。
  galaxy_tags: []
。。
dependencies:
  - name: firewall
这里我们简单聊聊角色依赖,角色依赖可以在使用角色时自动拉入其他角色。Ansible 执行角色依赖项,则必须使用关键字dependencies在mate文件夹下的main.yaml中声明在指定角色之前插入的角色和参数列表,我们这里的参数是定义在deploy_*.yaml
「主任务剧本」
- 通过yum模块下载负载均衡工具
haproxy和反向代理工具socat - 通过Service模块启动haproxy,并设置开启自启
- 通过template模块,利用jieja2 模板,替换配置文件,这里处理完要通知前面重载配置文件的handlers
┌──[[email protected]]-[/home/student/DO447/labs/development-practices/roles/haproxy]
└─$cat tasks/main.yml
---
# tasks file for haproxy
- name: Ensure haproxy packages are present
  yum:
    name:
      - haproxy
      - socat
    state: present

- name: Ensure haproxy is started and enabled
  service:
    name: haproxy
    state: started
    enabled: yes

- name: Ensure haproxy configuration is set
  template:
    src: haproxy.cfg.j2
    dest: /etc/haproxy/haproxy.cfg
    #validate: haproxy -f %s -c -q
  notify: reload haproxy
模板文件编写,这里用到了jieja2模板引擎,在一般的python web项目中用的比较多一点,这里简单的理解为变量替换。
haproxy.cfg.j2模板里用到了我们之前定义的大量变量,包括default目录的下main.yaml中定义的变量,以及appservers.yaml中的变量。
┌──[[email protected]]-[/home/student/DO447/labs/development-practices/roles/haproxy]
└─$cat templates/haproxy.cfg.j2
#---------------------------------------------------------------------
# Global settings
#---------------------------------------------------------------------
global
    #Send events/messages to rsyslog server.
    log         127.0.0.1:514 local0 {
   { log_level }}

    chroot      /var/lib/haproxy
    pidfile     /var/run/haproxy.pid
    maxconn     4000
    user        haproxy
    group       haproxy
    daemon

   #state changes due to API calls are stored in this file.
   server-state-file /usr/local/haproxy/haproxy.state

    # turn on stats unix socket
    #  required for the ansible haproxy module.
    stats socket {
   { socket }} level admin

    # utilize system-wide crypto-policies
    ssl-default-bind-ciphers PROFILE=SYSTEM
    ssl-default-server-ciphers PROFILE=SYSTEM

#---------------------------------------------------------------------
# common defaults that all the 'listen' and 'backend' sections will
# use if not designated in their block
#---------------------------------------------------------------------
defaults
    mode                        http
    log                         global
    option                      httplog
    option                      dontlognull
    option http-server-close
    option forwardfor           except 127.0.0.0/8
    option                      redispatch
    retries                     3
    timeout http-request        10s
    timeout queue               1m
    timeout connect             10s
    timeout client              1m
    timeout server              1m
    timeout http-keep-alive     10s
    timeout check               10s
    maxconn                     3000

    #Loads state changes from the state file.
    load-server-state-from-file global

#---------------------------------------------------------------------
# main frontend which proxys to the backends
#---------------------------------------------------------------------
frontend main
    mode http
    bind *:{
   { port }}
    default_backend {
   { backend_name }}

#---------------------------------------------------------------------
# round robin balancing between the various backends
#---------------------------------------------------------------------
backend {
   { backend_name }}
    balance roundrobin
{% for server in appservers %}
    server {
   { server.name }} {
   { server.ip }}:{
   { backend_port }}
{% endfor %}
appservers 清单变量用于定义需要负载的机器域名和ip。这里为了角色的复用性,单独分离出来。
┌──[[email protected]]-[/home/student/DO447/labs/development-practices]
└─$cat appservers.yml

appservers:
  - name: serverb.lab.example.com
    ip: "172.25.250.11"
  - name: serverc.lab.example.com
    ip: "172.25.250.12"
剩下的就是测试相关的yaml文件,不多介绍,remote_user指定连接受管机的远程用户名
┌──[[email protected]]-[/home/student/DO447/labs/development-practices/roles/haproxy]
└─$cat tests/inventory
localhost

┌──[[email protected]]-[/home/student/DO447/labs/development-practices/roles/haproxy]
└─$cat tests/test.yml
---
- hosts: localhost
  remote_user: root
  roles:
    - haproxy
apache 角色
apache 角色用于提供http 服务,目录结构相对简单
┌──[[email protected]]-[/home/student/DO447/labs/development-practices/roles]
└─$cd apache/
┌──[[email protected]]-[/home/student/DO447/labs/development-practices/roles/apache]
└─$tree
.
├── meta
│   └── main.yml
├── tasks
│   └── main.yml
└── tests
    ├── inventory
    └── test.yml

3 directories, 4 files
┌──[[email protected]]-[/home/student/DO447/labs/development-practices/roles/apache]
└─$
meta 文件夹我们这里不多介绍了,涉及防火墙操作,所以依赖firewall角色,看一下主任务剧本
- yum模块安装 http相关包
- seboolean模块用于设置selinux开机自启,允许
httpd_can_network_connect访问网络 - service模块用于启动http服务
┌──[[email protected]]-[/home/student/DO447/labs/development-practices/roles/apache]
└─$cat tasks/main.yml
---
# tasks file for apache

- name: Install http
  yum:
    name:
      - httpd
      - php
      - git
      - php-mysqlnd
    state: present

- name: Configure SELinux to allow httpd to connect to remote database
  seboolean:
    name: httpd_can_network_connect_db
    state: true
    persistent: yes

- name: http service state
  service:
    name: httpd
    state: started
    enabled: yes
webapp 角色
webapp角色用于部署web 项目到httpd服务,主要涉及缺省变量编写和主任务剧本。
┌──[[email protected]]-[/home/student/DO447/labs/development-practices/roles]
└─$cd webapp/
┌──[[email protected]]-[/home/student/DO447/labs/development-practices/roles/webapp]
└─$tree
.
├── defaults
│   └── main.yml
├── meta
│   └── main.yml
├── tasks
│   └── main.yml
└── tests
    ├── inventory
    └── test.yml

4 directories, 5 files
┌──[[email protected]]-[/home/student/DO447/labs/development-practices/roles/webapp]
└─$
defaults目录下的清单变量只有一个webapp_message,meta目录下的元数据不多介绍
┌──[[email protected]]-[/home/student/DO447/labs/development-practices/roles/webapp]
└─$cat defaults/main.yml
webapp_message: "This is"
┌──[[email protected]]-[/home/student/DO447/labs/development-practices/roles/webapp]
└─$cat meta/main.yml
主任务剧本中,用了一个dufault目录下的缺省变量和一个ansible的魔法变量,一个使用角色时定义的剧本变量。通过copy模块向http服务的引导页写入一句话。
┌──[[email protected]]-[/home/student/DO447/labs/development-practices/roles/webapp]
└─$cat tasks/main.yml
---
# tasks file for webapp

#- name: Copy the code from the repository
#  git:
#    repo: "{
   { webapp_repo }}"
#    version: "{
   { webapp_version }}"
#    dest: /var/www/html/
#    accept_hostkey: yes
##    key_file: deployment key??

- name: Copy a stub file.
  copy:
    content: "{
   { webapp_message }} {
   { ansible_hostname }}. (version {
   { webapp_version}})\n"
    dest: /var/www/html/index.html
最后来看一下firewall角色
firewall 角色
firewall 角色并没有被显示的调用,那么它是如何被调用的?
┌──[[email protected]]-[/home/student/DO447/labs/development-practices/roles]
└─$cd firewall/
┌──[[email protected]]-[/home/student/DO447/labs/development-practices/roles/firewall]
└─$tree
.
├── defaults
│   └── main.yml
├── handlers
│   └── main.yml
├── meta
│   └── main.yml
├── tasks
│   └── main.yml
└── tests
    ├── inventory
    └── test.yml

5 directories, 6 files
┌──[[email protected]]-[/home/student/DO447/labs/development-practices/roles/firewall]
└─$
这里就要讲到角色依赖,我们上面的haproxy角色和apache角色都在meta/main.yaml 文件中依赖了firewall角色,所以haproxy角色和apache角色在执行的时候要先执行firewall角色.
┌──[[email protected]]-[/home/student/DO447/labs/development-practices/roles/firewall]
└─$cat defaults/main.yml
---
# defaults file for firewall


# This role requires that firewall_rules variable
# be defined. The variable is a list of rules, and
# each rule defines:
#
#   service: (optional)
#   port:    (optional)
#   zone:    (optional)
#   source:  (optional)
#
# A rule should only define a service or a port.
# And example definition is:
#
# firewall_rules:
#   - service: http
#     zone: internal
#   - port: 8443
#     source: 192.168.0.2

# By default, no rules are implemented.
firewall_rules: []
一个重载firewall 配置文件的任务
┌──[[email protected]]-[/home/student/DO447/labs/development-practices/roles/firewall]
└─$cat handlers/main.yml
---
# handlers file for firewall

- name: reload firewalld
  service:
    name: firewalld
    state: reloaded
主任务文件,编写防火墙配置,在配置完通知上面的handlers
┌──[[email protected]]-[/home/student/DO447/labs/development-practices/roles/firewall]
└─$cat tasks/main.yml
---
# tasks file for firewall

- name: Ensure Firewall Sources Configuration
  firewalld:
    source: "{
   { item.source if item.source is defined else omit }}"
    zone: "{
   { item.zone if item.zone is defined else omit }}"
    permanent: yes
    state: "{
   { item.state | default('enabled') }}"
    service: "{
   { item.service if item.service is defined else omit }}"
    immediate: true
    port: "{
   { item.port if item.port is defined else omit }}"
  loop: "{
   { firewall_rules }}"
  notify: reload firewalld
对剧本的clean
当我们不需要这套环境了需要编写一个卸载当前环境的剧本clean.yml
- name: Clean Load Balancers
  hosts: lb_servers
  gather_facts: no
  tasks:
    - name: Remove packages
      yum:
        name: haproxy
        state: absent
    - set_fact:
        firewall_rules:
          - port: 80/tcp

- name: Clean Web Servers
  hosts: web_servers
  gather_facts: no
  tasks:
    - name: Remove packages
      yum:
        name: httpd
        state: absent
    - set_fact:
        firewall_rules:
          - zone: internal
            service: http
          - zone: internal
            source: 172.25.250.10


- name: Clean Firewall rules
  hosts: lb_servers, web_servers
  tasks:
    - name: Ensure Firewall Sources Configuration
      firewalld:
        source: "{
   { item.source if item.source is defined else omit }}"
        zone: "{
   { item.zone if item.zone is defined else omit }}"
        permanent: yes
        state: 'disabled'
        service: "{
   { item.service if item.service is defined else omit }}"
        port: "{
   { item.port if item.port is defined else omit }}"
      loop: "{
   { firewall_rules }}"

    - name: reload firewalld
      service:
        name: firewalld
        state: reloaded

- name: Remove web application
  hosts: web_servers
  tasks:
    - name: Remove stub file
      file:
        state: absent
        path: "/var/www/html/index.html"
下面是Demo完整的结构
┌──[[email protected]]-[/home/student/DO447/labs/development-practices]
└─$ls
ansible.cfg     clean.yml          deploy_haproxy.yml  inventory  site.yml
appservers.yml  deploy_apache.yml  deploy_webapp.yml   roles
┌──[[email protected]]-[/home/student/DO447/labs/development-practices]
└─$智能推荐
【蓝桥杯嵌入式学习笔记】(一)比赛及开发环境相关介绍_蓝桥杯嵌入式比赛时会提供什么-程序员宅基地
文章浏览阅读1.9k次,点赞3次,收藏33次。一、比赛相关介绍1、我刚开始学习32的时候是先学习的库函数,这种传统的库函数开发方式会花费很多时间在各种模块的初始化上面,而CubeMX+HAL库开发的方式,则是省去了初始化的部分,让我们能将更多的精力放在实现功能和逻辑设计方面。当然,库函数的开发方式也是有必要学习的,一些相关底层知识也需要一定的理解,因为 CubeMX也可能存在Bug,如果你对库函数不了解的话也会出现一些麻烦无法解决。2、蓝桥杯嵌入式比赛开发板主控芯片采用STM32G431RBT6,并预留扩展板接口。..._蓝桥杯嵌入式比赛时会提供什么
JS 离散点生成等高线图的几种方式_observable plot-程序员宅基地
文章浏览阅读1.7k次,点赞15次,收藏27次。JS 离散点生成等高线图的几种方式_observable plot
Java全栈课程之JavaSE——Java预科阶段_全栈javase项目-程序员宅基地
文章浏览阅读72次。① 系统软件:dos、windows、Linux、unix、Mac、Android、ios。5.广泛应用在:科学计算、数据处理、自动控制、计算机辅助设计、人工智能、网络等领域。2.计算机硬件组成:cpu、主板、内存、电源、主机箱、硬盘、显卡、键盘、鼠标等。2.能够按照程序运行,自动、高速处理海量数据的现代化智能电子设备。4.常见的形式有台式计算机、笔记本计算机、大型计算机等。运算器 控制器。② 应用软件:wps、QQ、微信。输入设备→存储器→输出设备。3.第三代语言:高级语言。_全栈javase项目
Anaconda conda常用命令:从入门到精通_conda命令-程序员宅基地
文章浏览阅读10w+次,点赞286次,收藏1.3k次。简要介绍Anaconda conda的常用命令的使用,掌握了这些基本命令应该足以应付日常的‘生活自理’吧_conda命令
thinkphp6/8 - 超详细使用阿里云短信服务发送验证码功能,TP框架调用对接阿里云短信发验证码(详细示例代码,一键复制开箱即用)_thinkphp6 extend扩展短信扩展类-程序员宅基地
文章浏览阅读2k次,点赞3次,收藏4次。php thinkphp 阿里云短信服务,阿里云短信,tp框架php对接短信服务,tp6对接阿里云短信,tp发送短信控制器,thinkphp6调用阿里云短信服务发送验证码功能实现,thinkphp怎么对接阿里云短信验证码,tp如何使用阿里云短信,tp5/6使用阿里云短信新手详细教程,TP实现生成和校验验证码功能,Thinkphp6对接阿里云短信验证码服务,TP6 对接阿里云短信接口,tp接入阿里云短信报错不生效,thinkPHP6验证码接口,用thinkphp调用阿里云生成验证码的接口,thinkphp6 _thinkphp6 extend扩展短信扩展类
Python ctx-程序员宅基地
文章浏览阅读2.9k次,点赞5次,收藏10次。ctx是context的缩写, 翻译成"上下文; 环境"ctx专门用在静态方法中我们知道python类函数都要带self参数,但是在静态方法中,带ctx参数而不是selfself指的是实例对象; 而ctx用在静态方法中, 调用的时候不需要实例化对象, 直接通过类名就可以调用, 所以self在静态方法中没有意义自定义的forward()方法和backward()方法的第一个参数必须是ctx; ctx可以保存forward()中的变量,以便在backward()中继续使用, 下一条是具体的._python ctx
随便推点
回调函数例子-程序员宅基地
文章浏览阅读1k次。回调函数_回调函数例子
能量俘获阅读【5】- 纳米摩擦发电机之精密传感 - TENG文献阅读- 摩擦电子晶体管传感器用于增强型氢气检测传感装置_纳米摩擦发电机 用于传感-程序员宅基地
文章浏览阅读197次。这篇是近期,国家纳米中心的庞耀坤、陈立波、胡国锋等学者在NANO RESEARCH期刊上发表在Nano Research 上的一篇关于先进氢气监测传感器的文章,英文名称是:Tribotronic transistor sensor for enhanced hydrogen detection 研究团队将ZnO场效应晶体管(FET)与摩擦电纳米发电机在独立模式下耦合,研制了一种新型ZnO摩擦电子晶体管,并将其用作室温下氢气检测传感器。_纳米摩擦发电机 用于传感
python爬虫之Scrapy介绍八——Scrapy-分布式(以爬取京东读书为示例)_京东读书校园版 python-程序员宅基地
文章浏览阅读781次。Scrapy-分布式(scrapy-redis)介绍1 Scrapy-分布式介绍1.1 Scrapy-redis工作原理1.2 Scrapy-redis 安装和基本使用1.2.1 安装1.2.2 基本使用2 Scrapy转为Scrapy-分布式2.1 scrapy爬取京东读书2.2 改为Scrapy-分布式1 Scrapy-分布式介绍1.1 Scrapy-redis工作原理首先回顾一下Scrapy的工作流程,然后进一步介绍Srapy-分布式的工作流程和原理。(1)Scrapy的工作流程详见:pyt_京东读书校园版 python
java后台怎么设置转盘抽奖_[Java教程]转盘抽奖-程序员宅基地
文章浏览阅读492次。[Java教程]转盘抽奖0 2015-09-09 12:00:06html部分 css部分,由于做的这个转盘是手机端的,采用的响应式布局.turntableWap{ padding:1rem; b...
CSP-J 初赛模拟卷4 题解_数组可能无法o(1)完成的操作-程序员宅基地
文章浏览阅读536次,点赞2次,收藏3次。题解:首先先让第一个人选择,第一个人可以选择三间教室中的任意一间,第二个人可以选择剩下三间中的其中一间,第三个人选择剩下两间中的其中一间,最后一个人可以选择任意一间,与第一、第二或第三个人配对。证明:既然有64个叶子,那么就证明最底层有64个结点,树的深度为7,又得深度为k的二叉树至多有2^k-1个结点,把7代入,得2^7-1=128-1=127个结点。题解:二叉树的其中一个性质——n个叶子的完全二叉树最少有2n-1个结点,把64代入公式,得64×2-1=128-1=127个结点。_数组可能无法o(1)完成的操作
python快速学习回忆版本------第八章-3_python123第八单元-程序员宅基地
文章浏览阅读132次。'''int()函数,将字符串转换为整数,默认按照10进制转换,可以设置进制'''print(int("123a",base=16))#大量进行16进制转换def int16(strExption,base=16): return int(strExption,base)print(int16("123ab"))import functools#偏函数#functo..._python123第八单元