ubuntu18.10下面升级wine_ubuntu wine 更新-程序员宅基地
技术标签: wine
Wine, a free compatibility layer to run Windows applications on Linux, released 4.0 stable recently. Here’s how to install it in Ubuntu 18.04, Ubuntu 16.04, Ubuntu 14.04, Linux Mint 18.x and 19.
Wine 4.0 is a big release that features:
- Vulkan support.
- Direct3D 12 support.
- Game controllers support.
- High-DPI support on Android.
- See announcement for more.
The official wine repository offers Ubuntu packages for all current Ubuntu releases, so you can easily install it via following steps:
1. Open terminal from application menu, then run command to enable 32 bit architecture:
sudo dpkg --add-architecture i386
Type user password (no visual feedback) when it prompts and hit Enter.
2. Run command to download and add the repository key:
wget -nc https://dl.winehq.org/wine-builds/winehq.key
sudo apt-key add winehq.key
3. For Ubuntu 18.04, Linux Mint 19.x, run command to add the repository:
sudo apt-add-repository 'deb https://dl.winehq.org/wine-builds/ubuntu/ bionic main'
For other releases, replace bionic in the code with:
- cosmic for Ubuntu 18.10.
- xenial for Ubuntu 16.04, and Linux Mint 18.x.
- trusty for Ubuntu 14.04.
4. Finally check system package cache and install Wine 4.0:
sudo apt-get update
sudo apt-get install --install-recommends winehq-stable
For Ubuntu 18.04 and higher, you can skip apt-get update as it’s done after adding PPA.
How to Use Wine in Ubuntu:
Once installed, you need to generate configuration file by running command:
winecfg
It prompts you to install some libraries and finally launches the configuration dialog.
To run a .exe file, right-click on file, select “Open with Other Application”, and choose “Wine Windows Program Loader”.
Uninstall:
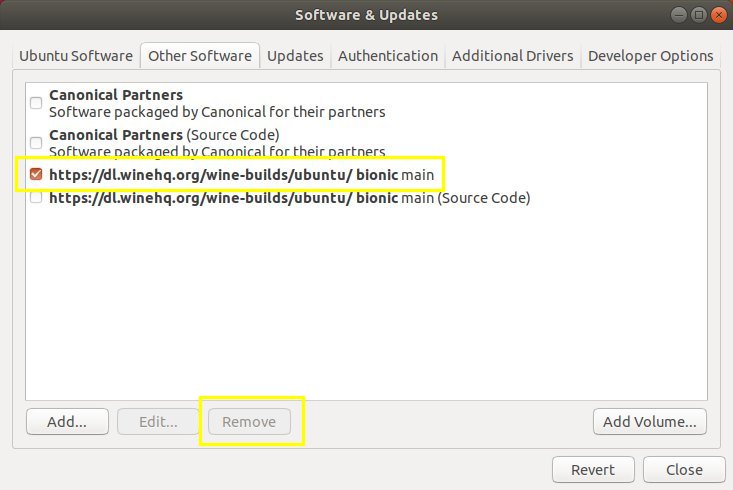
To remove Wine repository, go to Software & Updates -> Other Software, highlight the repository line and remove it.
To remove wine, run command in terminal:
sudo apt-get remove --autoremove wine-stable winehq-stable
智能推荐
Python 入门的60个基础练习_练习python基础语法-程序员宅基地
文章浏览阅读4.2w次,点赞329次,收藏2.7k次。Python 入门的60个基础练习_练习python基础语法
iOS6和iOS7代码的适配(2)——status bar_ios7 statusbar-程序员宅基地
文章浏览阅读1w次。用Xcode5运行一下应用,第一个看到的就是status bar的变化。在iOS6中,status bar是系统在处理,应用_ios7 statusbar
gdb调试时No symbol "var" defined in current context && No Register_no registers调试显示-程序员宅基地
文章浏览阅读2.1k次。问题描述:,在gdb调试程序输出变量:p var,会提示No symbol "var" in current context.原因:程序编译时开启了优化选项,那么在用GDB调试被优化过的程序时,可能会发生某些变量不能访问,或是取值错误码的情况。这个是很正常的,因为优化程序会删改程序,整理程序的语句顺序,剔除一些无意义的变量等,所以在GDB调试这种程序时,运行时的指令和你所编写指_no registers调试显示
IDGeneratorUtil 主键id生成工具类_idgeneratorutils.generateid()-程序员宅基地
文章浏览阅读3.4k次。import java.util.Random;import org.drools.util.UUIDGenerator;/** * * * 类名称:GenerateIdUtil * 类描述: 主键生成工具类 * @author chenly * 创建时间:Jul 10, 2012 8:10:43 AM * 修改人: * 修改时间:Jul 10, 2012 8..._idgeneratorutils.generateid()
关于汇编 BX 和 BLX 跳转指令_汇编blx-程序员宅基地
文章浏览阅读5k次。BX:跳转到寄存器reg给出的目的地址处,如:BX R2BLX:跳转到寄存区reg给出的目的地址处并将返回地址存储到LR(R14)使用这两个指令时有一点特别需要注意:跳转的目的地址必须是奇数,若不是奇数则在后面加1,如某函数的起始地址是0x80000f00,则要跳转到此函数则应该跳转到0x80000f01处!否则会进入硬件错误中断!..._汇编blx
前端vue,打包整合进后端springboot的resources里面后,运行只要刷新就报404_前端项目放入resource-程序员宅基地
文章浏览阅读2.6k次,点赞2次,收藏4次。vue打包后,其实就剩index.html和一堆静态资源,页面的加载和替换都是通过刷新index.html种的dom来实现的(应该是这样,可能表述不是很好),所以做个重定向就可以了。(博主是这么解决的,网上还有很多人是各种路径错误,大家可以尝试下自己是哪个原因)import org.springframework.boot.web.server.ConfigurableWebServerFa..._前端项目放入resource
随便推点
添加远程github仓库时报错 Warning: Permanently added the RSA host key for IP address 52.74.223.119_cmd warning: permanently added-程序员宅基地
文章浏览阅读9.7k次。1.问题展示2.解决方案1.任意窗口, 打开git bash2.命令行界面, 输入cd C:3.cat ~/.ssh/id_rsa.pub正常下面应该显示一大串公钥如果没有,显示如下图, 则进行下一步, 创建公钥4.创建公钥, 输入 ssh-keygen5.然后一直下一步, 直到出现6.再次输入cat ~/.ssh/id_rsa.pub下面一大串数字便是公钥,复制这些字符串, 打开github, 点击头像, 打开settings, 打开SSH and GPG Keys_cmd warning: permanently added
SQL*Plus 使用技巧1-程序员宅基地
文章浏览阅读154次。[code="java"]1. SQL/Plus 常用命令 a. help [topic] 查看命令的使用方法,topic表示需要查看的命令名称。 如: help desc; b. host 该命令可以从SQL*Plus环境切换到操作系统环境,以便执行操作系统命名。 c. host [command] 在sql*plus环境中执行操作系统命令,如:host notepad.exe..._sql+plus的使用方法
域控服务器搭建与管理论文,校园网络服务器的配置与管理 毕业论文.doc-程序员宅基地
文章浏览阅读441次。该文档均来自互联网,如果侵犯了您的个人权益,请联系我们将立即删除!**学校毕 业 论 文**学校园网络服务器的配置与管理姓 名: **学 号: **指导老师:系 名:专 业: 计算机网络技术班 级:二0一一年十二月十五日摘 要随着网络技术的不断发展和Internet的日益普及,许多学校都建立了校园网络并投入使用,这无疑对加快信息处理,提高工作效..._服务器配置与应用论文
mysql单实例多库与多实例单库_数据库单实例和多实例-程序员宅基地
文章浏览阅读1k次。一、单实例多库:一个mysql实例,创建多个数据目录。规划:实例路径:/usr/local/mysql数据目录路径:(1)/usr/local/mysql/data(2)/usr/local/mysql/data2步骤:安装mysql。配置my.cnf文件。初始化各个数据库。用mysqld_multi启动。1、安装mysql。平常安装。2、m..._数据库单实例和多实例
MFC解决找不到MFC90.DLL的问题_microsoft v90.debugmfc-程序员宅基地
文章浏览阅读6.3k次。今天装了第三方的MFC软件库Xtreme ToolkitPro v15.0.1,听说搞MFC的人都知道它的强大,我刚学习,所以装了一个,然后想运行一下它自带的例子看看。出现一个“找不到mfc90.dll“的问题,百度一下,记录如下:vs2008已经打过sp1补丁,编译C++程序会提示找不到mfc90.dll文件的错误,但是如果是release版的话就能正常运行csdn看到解决方案,粘贴_microsoft v90.debugmfc
XeLaTeX-中文排版解决方案_latex 中文排版 texlive-程序员宅基地
文章浏览阅读2.1k次。以前使用CJK进行中文的排版,需要自己生成字体库,近日,出现了XeTeX,可以比较好的解决中文字体问题,不需要额外生成LaTeX字体库,直接使用计算机系统里的字体,本文以在Linux下为例说明XeTeX的使用。操作系统: UbuntuTeX:除了texlive包外,还需要安装的包是texlive-xetex。字体:可以使用fc-list查看你自己的字体库,注意字体的完整名称,在XeTe..._latex 中文排版 texlive