three.js 交互_如何使用Three.js创建交互式3D角色-程序员宅基地
技术标签: ViewUI java webgl html javascript 游戏开发
three.js 交互
Ever had a personal website dedicated to your work and wondered if you should include a photo of yourself in there somewhere? I recently figured I’d go a couple steps further and added a fully interactive 3D version of myself that watched the user’s cursor as they navigated around my screen. And ass if that wasn’t enough, you could even click on me and I’d do stuff. This tutorial shows you how to do the same with a model we chose named Stacy.
曾经有一个专门针对您的工作的个人网站,并且想知道您是否应该在其中放置自己的照片吗? 最近,我想我可以再走几步,并添加了一个完全交互式的3D版本的自己,当用户在我的屏幕上浏览时,它会看着用户的光标。 而且这还不够,你甚至可以点击我,我会做的。 本教程向您展示如何对我们选择的名为Stacy的模型执行相同的操作。
Here’s the demo (click on Stacy, and move your mouse around the Pen to watch her follow it).
这是演示(单击Stacy,然后在Pen上移动鼠标以观看她的操作)。
We’re going to use Three.js, and I’m going to assume you have a handle on JavaScript.
我们将使用Three.js,并且假设您对JavaScript有所了解。
See the Pen Character Tutorial – Final by Kyle Wetton (@kylewetton) on CodePen.
请参阅CodePen上的Kyle Wetton( @kylewetton )的笔字符教程-最终版本。
The model we use has ten animations loaded into it, at the bottom of this tutorial, I’ll explain how its set up. This is done in Blender and the animations are from Adobe’s free animation repo, Mixamo.
我们使用的模型已加载了十个动画,在本教程的底部,我将说明其设置方法。 这是在Blender中完成的,动画来自Adobe的免费动画仓库Mixamo 。
第1部分:HTML和CSS项目入门 (Part 1: HTML and CSS Project Starter)
Let’s get the small amount of HTML and CSS out of the way. This pen has everything you need. Follow along by forking this pen, or copy the HTML and CSS from here into a blank project elsewhere.
让我们排除少量HTML和CSS。 这支笔拥有您所需的一切。 跟随这支笔,或者将HTML和CSS从此处复制到其他地方的空白项目中。
See the Pen Character Tutorial – Blank by Kyle Wetton (@kylewetton) on CodePen.
见钢笔字教程-空白凯尔Wetton( @kylewetton )上CodePen 。
Our HTML consists of a loading animation (currently commented out until we need it), a wrapper div and our all-important canvas element. The canvas is what Three.js uses to render our scene, and the CSS sets this at 100% viewport size. We also load in two dependencies at the bottom of our HTML file: Three.js, and GLTFLoader (GLTF is the format that our 3D model is imported as). Both of these dependencies are available as npm modules.
我们HTML包含一个加载动画(当前被注释掉,直到需要使用它),一个包装div和我们所有重要的canvas元素。 画布是Three.js用于渲染场景的工具,CSS将其设置为100%视口大小。 我们还在HTML文件的底部加载了两个依赖项:Three.js和GLTFLoader(GLTF是导入3D模型的格式)。 这两个依赖项都可以作为npm模块使用。
The CSS also consists of a small amount of centering styling and the rest is just the loading animation; really nothing more to it than that. You can now collapse your HTML and CSS panels, we will delve into that very little for the rest of the tutorial.
CSS还包含少量居中样式,其余只是加载动画。 真的,仅此而已。 现在,您可以折叠HTML和CSS面板,在本教程的其余部分中,我们将对此进行深入研究。
第2部分:构建场景 (Part 2: Building our Scene)
In my last tutorial, I found myself making you run up and down your file adding variables at the top that needed to be shared in a few different places. This time I’m going to give all of these to you upfront, and I’ll let you know when we use them. I’ve included explanations of what each are if you’re curious. So, our project starts like this. In your JavaScript add these variables. Note that because there is a bit at work here that would otherwise be in global scope, we’re wrapping our entire project in a function:
在上一教程中,我发现自己让您在文件中上下运行,并在顶部添加了需要在几个不同位置共享的变量。 这次,我将把所有这些预先提供给您,当我们使用它们时,我会通知您。 如果您有好奇心,我已经提供了每个解释。 因此,我们的项目就是这样开始的。 在您JavaScript中添加这些变量。 请注意,因为这里有些工作本来应该在全局范围内进行,所以我们将整个项目包装在一个函数中:
(function() {
// Set our main variables
let scene,
  renderer,
  camera,
  model,                              // Our character
  neck,                               // Reference to the neck bone in the skeleton
  waist,                               // Reference to the waist bone in the skeleton
  possibleAnims,                      // Animations found in our file
  mixer,                              // THREE.js animations mixer
  idle,                               // Idle, the default state our character returns to
  clock = new THREE.Clock(),          // Used for anims, which run to a clock instead of frame rate
  currentlyAnimating = false,         // Used to check whether characters neck is being used in another anim
  raycaster = new THREE.Raycaster(),  // Used to detect the click on our character
  loaderAnim = document.getElementById('js-loader');

})(); // Don't add anything below this line
We’re going to set up Three.js. This consists of a scene, a renderer, a camera, lights, and an update function. The update function runs on every frame.
我们将设置Three.js。 它由一个场景,一个渲染器,一个照相机,灯光和一个更新功能组成。 更新功能在每一帧上运行。
Let’s do all this inside an init() function. Under our variables, and inside our function scope, we add our init function:
让我们在init()函数中完成所有这些操作。 在变量下,在函数范围内,我们添加init函数:
init();

function init() {

}
Inside our init function, let’s reference our canvas element and set our background color, I’ve gone for a very light grey for this tutorial. Note that Three.js doesn’t reference colors in a string like so “#f1f1f1”, but rather a hexadecimal integer like 0xf1f1f1.
在我们的init函数中,让我们引用我们的canvas元素并设置我们的背景色,在本教程中,我已经选择了非常浅的灰色。 请注意,Three.js不会像“#f1f1f1”这样的字符串中引用颜色,而是像0xf1f1f1这样的十六进制整数。
const canvas = document.querySelector('#c');
const backgroundColor = 0xf1f1f1;
Below that, let’s create a new Scene. Here we set the background color, and we’re also going to add some fog. This isn’t that visible in this tutorial, but if your floor and background color are different, it can come in handy to blur those together.
在此之下,让我们创建一个新场景。 在这里,我们设置背景色,并且还将添加一些雾。 这在本教程中并不明显,但是如果您的背景色和背景色不同,则可以方便地将它们模糊在一起。
// Init the scene
scene = new THREE.Scene();
scene.background = new THREE.Color(backgroundColor);
scene.fog = new THREE.Fog(backgroundColor, 60, 100);
Next up is the renderer, we create a new renderer and pass an object with the canvas reference and other options. The only option we’re using here is that we’re enabling antialiasing. We enable shadowMap so that our character can cast a shadow, and we set the pixel ratio to be that of the device, this is so that mobile devices render correctly. The canvas will display pixelated on high density screens otherwise. Finally, we add our renderer to our document body.
接下来是渲染器,我们创建一个新的渲染器,并通过画布引用和其他选项传递一个对象。 我们在这里使用的唯一选项是启用抗锯齿。 我们启用shadowMap,以便我们的角色可以投射阴影,并将像素比设置为设备的像素比,这样移动设备才能正确渲染。 否则,画布将在高密度屏幕上显示像素化。 最后,我们将渲染器添加到文档主体中。
// Init the renderer
renderer = new THREE.WebGLRenderer({ canvas, antialias: true });
renderer.shadowMap.enabled = true;
renderer.setPixelRatio(window.devicePixelRatio);
document.body.appendChild(renderer.domElement);
That covers the first two things that Three.js needs. Next up is a camera. Let’s create a new perspective camera. We’re setting the field of view to 50, the size to that of the window, and the near and far clipping planes are the default. After that, we’re positioning the camera to be 30 units back, and 3 units down. This will become more obvious later. All of this can be experimented with, but I recommend using these settings for now.
这涵盖了Three.js需要的前两件事。 接下来是相机。 让我们创建一个新的透视相机。 我们将视场设置为50,将窗口的大小设置为窗口的大小,默认设置为近和远剪切平面。 之后,我们将摄像机定位在向后30个单位和向后3个单位的位置。 这将在以后变得更加明显。 可以尝试所有这些设置,但是我建议暂时使用这些设置。
// Add a camera
camera = new THREE.PerspectiveCamera(
  50,
  window.innerWidth / window.innerHeight,
  0.1,
  1000
);
camera.position.z = 30
camera.position.x = 0;
camera.position.y = -3;
Note that scene, renderer and camera are initially referenced at the top of our project.
请注意,场景,渲染器和摄影机最初是在我们项目的顶部引用的。
Without lights our camera has nothing to display. We’re going to create two lights, a hemisphere light, and a directional light. We then add them to the scene using scene.add(light).
没有灯光,我们的相机将无法显示。 我们将创建两个光源,一个半球光源和一个定向光源。 然后,我们使用scene.add( light )将它们添加到场景中。
Let’s add our lights under the camera. I’ll explain a bit more about what we’re doing afterwards:
让我们在相机下添加灯光。 我将进一步解释我们之后的工作:
// Add lights
let hemiLight = new THREE.HemisphereLight(0xffffff, 0xffffff, 0.61);
hemiLight.position.set(0, 50, 0);
// Add hemisphere light to scene
scene.add(hemiLight);

let d = 8.25;
let dirLight = new THREE.DirectionalLight(0xffffff, 0.54);
dirLight.position.set(-8, 12, 8);
dirLight.castShadow = true;
dirLight.shadow.mapSize = new THREE.Vector2(1024, 1024);
dirLight.shadow.camera.near = 0.1;
dirLight.shadow.camera.far = 1500;
dirLight.shadow.camera.left = d * -1;
dirLight.shadow.camera.right = d;
dirLight.shadow.camera.top = d;
dirLight.shadow.camera.bottom = d * -1;
// Add directional Light to scene
scene.add(dirLight);
The hemisphere light is just casting white light, and its intensity is at 0.61. We also set its position 50 units above our center point; feel free to experiment with this later.
半球光只是投射白光,其强度为0.61。 我们还将其位置设置为比中心点高50个单位。 请稍后再尝试。
Our directional light needs a position set; the one I’ve chosen feels right, so let’s start with that. We enable the ability to cast a shadow, and set the shadow resolution. The rest of the shadows relate to the lights view of the world, this gets a bit vague to me, but its enough to know that the variable d can be adjusted until your shadows aren’t clipping in strange places.
我们的定向灯需要定位。 我选择的那种感觉不错,所以让我们开始吧。 我们启用了投射阴影并设置阴影分辨率的功能。 阴影的其余部分与世界的灯光视图有关,这对我来说有点模糊,但足以知道可以调整变量d,直到您的阴影不会在陌生的地方修剪为止。
While we’re here in our init function, lets add our floor:
当我们在这里使用init函数时,让我们添加地板:
// Floor
let floorGeometry = new THREE.PlaneGeometry(5000, 5000, 1, 1);
let floorMaterial = new THREE.MeshPhongMaterial({
  color: 0xeeeeee,
  shininess: 0,
});

let floor = new THREE.Mesh(floorGeometry, floorMaterial);
floor.rotation.x = -0.5 * Math.PI; // This is 90 degrees by the way
floor.receiveShadow = true;
floor.position.y = -11;
scene.add(floor);
What we’re doing here is creating a new plane geometry, which is big: it’s 5000 units (for no particular reason at all other than it really ensures our seamless background).
我们在这里所做的是创建一个新的平面几何图形,该几何图形非常大:它有5000个单位(除了真正确保我们无缝背景之外,没有其他特殊原因)。
We then create a material for our scene. This is new. We only have a couple different materials in this tutorial, but it’s enough to know for now that you combine geometry and materials into a mesh, and this mesh is a 3D object in our scene. The mesh we’re making now is a really big, flat plane rotated to be flat on the ground (well, it is the ground). Its color is set to 0xeeeeee which is slightly darker than our background. Why? Because our lights shine on this floor, but our lights don’t affect the background. This is a color I manually tweaked in to give us the seamless scene. Play around with it once we’re done.
然后,我们为场景创建材质。 这是新的。 在本教程中,我们只有几种不同的材质,但是现在您已经足够知道将几何体和材质组合成一个网格,并且该网格是场景中的3D对象。 我们现在制作的网格是一个非常大的平面,旋转后可以在地面上平坦(嗯,它是地面)。 颜色设置为0xeeeeee,比我们的背景略深。 为什么? 因为我们的灯光照在这个地板上,但是我们的灯光不会影响背景。 我手动对其进行了调整,以提供无缝的场景。 一旦完成,请尝试一下。
Our floor is a Mesh which combines the Geometry and Material. Read through what we just added, I think you’ll find that everything is self explanatory. We’re moving our floor down 11 units, this will make sense once we load in our character.
我们的地板是结合了几何和材质的网格。 通读我们刚刚添加的内容,我想您会发现所有内容都是不言而喻的。 我们正在将地板向下移动11个单位,这将在加载角色时有意义。
That’s it for our init() function for now.
现在就是我们的init()函数。
One crucial aspect that Three.js relies on is an update function, which runs every frame, and is similar to how game engines work if you’ve ever dabbled with Unity. This function needs to be placed after our init() function instead of inside it. Inside our update function the renderer renders the scene and camera, and the update is run again. Note that we immediately call the function after the function itself.
Three.js依赖的一个关键方面是更新功能,该功能在每一帧运行,并且与您曾经涉足Unity的游戏引擎的工作方式类似。 此函数需要放置在我们的init()函数之后,而不是放在其内部。 在我们的更新功能中,渲染器渲染场景和相机,然后再次运行更新。 请注意,我们会在函数本身之后立即调用该函数。
function update() {
  renderer.render(scene, camera);
  requestAnimationFrame(update);
}
update();
Our scene should now turn on. The canvas is rendering a light grey; what we’re actually seeing here is both the background and the floor. You can test this out by changing the floors material color to 0xff0000. Remember to change it back though!
现在,我们的场景应该打开了。 画布呈现浅灰色; 我们在这里实际看到的是背景和地板。 您可以通过将地板材料的颜色更改为0xff0000来进行测试。 记住要改回来!
We’re going to load the model in the next part. Before we do though, there is one more thing our scene needs. The canvas as an HTML element will resize just fine the way it is, the height and width is set to 100% in CSS. But, the scene needs to be aware of resizes too so that it can keep everything in proportion. Below where we call our update function (not inside it), add this function. Read it carefully if you’d like, but essentially what it’s doing is constantly checking whether our renderer is the same size as our canvas, as soon as it’s not, it returns needResize as a boolean.
我们将在下一部分中加载模型。 在此之前,我们的场景还需要做一件事。 作为HTML元素的画布将按原样调整大小,在CSS中将高度和宽度设置为100%。 但是,场景也需要注意调整大小,以便可以使所有内容保持比例。 在我们称为更新函数的位置下方(而不是内部),添加此函数。 如果需要,请仔细阅读,但实际上,它的作用是不断检查渲染器的大小是否与画布相同,如果不相同,它将以布尔值形式返回needResize 。
function resizeRendererToDisplaySize(renderer) {
  const canvas = renderer.domElement;
  let width = window.innerWidth;
  let height = window.innerHeight;
  let canvasPixelWidth = canvas.width / window.devicePixelRatio;
  let canvasPixelHeight = canvas.height / window.devicePixelRatio;

  const needResize =
    canvasPixelWidth !== width || canvasPixelHeight !== height;
  if (needResize) {
    renderer.setSize(width, height, false);
  }
  return needResize;
}
We’re going to use this inside our update function. Find these lines:
我们将在更新函数中使用它。 找到这些行:
renderer.render(scene, camera);
requestAnimationFrame(update);
ABOVE these lines, we’re going to check if we need a resize by calling our function, and updating the cameras aspect ratio to match the new size.
在这些行上方,我们将通过调用函数并更新相机的宽高比以匹配新的尺寸来检查是否需要调整尺寸。
if (resizeRendererToDisplaySize(renderer)) {
  const canvas = renderer.domElement;
  camera.aspect = canvas.clientWidth / canvas.clientHeight;
  camera.updateProjectionMatrix();
}
Our full update function should now look like this:
现在,我们的完整更新功能应如下所示:
function update() {

  if (resizeRendererToDisplaySize(renderer)) {
    const canvas = renderer.domElement;
    camera.aspect = canvas.clientWidth / canvas.clientHeight;
    camera.updateProjectionMatrix();
  }
  renderer.render(scene, camera);
  requestAnimationFrame(update);
}

update();

function resizeRendererToDisplaySize(renderer) { ... }
Here’s our project in its entirety so far. Next up we’re going to load the model.
到目前为止,这是我们整个项目。 接下来,我们将加载模型。
See the Pen Character Tutorial – Round 1 by Kyle Wetton (@kylewetton) on CodePen.
见钢笔字教程-第1轮由凯尔Wetton( @kylewetton )上CodePen 。
第3部分:添加模型 (Part 3: Adding the Model)
Our scene is super sparse, but it’s set up and we’ve got our resizing sorted, our lights and camera are working. Let’s add the model.
我们的场景非常稀疏,但是已经设置好了,并且调整了大小,灯光和相机正在工作。 让我们添加模型。
Right at the top of our init() function, before we reference our canvas, let’s reference the model file. This is in the GLTf format (.glb), Three.js support a range of 3D model formats, but this is the format it recommends. We’re going to use our GLTFLoader dependency to load this model into our scene.
在init()函数顶部,在引用画布之前,让我们先引用模型文件。 这是GLTf格式(.glb),Three.js支持多种3D模型格式,但这是它推荐的格式。 我们将使用GLTFLoader依赖项将此模型加载到场景中。
const MODEL_PATH = 'https://s3-us-west-2.amazonaws.com/s.cdpn.io/1376484/stacy_lightweight.glb';Still inside our init() function, below our camera setup, let’s create a new loader:
仍然在相机设置下面的init()函数中,让我们创建一个新的加载器:
var loader = new THREE.GLTFLoader();This loader uses a method called load. It takes four arguments: the model path, a function to call once the model is loaded, a function to call during the loading, and a function to catch errors.
该加载器使用一种称为load的方法。 它包含四个参数:模型路径,加载模型后调用的函数,加载过程中调用的函数以及捕获错误的函数。
Lets add this now:
现在添加:
var loader = new THREE.GLTFLoader();

loader.load(
  MODEL_PATH,
  function(gltf) {
   // A lot is going to happen here
  },
  undefined, // We don't need this function
  function(error) {
    console.error(error);
  }
);
Notice the comment “A lot is going to happen here”, this is the function that runs once our model is loaded. Everything going forward is added inside this function unless I mention otherwise.
请注意注释“这里将发生很多事情”,这是在加载模型后运行的功能。 除非另有说明,否则所有后续操作都将添加到此函数中。
The GLTF file itself (passed into the function as the variable gltf) has two parts to it, the scene inside the file (gltf.scene), and the animations (gltf.animations). Let’s reference both of these at the top of this function, and then add the model to the scene:
GLTF文件本身(作为变量gltf传递到函数中)包括两个部分,文件内部的场景(gltf.scene)和动画(gltf.animations)。 让我们在函数顶部引用这两个方法,然后将模型添加到场景中:
model = gltf.scene;
let fileAnimations = gltf.animations;

scene.add(model);
Our full loader.load function so far looks like this:
到目前为止,我们完整的loader.load函数如下所示:
loader.load(
  MODEL_PATH,
  function(gltf) {
  // A lot is going to happen here
    model = gltf.scene;
    let fileAnimations = gltf.animations;

    scene.add(model);

  },
  undefined, // We don't need this function
  function(error) {
    console.error(error);
  }
);
Note that model is already initialized at the top of our project.
请注意,模型已经在我们项目的顶部进行了初始化。
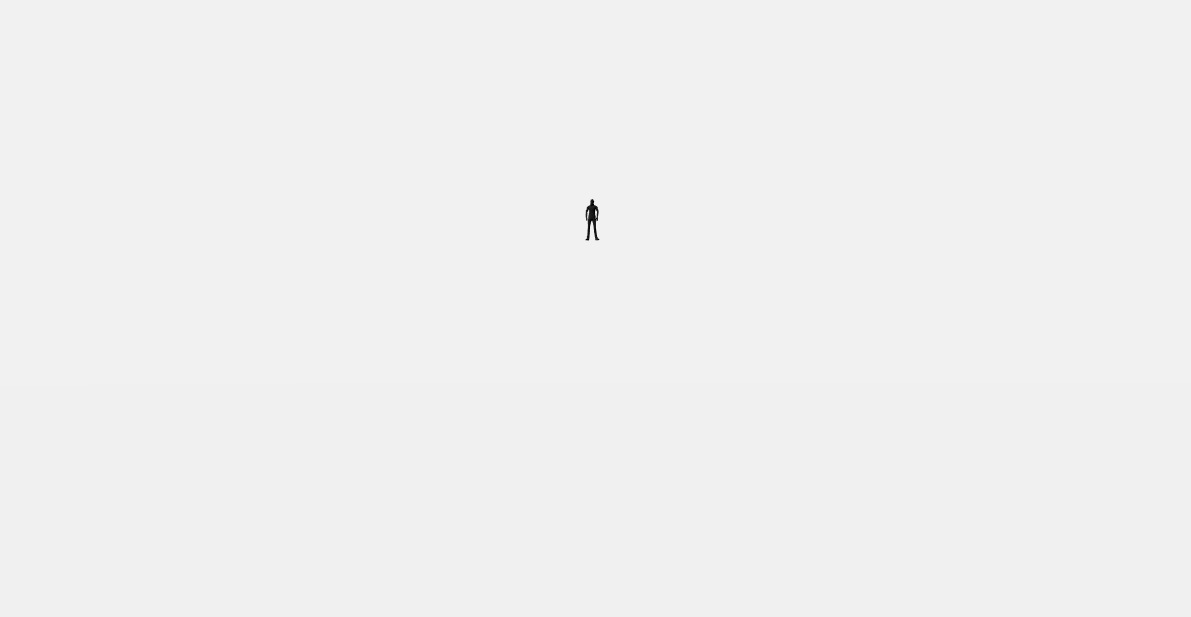
You should now see a small figure in our scene.
您现在应该在我们的场景中看到一个小人物。
A couple of things here:
这里有几件事:
- Our model is really small; 3D models are like vectors, you can scale them without any loss of definition; Mixamo outputs the model really small, and for that reason we will need to scale it up. 我们的模型很小。 3D模型就像矢量一样,您可以缩放它们而不会丢失任何定义; Mixamo输出的模型非常小,因此,我们将需要扩大模型。
- You can include textures inside a GLTF model, there are a number of reasons why I didn’t, the first is that decoupling them allows for smaller file sizes when hosting the assets, the other is to do with color space and I cover that more in the section at the bottom of this tutorial which deals with how to set 3D models up. 您可以在GLTF模型中包含纹理,但我之所以没有这样做,有很多原因,首先是去耦它们可以在托管资产时允许较小的文件大小,其二是与色彩空间有关,我将介绍更多在本教程底部的部分中,该部分涉及如何设置3D模型。
We added our model prematurely, so above scene.add(model), let’s do a couple more things.
我们过早地添加了我们的模型,因此在scene.add(model)之上,让我们做更多的事情。
First of all, we’re going to use the model’s traverse method to find all the meshs, and enabled the ability to cast and receive shadows. This is done like this. Again, this should go above scene.add(model):
首先,我们将使用模型的遍历方法查找所有网格,并启用投射和接收阴影的功能。 这样做是这样的。 同样,这应该超出scene.add(model):
model.traverse(o => {
  if (o.isMesh) {
    o.castShadow = true;
    o.receiveShadow = true;
  }
});
Then, we’re going to set the model’s scale to a uniformed 7x its initial size. Add this below our traverse method:
然后,我们将模型的比例尺设置为其初始尺寸的统一7倍。 将其添加到我们的遍历方法下面:
// Set the models initial scale
model.scale.set(7, 7, 7);
And finally, let’s move the model down by 11 units so that it’s standing on the floor.
最后,让我们将模型向下移动11个单位,使其站在地板上。
model.position.y = -11;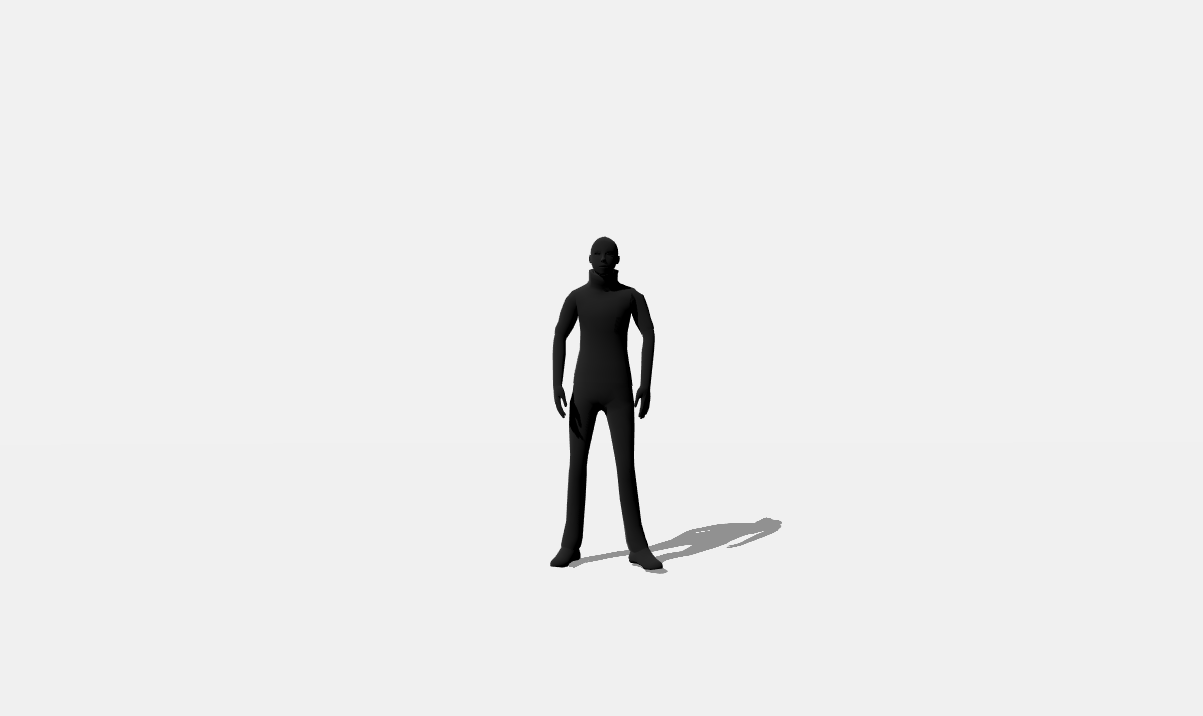
Perfect, we’ve loaded in our model. Let’s now load in the texture and apply it. This model came with the texture and the model has been mapped to this texture in Blender. This process is called UV mapping. Feel free to download the image itself to look at it, and learn more about UV mapping if you’d like to explore the idea of making your own character.
完美,我们已经加载了模型。 现在让我们加载纹理并应用它。 该模型附带纹理,并且该模型已在Blender中映射到该纹理。 此过程称为UV映射。 如果您想探索制作自己的角色的想法,请随意下载图像以进行查看,并了解有关UV贴图的更多信息。
We referenced the loader earlier; let’s create a new texture and material above this reference:
我们之前引用了加载器; 让我们在此参考上方创建新的纹理和材质:
let stacy_txt = new THREE.TextureLoader().load('https://s3-us-west-2.amazonaws.com/s.cdpn.io/1376484/stacy.jpg');

stacy_txt.flipY = false; // we flip the texture so that its the right way up

const stacy_mtl = new THREE.MeshPhongMaterial({
  map: stacy_txt,
  color: 0xffffff,
  skinning: true
});

// We've loaded this earlier
var loader - new THREE.GLTFLoader()
Lets look at this for a second. Our texture can’t just be a URL to an image, it needs to be loaded in as a new texture using TextureLoader. We set this to a variable called stacy_txt.
让我们先看一下。 我们的纹理不仅可以作为图像的URL,还需要使用TextureLoader将其作为新纹理加载。 我们将其设置为一个名为stacy_txt的变量。
We’ve used materials before. This was placed on our floor with the color 0xeeeeee, we’re using a couple of new options here for our models material. Firstly, we’re passing the stacy_txt texture to the map property. Secondly we are turning skinning on, this is critical for animated models. We reference this material with stacy_mtl.
我们以前用过材料。 它以0xeeeeee颜色放置在我们的地板上,我们在此处为模型材料使用了几个新选项。 首先,我们将stacy_txt纹理传递给map属性。 其次,我们要启用蒙皮功能,这对于动画模型至关重要。 我们使用stacy_mtl引用此材料。
Okay, so we’ve got our textured material, our files scene (gltf.scene) only has one object, so, in our traverse method, let’s add one more line under the lines that enabled our object to cast and receive shadows:
好的,我们有了纹理材质,文件场景(gltf.scene)仅包含一个对象,因此,在遍历方法中,让我们在允许对象投射和接收阴影的线下再添加一行:
model.traverse(o => {
 if (o.isMesh) {
   o.castShadow = true;
   o.receiveShadow = true;
   o.material = stacy_mtl; // Add this line
 }
});
Just like that, our model has become the fully realized character, Stacy.
就像那样,我们的模型已成为完全实现的角色Stacy。
She’s a little lifeless though. The next section will deal with animations, but now that you’ve handled geometry and materials, let’s use what we’ve learned to make the scene a little more interesting. Scroll down to where you added your floor, I’ll meet you there.
她虽然有点死气沉沉。 下一节将讨论动画,但是既然您已经处理了几何和材质,那么让我们使用我们学到的知识使场景更加有趣。 向下滚动到添加楼层的位置,我在那里见。
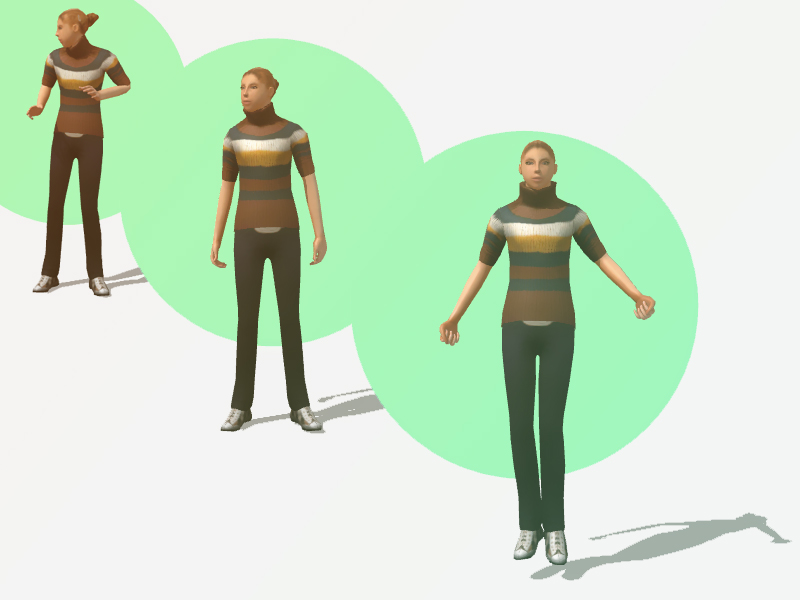
Below your floor, as the final lines of your init() function, let’s add a circle accent. This is really a 3D sphere, quite big but far away, that uses a BasicMaterial. The materials we’ve used previously are called PhongMaterials which can be shiny, and also most importantly can receive and cast shadows. A BasicMaterial however, can not. So, add this sphere to your scene to create a flat circle that frames Stacy better.
在您的地板下面,作为init()函数的最后几行,让我们添加一个圆形重音符号。 这实际上是一个使用BasicMaterial的3D球体,虽然很大但很远。 我们之前使用的材料称为PhongMaterials,它可以发亮,而且最重要的是可以接收和投射阴影。 但是,BasicMaterial不能。 因此,将此球体添加到场景中以创建一个可以更好地构架Stacy的平面圆。
let geometry = new THREE.SphereGeometry(8, 32, 32);
let material = new THREE.MeshBasicMaterial({ color: 0x9bffaf }); // 0xf2ce2e
let sphere = new THREE.Mesh(geometry, material);
sphere.position.z = -15;
sphere.position.y = -2.5;
sphere.position.x = -0.25;
scene.add(sphere);
Change the color to whatever you want!
将颜色更改为您想要的任何颜色!
第4部分:动画风格 (Part 4: Animating Stacy)
Before we get started, you may have noticed that Stacy takes a while to load. This can cause confusion because before she loads, all we see is a colored dot in the middle of the page. I mentioned that in our HTML we had a loader that was commented out. Head to the HTML and uncomment this markup.
在开始之前,您可能已经注意到Stacy需要花费一些时间来加载。 这可能会造成混乱,因为在加载之前,我们只能看到页面中间的一个彩色圆点。 我提到过,在我们HTML中,有一个被注释掉的加载器。 转到HTML并取消注释此标记。
<!-- The loading element overlays everything else until the model is loaded, at which point we remove this element from the DOM -->
<div class="loading" id="js-loader"><div class="loader"></div></div>
Then again in our loader function, once the model has been added into the scene with scene.add(model), add this line below it. loaderAnim has already been referenced at the top of our project.
然后再次在我们的加载器函数中,将模型通过scene.add(model)添加到场景中之后,在其下方添加此行。 loaderAnim已在我们项目的顶部引用。
loaderAnim.remove();All we’re doing here is removing the loading animation overlay once Stacy has been added to the scene. Save and then refresh, you should see the loader until the page is ready to show Stacy. If the model is cached, the page might load too quickly to see it.
一旦Stacy添加到场景中,我们要做的就是删除加载动画叠加层。 保存然后刷新,您应该会看到加载程序,直到页面准备显示Stacy。 如果模型被缓存,页面加载可能太快而看不到它。
Anyway, onto animating!
无论如何,动画!
We’re still in our loader function, we’re going to create a new AnimationMixer, an AnimationMixer is a player for animations on a particular object in the scene. Some of this might look foreign, and is potentially outside of the scope of this tutorial, but if you’d like to know more, check out the Three.js docs page on the AnimationMixer. You won’t need to know more than what we handle here to complete the tutorial.
我们仍然处于加载器功能中,我们将创建一个新的AnimationMixer,AnimationMixer是用于场景中特定对象的动画播放器。 其中一些可能看起来很陌生,并且可能超出了本教程的范围,但是如果您想了解更多信息,请查看AnimationMixer上的Three.js文档页面。 完成本教程,您不需要了解更多信息。
Add this below the line that removes the loader, and pass in our model:
将其添加到删除加载器的行下方,然后传递我们的模型:
mixer = new THREE.AnimationMixer(model);Note that mixer is referenced at the top of our project.
请注意,混音器在我们项目的顶部引用。
Below this line, we’re going to create a new AnimationClip, we’re looking inside our fileAnimations to find an animation called ‘idle’. This name was set inside Blender.
在此行下面,我们将创建一个新的AnimationClip,我们在fileAnimations内部查找一个名为“ idle”的动画。 此名称是在Blender中设置的。
let idleAnim = THREE.AnimationClip.findByName(fileAnimations, 'idle');We then use a method in our mixer called clipAction, and pass in our idleAnim. We call this clipAction idle.
然后,我们在混合器中使用一个名为clipAction的方法,并传入我们的idleAnim。 我们称这个clipAction空闲。
Finally, we tell idle to play:
最后,我们告诉空闲玩家:
idle = mixer.clipAction(idleAnim);
idle.play();
It’s not going play yet though, we do need one more thing. The mixer needs to be updated in order for it to run continuously through an animation. In order to do this, we need to tell it to update inside our update() function. Add this right at the top, above our resizing check:
不过,这还没有开始,我们还需要一件事。 需要对混合器进行更新,以使其能够通过动画连续运行。 为了做到这一点,我们需要告诉它在我们的update()函数中进行更新。 在调整大小检查上方的顶部添加此权限:
if (mixer) {
  mixer.update(clock.getDelta());
}
The update takes our clock (a Clock was referenced at the top of our project) and updates it to that clock. This is so that animations don’t slow down if the frame rate slows down. If you run an animation to a frame rate, it’s tied to the frames to determine how fast or slow it runs, that’s not what you want.
此更新将占用我们的时钟(在项目顶部引用了Clock)并将其更新为该时钟。 这样一来,如果帧频变慢,动画就不会变慢。 如果以帧速率运行动画,则动画会与帧绑定以确定动画运行的快慢,这不是您想要的。

Stacy should be happily swaying side by side! Great job! This is only one of 10 animations loaded inside our model file though, soon we will pick a random animation to play when you click on Stacy, but next up, let’s make our model even more alive by having her head and body point toward our cursor.
斯泰西应该幸福地并肩摇曳! 很好! 不过,这只是载入到模型文件中的10个动画中的一个,很快,当您单击Stacy时,我们将选择一个随机动画播放,但是接下来,让我们通过将其头部和身体指向光标来使我们的模型更加生动。
第5部分:观察我们的光标 (Part 5: Looking at our Cursor)
If you don’t know much about 3D (or even 2D animation in most cases), the way it works is that there is a skeleton (or an array of bones) that warp the mesh. These bones position, scale and rotation are animated across time to warp and move our mesh in interesting ways. We’re going to hook into Stacys skeleton (ek) and reference her neck bone and her bottom spine bone. We’re then going to rotate these bones depending on where the cursor is relative to the middle of the screen. In order for us to do this though, we need to tell our current idle animation to ignore these two bones. Let’s get started.
如果您对3D(在大多数情况下甚至是2D动画)了解不多,那么它的工作方式就是有一个扭曲网格的骨架(或骨骼阵列)。 这些骨骼的位置,比例和旋转会随时间变化,以有趣的方式扭曲和移动网格。 我们将使用Stacys骨架(ek),并参考她的颈骨和底部的脊椎骨。 然后,我们将根据光标相对于屏幕中间的位置来旋转这些骨骼。 为了使我们能够做到这一点,我们需要告诉当前的空闲动画忽略这两个骨骼。 让我们开始吧。
Remember that part in our model traverse method where we said if (o.isMesh) { … set shadows ..}? In this traverse method (don’t do this), you can also use o.isBone. I console logged all the bones and found the neck and spine bones, and their namess. If you’re making your own character, you’ll want to do this to find the exact name string of your bone. Have a look here… (again don’t add this to our project)
还记得我们模型遍历方法中的那一部分,我们说过(o.isMesh){…设置阴影..}吗? 在这种遍历方法中(不要这样做),您也可以使用o.isBone。 我用控制台记录了所有骨头,发现脖子和脊椎骨头及其名称。 如果要创建自己的角色,则需要这样做以查找骨骼的确切名称字符串。 在这里看看……(同样不要将其添加到我们的项目中)
model.traverse(o => {
if (o.isBone) {
  console.log(o.name);
}
if (o.isMesh) {
  o.castShadow = true;
  o.receiveShadow = true;
  o.material = stacy_mtl;
}
I got an output of a lot of bones, but the ones I was trying to find where these (this is pasted from my console):
我得到了很多骨头的输出,但是我试图找到这些骨头的位置(这是从控制台粘贴的):
...
...
mixamorigSpine
...
mixamorigNeck
...
...
So now we know our spine (from here on out referenced as the waist), and our neck names.
因此,现在我们知道了脊椎(从这里开始被称为腰部)和脖子的名称。
In our model traverse, let’s add these bones to our neck and waist variables which have already been referenced at the top of our project.
在模型遍历中,让我们将这些骨骼添加到我们的项目顶部已引用的脖子和腰部变量中。
model.traverse(o => {
  if (o.isMesh) {
    o.castShadow = true;
    o.receiveShadow = true;
    o.material = stacy_mtl;
  }
  // Reference the neck and waist bones
  if (o.isBone && o.name === 'mixamorigNeck') {
    neck = o;
  }
  if (o.isBone && o.name === 'mixamorigSpine') {
    waist = o;
  }
});
Now for a little bit more investigative work. We created an AnimationClip called idleAnim which we then sent to our mixer to play. We want to snip the neck and skeleton tracks out of this animation, or else our idle animation is going to overwrite any manipulation we try and create manually on our model.
现在进行更多调查工作。 我们创建了一个名为idleAnim的AnimationClip,然后将其发送到调音台进行播放。 我们希望从该动画中截取脖子和骨骼的轨迹,否则我们的空闲动画将覆盖我们尝试在模型上手动创建的任何操作。
So the first thing I did was console log idleAnim. It’s an object, with a property called tracks. The value of tracks is an array of 156 values, every 3 values represent the animation of a single bone. The three being the position, quaternion (rotation) and the scale of a bone. So the first three values are the hips position, rotation and scale.
所以我要做的第一件事是控制台日志idleAnim。 它是一个对象,具有称为track的属性。 轨迹的值是156个值的数组,每3个值表示单个骨骼的动画。 这三个是骨骼的位置,四元数(旋转)和刻度。 因此,前三个值是臀部的位置,旋转和比例。
What I was looking for though was this (pasted from my console):
我一直在寻找的是这个(从控制台粘贴):
3: ad {name: "mixamorigSpine.position", ...
4: ke {name: "mixamorigSpine.quaternion", ...
5: ad {name: "mixamorigSpine.scale", ...
…and this:
…和这个:
12: ad {name: "mixamorigNeck.position", ...
13: ke {name: "mixamorigNeck.quaternion", ...
14: ad {name: "mixamorigNeck.scale", ...
So inside our animation, I want to splice the tracks array to remove 3,4,5 and 12,13,14.
因此,在我们的动画中,我想拼接tracks数组以删除3,4,5和12,13,14。
However, once I splice 3,4,5 …. My neck becomes 9,10,11. Something to keep in mind.
但是,一旦我拼接了3、4、5…。 我的脖子变成9,10,11。 要记住的事情。
Let’s do this now. Below where we reference idleAnim inside our loader function, add these lines:
让我们现在开始。 在我们的加载器函数内引用idleAnim的位置下方,添加以下行:
let idleAnim = THREE.AnimationClip.findByName(fileAnimations, 'idle');

// Add these:
idleAnim.tracks.splice(3, 3);
idleAnim.tracks.splice(9, 3);
We’re going to do this to all animations later on. This means that regardless of what she’s doing, you still have some control over her waist and neck, letting you modify animations in interesting ways in real time (yes, I did make my character play air guitar, and yes I did spend 3 hours making him head bang with my mouse while the animation ran).
稍后我们将对所有动画执行此操作。 这意味着无论她在做什么,您都可以控制她的腰部和颈部,让您以有趣的方式实时修改动画(是的,我确实让我的角色扮演了空中吉他,是的,我确实花了3个小时来制作动画播放时,他用鼠标摇头)。
Right at the bottom of our project, let’s add an event listener, along with a function that returns our mouse position whenever it’s moved.
在我们项目的底部,让我们添加一个事件侦听器,以及一个函数,该函数在移动时会返回我们的鼠标位置。
document.addEventListener('mousemove', function(e) {
  var mousecoords = getMousePos(e);
});

function getMousePos(e) {
  return { x: e.clientX, y: e.clientY };
}
Below this, we’re going to create a new function called moveJoint. I’ll walk us through everything that these functions do.
在此之下,我们将创建一个名为moveJoint的新函数。 我将引导我们完成这些功能的所有工作。
function moveJoint(mouse, joint, degreeLimit) {
  let degrees = getMouseDegrees(mouse.x, mouse.y, degreeLimit);
  joint.rotation.y = THREE.Math.degToRad(degrees.x);
  joint.rotation.x = THREE.Math.degToRad(degrees.y);
}
The moveJoint function takes three arguments, the current mouse position, the joint we want to move, and the limit (in degrees) that the joint is allowed to rotate. This is called degreeLimit, remember this as I’ll talk about it soon.
moveJoint函数采用三个参数,即当前鼠标位置,我们要移动的关节以及允许关节旋转的极限(以度为单位)。 这称为degreeLimit ,请记住这一点,我将在稍后进行讨论。
We have a variable called degrees referenced at the top, the degrees come from a function called getMouseDegrees, which returns an object of {x, y}. We then use these degrees to rotate the joint on the x axis and the y axis.
我们在顶部引用了一个称为度数的变量,度数来自一个名为getMouseDegrees的函数,该函数返回{x,y}对象。 然后,我们使用这些角度在x轴和y轴上旋转关节。
Before we add getMouseDegrees, I want to explain what it does.
在我们添加getMouseDegrees之前,我想解释一下它的作用。
getMouseDegrees does this: It checks the top half of the screen, the bottom half of the screen, the left half of the screen, and the right half of the screen. It determines where the mouse is on the screen in a percentage between the middle and each edge of the screen.
getMouseDegrees这样做:检查屏幕的上半部分,屏幕的下半部分,屏幕的左半部分和屏幕的右半部分。 它以屏幕中间和每个边缘之间的百分比确定鼠标在屏幕上的位置。
For instance, if the mouse is half way between the middle of the screen and the right edge. The function determines that right = 50%, if the mouse is a quarter of the way UP from the center, the function determines that up = 25%.
例如,如果鼠标在屏幕中间和右边缘之间的中间位置。 该函数确定右= 50%,如果鼠标距中心UP距离的四分之一,则该函数确定up = 25%。
Once the function has these percentages, it returns the percentage of the degreelimit.
一旦函数具有这些百分比,它将返回degreelimit的百分比。
So the function can determine your mouse is 75% right and 50% up, and return 75% of the degree limit on the x axis and 50% of the degree limit on the y axis. Same for left and right.
因此,该函数可以确定您的鼠标是右侧的75%和向上的50%,并在x轴上返回度数限制的75%,在y轴上返回度数限制的50%。 左右相同。
Here’s a visual:
这是一个视觉效果:
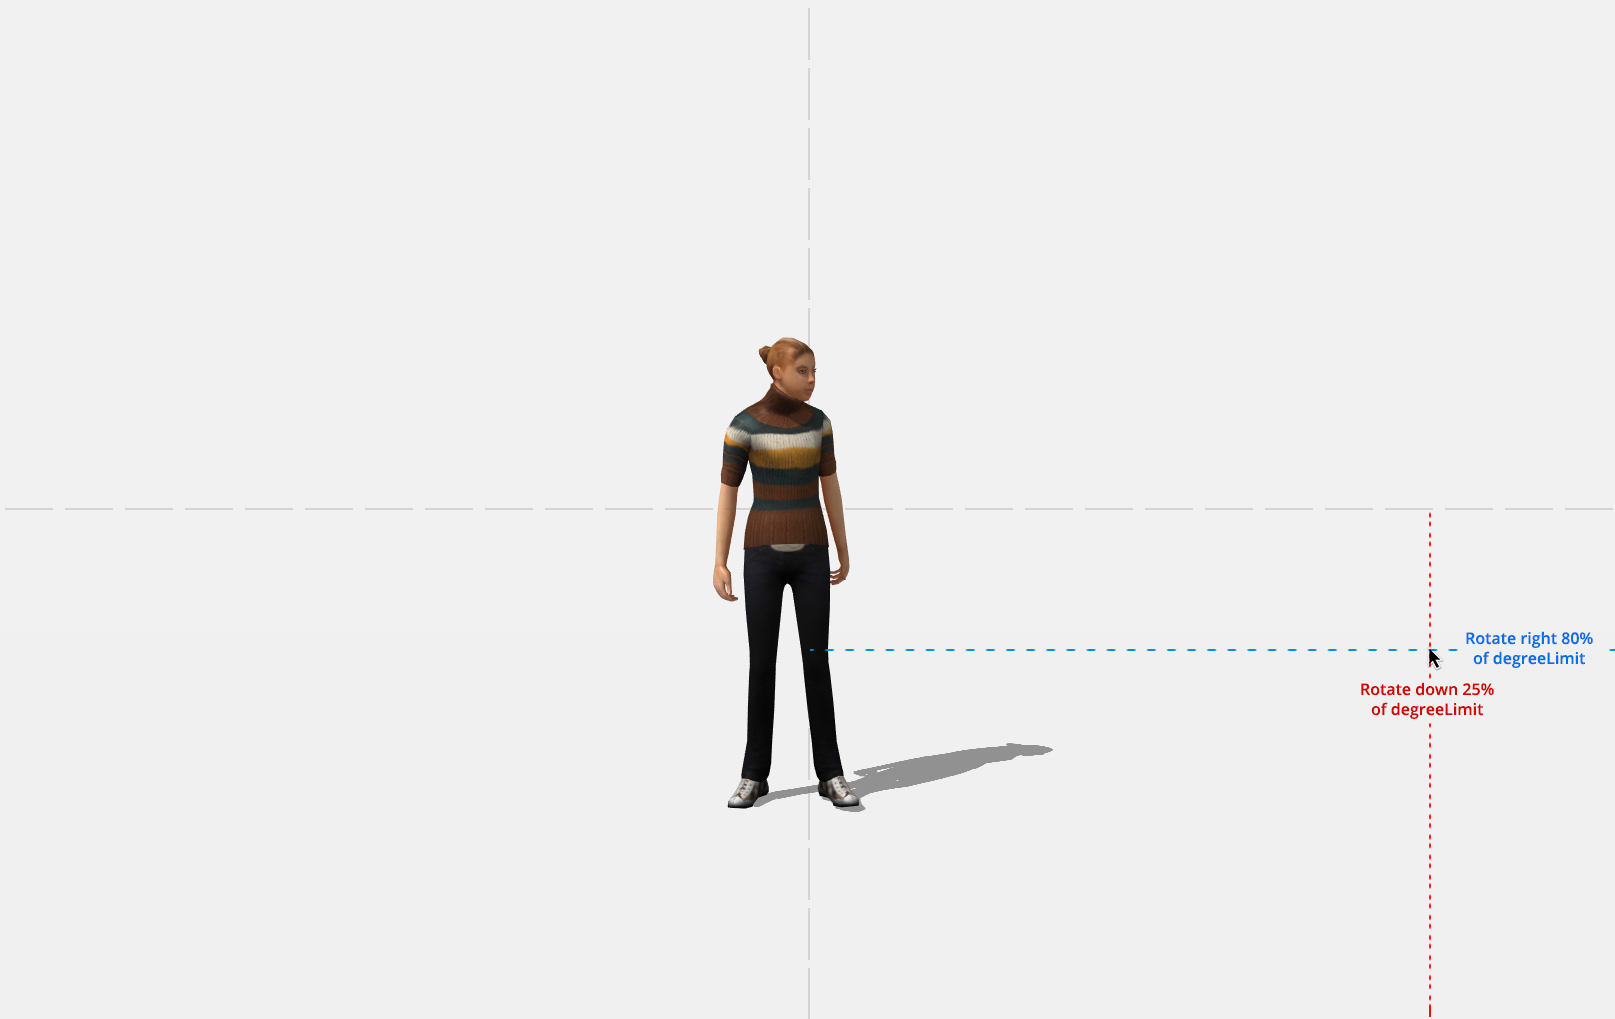
I wanted to explain that because the function looks pretty complicated, and I won’t bore you with each line, but I have commented every step of the way for you to investigate it more if you want.
我想解释一下这是因为该函数看起来非常复杂,并且我不会在每一行中都让您感到厌烦,但是我已经评论了方法的每一步,以便您根据需要进行更多的研究。
Add this function to the bottom of your project:
将此功能添加到项目的底部:
function getMouseDegrees(x, y, degreeLimit) {
  let dx = 0,
      dy = 0,
      xdiff,
      xPercentage,
      ydiff,
      yPercentage;

  let w = { x: window.innerWidth, y: window.innerHeight };

  // Left (Rotates neck left between 0 and -degreeLimit)

   // 1. If cursor is in the left half of screen
  if (x <= w.x / 2) {
    // 2. Get the difference between middle of screen and cursor position
    xdiff = w.x / 2 - x;
    // 3. Find the percentage of that difference (percentage toward edge of screen)
    xPercentage = (xdiff / (w.x / 2)) * 100;
    // 4. Convert that to a percentage of the maximum rotation we allow for the neck
    dx = ((degreeLimit * xPercentage) / 100) * -1; }
// Right (Rotates neck right between 0 and degreeLimit)
  if (x >= w.x / 2) {
    xdiff = x - w.x / 2;
    xPercentage = (xdiff / (w.x / 2)) * 100;
    dx = (degreeLimit * xPercentage) / 100;
  }
  // Up (Rotates neck up between 0 and -degreeLimit)
  if (y <= w.y / 2) {
    ydiff = w.y / 2 - y;
    yPercentage = (ydiff / (w.y / 2)) * 100;
    // Note that I cut degreeLimit in half when she looks up
    dy = (((degreeLimit * 0.5) * yPercentage) / 100) * -1;
    }

  // Down (Rotates neck down between 0 and degreeLimit)
  if (y >= w.y / 2) {
    ydiff = y - w.y / 2;
    yPercentage = (ydiff / (w.y / 2)) * 100;
    dy = (degreeLimit * yPercentage) / 100;
  }
  return { x: dx, y: dy };
}
Once we have that function, we can now use moveJoint. We’re going to use it for the neck with a 50 degree limit, and for the waist with a 30 degree limit.
一旦有了该功能,我们现在可以使用moveJoint。 我们将它用于限制度为50度的脖子和限制为30度度的腰部。
Update our mousemove event listener to include these moveJoints:
更新我们的mousemove事件侦听器以包括以下moveJoints:
document.addEventListener('mousemove', function(e) {
    var mousecoords = getMousePos(e);
  if (neck && waist) {
      moveJoint(mousecoords, neck, 50);
      moveJoint(mousecoords, waist, 30);
  }
  });
Just like that, move your mouse around the viewport and Stacy should watch your cursor wherever you go! Notice how idle animation is still running, but because we snipped the neck and spine bone (yuck), we’re able to controls those independently.
那样,在视口周围移动鼠标,无论您走到哪里,Stacy都应注视着光标! 请注意,空闲动画仍然如何运行,但是由于我们将颈部和脊骨(sn骨)剪断了,因此我们能够独立控制它们。
This may not be the most scientifically accurate way of doing it, but it certainly looks convincing enough to create the effect we’re after. Here’s our progress so far, dig into this pen if you feel you’ve missed something or you’re not getting the same effect.
这可能不是科学上最准确的方法,但无疑足以令人信服地创造出我们所追求的效果。 到目前为止,这是我们的进度,如果您觉得自己错过了某些东西或效果不佳,请深入研究这支笔。
See the Pen Character Tutorial – Round 2 by Kyle Wetton (@kylewetton) on CodePen.
请参阅CodePen上的Kyle Wetton( @kylewetton )撰写的钢笔角色教程-第2轮。
第6部分:挖掘其余动画 (Part 6: Tapping into the rest of the animations)
As I mentioned earlier, Stacy actually has 10 animations loaded into the file, and we’ve only used one of them. Let’s head back to our loader function and find this line.
如前所述,Stacy实际上已将10个动画加载到文件中,而我们仅使用了其中之一。 让我们回到加载器功能并找到这一行。
mixer = new THREE.AnimationMixer(model);Below this line, we’re going to get a list of AnimationClips that aren’t idle (we don’t want to randomly select idle as one of the options when we click on Stacy). We do that like so:
在此行下,我们将获得一个非闲置的AnimationClip列表(当我们单击Stacy时,我们不希望随机选择闲置作为选项之一)。 我们这样做是这样的:
let clips = fileAnimations.filter(val => val.name !== 'idle');Now below that, we’re going to convert all of those clips into Three.js AnimationClips, the same way we did for idle. We’re also going to splice the neck and spine bone out of the skeleton and add all of these AnimationClips into a variable called possibleAnims, which is already referenced at the top of our project.
现在,在这之下,我们将所有这些剪辑转换为Three.js AnimationClips,就像我们对空闲所做的一样。 我们还将把脖子和脊柱骨从骨骼中剪接出来,并将所有这些AnimationClips添加到一个名为“可能的动画”的变量中,该变量已在我们项目的顶部引用。
possibleAnims = clips.map(val => {
  let clip = THREE.AnimationClip.findByName(clips, val.name);
  clip.tracks.splice(3, 3);
  clip.tracks.splice(9, 3);
  clip = mixer.clipAction(clip);
  return clip;
 }
);
We now have an array of clipActions we can play when we click Stacy. The trick here though is that we can’t add a simple click event listener on Stacy, as she isn’t part of our DOM. We are instead going to use raycasting, which essentially means shooting a laser beam in a direction and returning the objects that it hit. In this case we’re shooting from our camera in the direction of our cursor.
现在,我们有了一系列单击stacy时可以播放的clipAction。 不过,这里的窍门是我们无法在Stacy上添加简单的click事件监听器,因为它不是我们DOM的一部分。 取而代之的是,我们将使用射线投射,这实际上意味着沿一定方向发射激光束并返回其撞击的物体。 在这种情况下,我们是从相机朝着光标的方向拍摄的。
Let’s add this above our mousemove event listener:
让我们在mousemove事件侦听器上方添加以下代码:
// We will add raycasting here
document.addEventListener('mousemove', function(e) {...}
So paste this function in that spot, and I’ll explain what it does:
因此,将此功能粘贴到该位置,然后我将解释其功能:
window.addEventListener('click', e => raycast(e));
window.addEventListener('touchend', e => raycast(e, true));

function raycast(e, touch = false) {
  var mouse = {};
  if (touch) {
    mouse.x = 2 * (e.changedTouches[0].clientX / window.innerWidth) - 1;
    mouse.y = 1 - 2 * (e.changedTouches[0].clientY / window.innerHeight);
  } else {
    mouse.x = 2 * (e.clientX / window.innerWidth) - 1;
    mouse.y = 1 - 2 * (e.clientY / window.innerHeight);
  }
  // update the picking ray with the camera and mouse position
  raycaster.setFromCamera(mouse, camera);

  // calculate objects intersecting the picking ray
  var intersects = raycaster.intersectObjects(scene.children, true);

  if (intersects[0]) {
    var object = intersects[0].object;

    if (object.name === 'stacy') {

      if (!currentlyAnimating) {
        currentlyAnimating = true;
        playOnClick();
      }
    }
  }
}
We’re adding two event listeners, one for desktop and one for touch screens. We pass the event to the raycast() function but for touch screens, we’re setting the touch argument as true.
我们将添加两个事件侦听器,一个用于桌面,另一个用于触摸屏。 我们将事件传递给raycast()函数,但对于触摸屏,我们将touch参数设置为true。
Inside the raycast() function, we have a variable called mouse. Here we set mouse.x and mouse.y to be changedTouches[0] position if touch is true, or just return the mouse position on desktop.
在raycast()函数内部,我们有一个名为mouse的变量。 在这里,如果touch为true,则将mouse.x和mouse.y设置为changeTouches [0]的位置,或者仅返回桌面上的鼠标位置。
Next we call setFromCamera on raycaster, which has already been set up as a new Raycaster at the top of our project, ready to use. This line essentially raycasts from the camera to the mouse position. Remember we’re doing this every time we click, so we’re shooting lasers with a mouse at Stacy (brand new sentence?).
接下来,我们呼吁raycaster,它已经被设置为在我们项目的最新Raycaster,准备用setFromCamera。 这条线实际上是从摄像机到鼠标位置的射线广播。 请记住,每次单击时我们都在执行此操作,所以我们在Stacy用鼠标射击激光(全新句子?)。
We then get an array of intersected objects; if there are any, we set the first object that was hit to be our object.
然后,我们得到一个相交对象的数组; 如果有,我们将被命中的第一个对象设置为我们的对象。
We check that the objects name is ‘stacy’, and we run a function called playOnClick() if the object is called ‘stacy’. Note that we are also checking that a variable currentlyAnimating is false before we proceed. We toggle this variable on and off so that we can’t run a new animation when one is currently running (other than idle). We will turn this back to false at the end of our animation. This variable is referenced at the top of our project.
我们检查对象名称是否为'stacy',如果对象称为'stacy',则运行名为playOnClick()的函数。 请注意,在继续操作之前,我们还要检查变量currentAnimating是否为false。 我们启用和禁用此变量,以便在当前正在运行的动画(空闲状态除外)时无法运行新动画。 我们将在动画结束时将其重新设置为false。 此变量在我们项目的顶部引用。
Okay, so playOnClick. Below our rayasting function, add our playOnClick function.
好的,所以playOnClick。 在我们的rayasting函数下面,添加我们的playOnClick函数。
// Get a random animation, and play it
 function playOnClick() {
  let anim = Math.floor(Math.random() * possibleAnims.length) + 0;
  playModifierAnimation(idle, 0.25, possibleAnims[anim], 0.25);
}
This simply chooses a random number between 0 and the length of our possibleAnims array, then we call another function called playModifierAnimation. This function takes in idle (we’re moving from idle), the speed to blend from idle to a new animation (possibleAnims[anim]), and the last argument is the speed to blend from our animation back to idle. Under our playOnClick function, lets add our playModifierAnimation and I’ll explain what its doing.
这只是选择一个介于0到可能的动画数组长度之间的随机数,然后调用另一个名为playModifierAnimation的函数。 该函数接受空闲(我们正在从空闲中移动),从空闲到新动画混合的速度(possibleAnims [anim]),最后一个参数是从动画到空闲的混合速度。 在playOnClick函数下,让我们添加playModifierAnimation,我将解释其作用。
function playModifierAnimation(from, fSpeed, to, tSpeed) {
  to.setLoop(THREE.LoopOnce);
  to.reset();
  to.play();
  from.crossFadeTo(to, fSpeed, true);
  setTimeout(function() {
    from.enabled = true;
    to.crossFadeTo(from, tSpeed, true);
    currentlyAnimating = false;
  }, to._clip.duration * 1000 - ((tSpeed + fSpeed) * 1000));
}
The first thing we do is reset the to animation, this is the animation that’s about to play. We also set it to only play once, this is done because once the animation has completed its course (perhaps we played it earlier), it needs to be reset to play again. We then play it.
我们要做的第一件事是将动画重置为动画,这是即将播放的动画。 我们还将其设置为仅播放一次,这是因为动画一旦完成其过程(也许我们之前播放过),就需要将其重置以再次播放。 然后我们播放它。
Each clipAction has a method called crossFadeTo, we use it to fade from (idle) to our new animation using our first speed (fSpeed, or from speed).
每个clipAction有一个叫做crossFadeTo我们用我们的第一速度(fSpeed,或速度)的全新动画方法,我们使用它(空闲)褪色。
At this point our function has faded from idle to our new animation.
在这一点上,我们的功能已经从闲置淡入到了新动画中。
We then set a timeout function, we turn our from animation (idle) back to true, we cross fade back to idle, then we toggle currentlyAnimating back to false (allowing another click on Stacy). The time of the setTimeout is calculated by combining our animations length (* 1000 as this is in seconds instead of milliseconds), and removing the speed it took to fade to and from that animation (also set in seconds, so * 1000 again). This leaves us with a function that fades from idle, plays an animation and once it’s completed, fades back to idle, allowing another click on Stacy.
然后,我们设置超时功能,将动画(空闲)恢复为true,淡入淡出回到空闲状态,然后将当前动画切换为false(允许再次单击Stacy)。 setTimeout的时间是通过组合动画长度(* 1000,因为以秒为单位,而不是毫秒)来计算的,然后去除淡出动画的速度(也以秒为单位,因此再次设置为* 1000)。 这给我们留下了一个功能,该功能可以从空闲状态淡入淡出,播放动画,完成后再淡入空闲状态,从而可以再次单击Stacy。
Notice that our neck and spine bones aren’t affected, giving us the ability to still control the way those rotate during the animation!
请注意,我们的脖子和脊椎骨骼没有受到影响,这使我们能够在动画过程中仍然控制它们的旋转方式!
That concludes this tutorial, here’s the completed project to reference if you got stuck.
本教程到此结束,如果您遇到困难,这里是完整的项目以供参考。
See the Pen Character Tutorial – Final by Kyle Wetton (@kylewetton) on CodePen.
请参阅CodePen上的Kyle Wetton( @kylewetton )的笔字符教程-最终版本。
Before I leave you though, if you’re interested in the workings of the model and animations itself, I’ll cover some of the basics in the final part. I’ll leave you to research some of the finer aspects, but this should give you plenty insight.
不过,在我离开您之前,如果您对模型和动画本身的工作方式感兴趣,那么我将在最后一部分中介绍一些基础知识。 我将留给您研究一些更美好的方面,但这将使您有很多见识。
第7部分:创建模型文件(可选) (Part 7: Creating the model file (optional))
You’ll require Blender for this part if you follow along. I recommend Blender 2.8, the latest stable build.
如果继续,则需要Blender进行此操作。 我推荐Blender 2.8,这是最新的稳定版本。
Before I get started, remember I mentioned that although you can include texture files inside your GLTF file (the format you export from Blender in), I had issues where Stacy’s texture was really dark. It had to do with the fact that GLTF expects sRGB format, and although I tried to convert it in Photoshop, it still wasn’t playing ball. You can’t guarantee the type of file you’re going to get as a texture, so the way I managed to fix this issue was instead export my file without textures, and let Three.js add it natively. I recommend doing it this way unless your project is super complicated.
在开始之前,请记住我曾经提到过,尽管您可以在GLTF文件(从Blender导出的格式)中包括纹理文件,但是我遇到的问题是Stacy的纹理确实很暗。 这与GLTF需要sRGB格式有关,尽管我尝试在Photoshop中进行转换,但它仍然没有发挥作用。 您不能保证将要获得的文件类型作为纹理,因此我设法解决此问题的方法是导出不带纹理的文件,然后让Three.js本地添加。 我建议这样做,除非您的项目非常复杂。
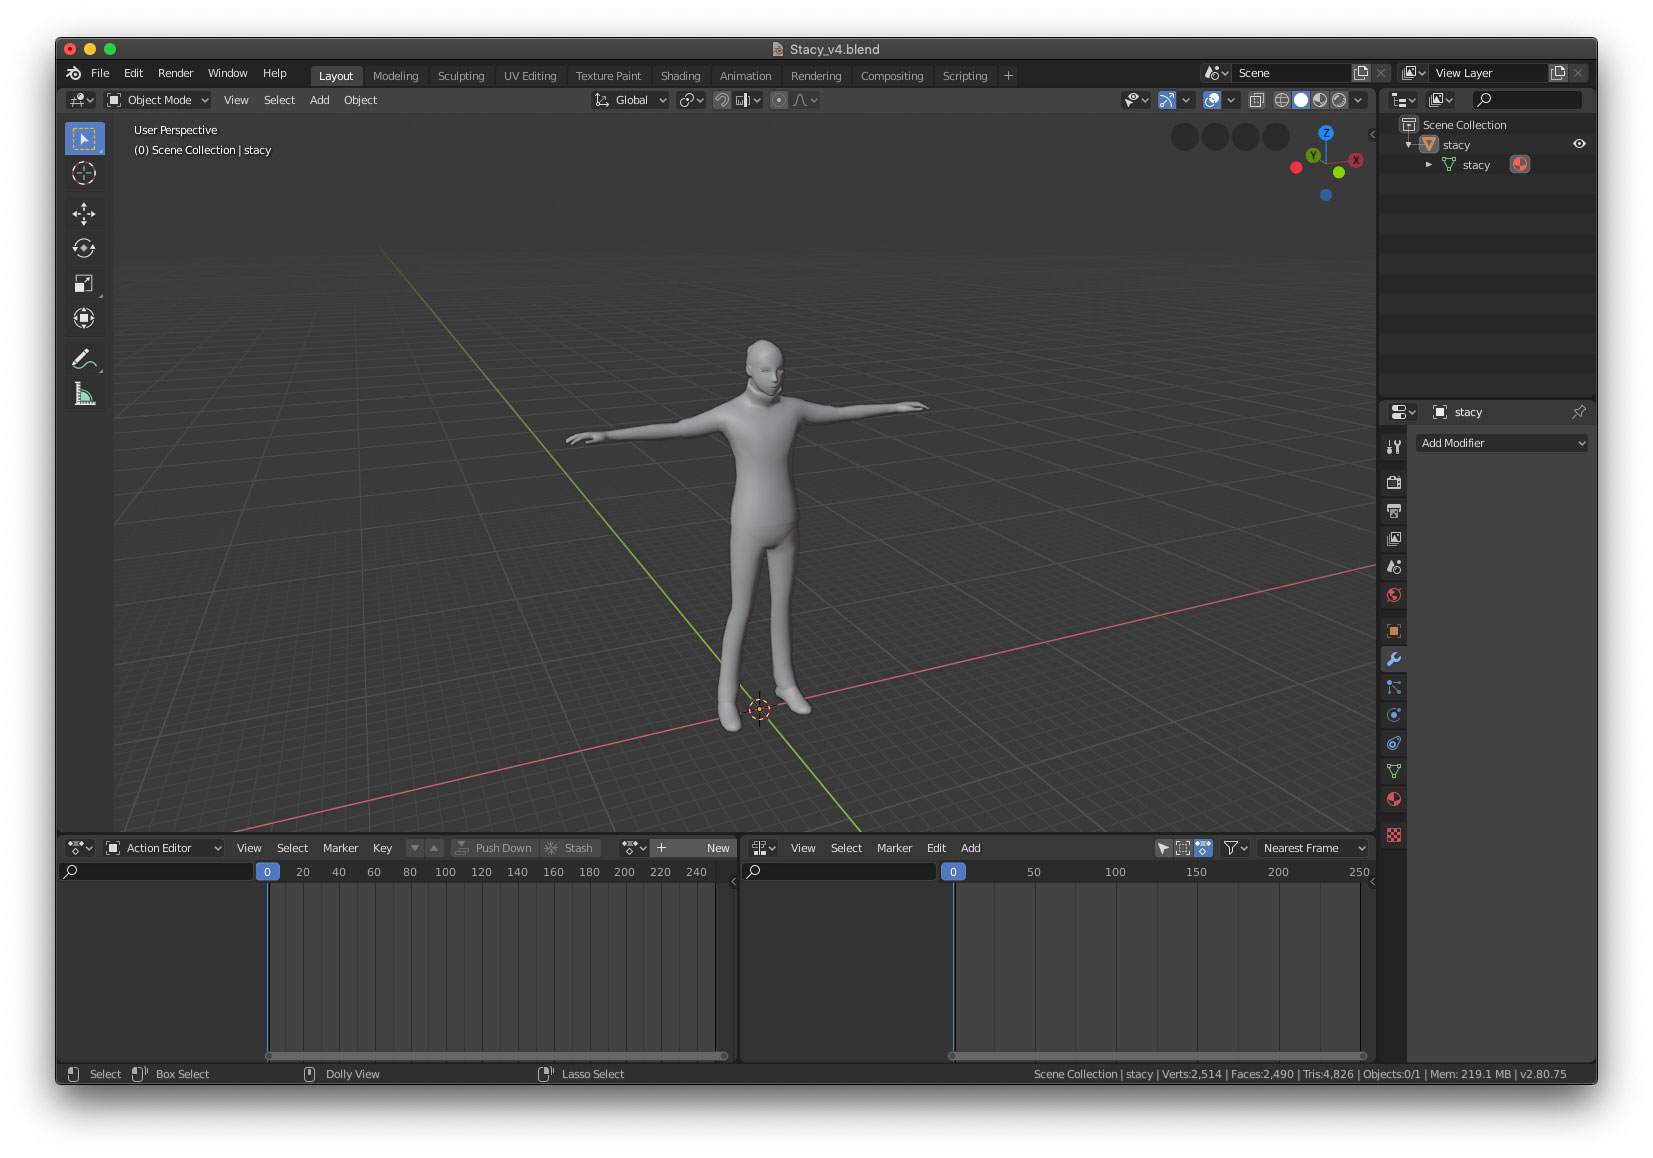
Any way, here’s what I started with in Blender, just a standard mesh of a character in a T pose. Your character most definitely should be in a T pose, because Mixamo is going to generate the skeleton for us, so it is expecting this.
无论如何,这就是我从Blender开始的内容,只是一个T姿势中角色的标准网格。 您的角色绝对应该摆在T形姿势中,因为Mixamo将为我们生成骨骼,因此可以期待。
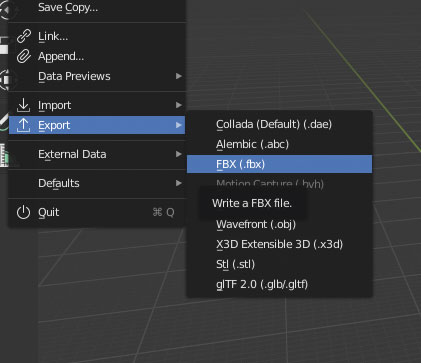
You want to export your model in the FBX format.
您要以FBX格式导出模型。
You aren’t going to need the current Blender session any more, but more on that soon.
您将不再需要当前的Blender会话,但很快就会更多。
Head to www.mixamo.com, this site has a bunch of free animations that are used for all sorts of things, commonly browsed by Indie game developers, this Adobe service goes hand-in-hand with Adobe Fuse, which is essentially a character creator software. This is free to use, but you will need an Adobe account (by free I mean, you won’t need a Creative Cloud subscription). So create one and sign in.
请访问www.mixamo.com ,该网站提供了许多用于各种事物的免费动画,这些动画通常由独立游戏开发人员浏览,该Adobe服务与Adobe Fuse紧密结合,这实际上是一个角色创作者软件。 它是免费使用的,但是您需要一个Adobe帐户(免费的意思是,您不需要Creative Cloud订阅)。 因此,创建一个并登录。
The first thing you want to do is upload your character. This is the FBX file that we exported from Blender. Mixamo will automatically bring up the Auto-Rigger feature once your upload is complete.
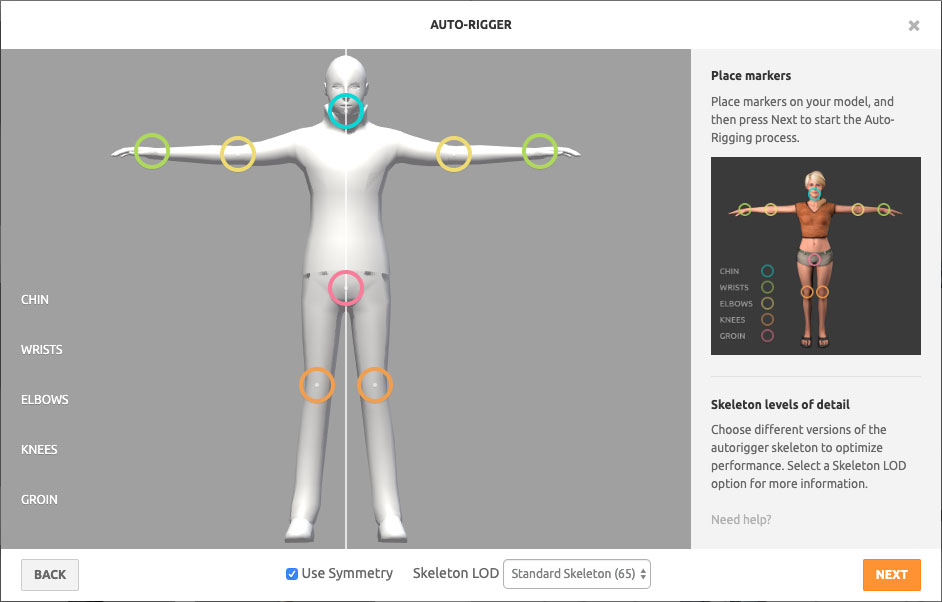
您要做的第一件事就是上传角色。 这是我们从Blender导出的FBX文件。 上传完成后,Mixamo将自动启用自动索具功能。

Follow the instructions to place the markers on the key areas of your model. Once the auto-rigging is complete, you’ll see a panel with your character animating!
按照说明将标记放置在模型的关键区域上。 自动装配完成后,您将看到一个带有动画角色的面板!
Mixamo has now created a skeleton for your model, this is the skeleton we hooked into in this tutorial.
Mixamo现在为您的模型创建了一个骨架,这就是我们在本教程中了解的骨架。
Click next, and then select the animations tab in the top left. Let’s find an idle animation to start with, use the search bar and type ‘idle’. The one we used in this tutorial is called “Happy idle” if you’re interested.
单击“下一步”,然后选择左上方的“动画”选项卡。 让我们找到一个空闲的动画开始,使用搜索栏并输入“ idle”。 如果您有兴趣,我们在本教程中使用的一个称为“快乐空闲”。
Clicking on any animation will preview it, explore this site to see some crazy other ones. But an important note: this particular project works best with animations where the feet end up where they began, in a position similar to our idle animation, because we’re cross fading these, it looks most natural when the ending pose is similar to the next animations starting pose, and visa versa.
单击任何动画将对其进行预览,并浏览此站点以查看一些疯狂的其他动画。 但请注意:该特定项目最适合脚部从其开始处开始的动画,其位置类似于我们的空闲动画,因为我们正在交叉淡化这些动画,所以当结束姿势与下一个动画开始摆姿势,反之亦然。
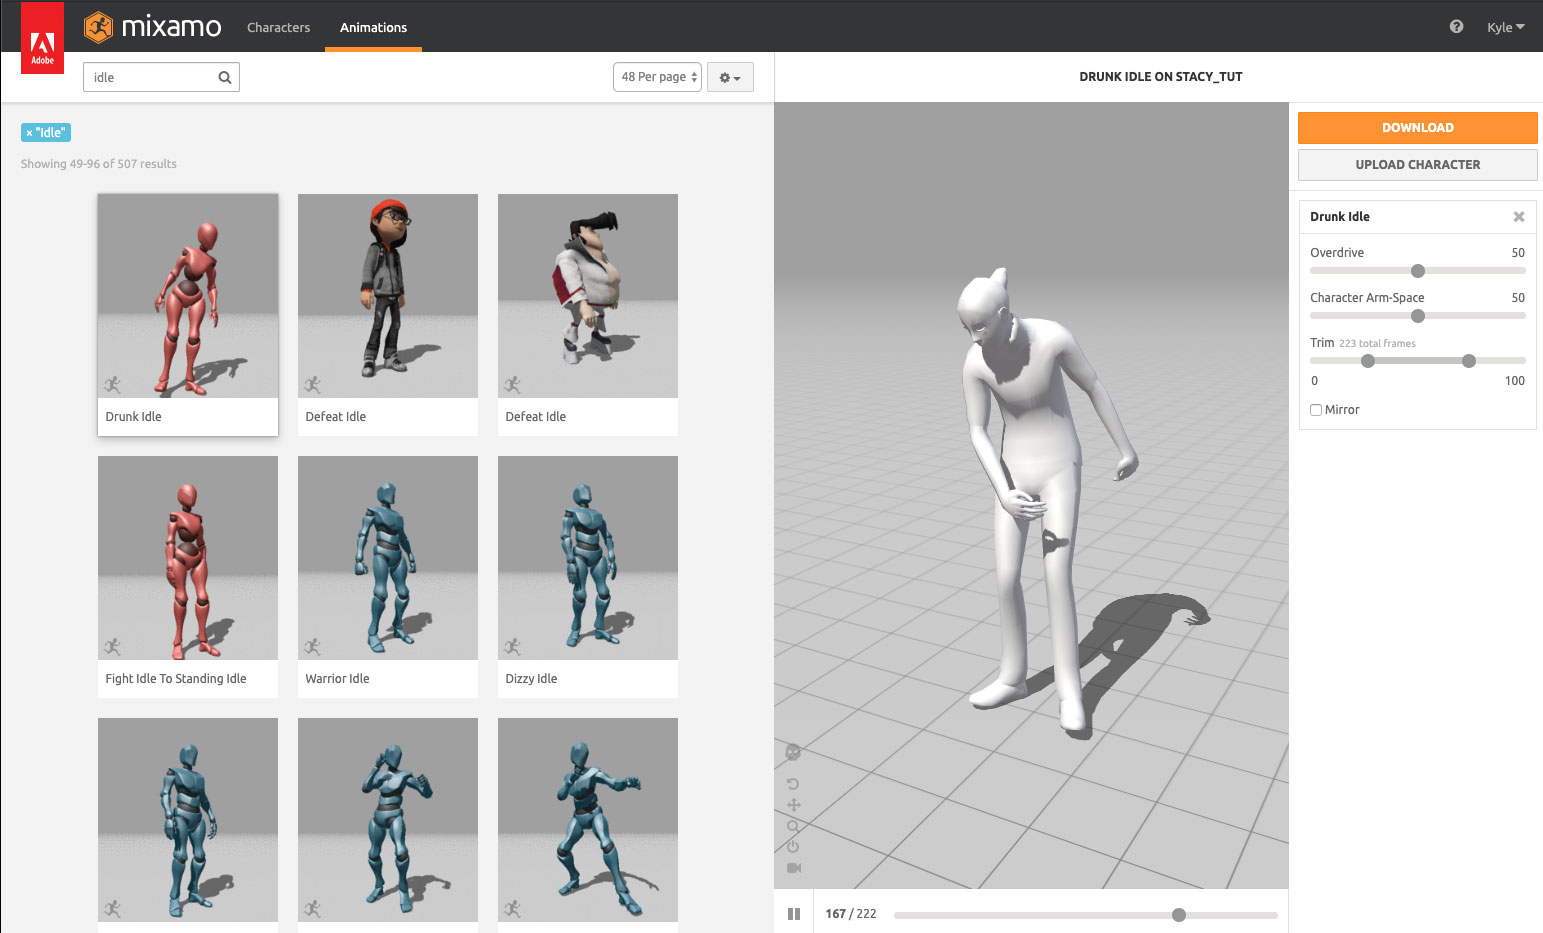
Once you’re happy with your idle animation, click Download Character. Your format should be FBX and skin should be set to With Skin. Leave the rest as default. Download this file. Keep Mixamo open.
对闲置动画感到满意后,点击下载角色。 您的格式应为FBX,并且皮肤应设置为With Skin 。 将其余的保留为默认值。 下载此文件。 保持Mixamo打开。
Back in Blender, import this file into a new, empty session (remove the light, camera and default cube that comes with a new Blender session).
返回Blender中,将此文件导入到一个新的空会话中(删除新Blender会话随附的光源,照相机和默认立方体)。
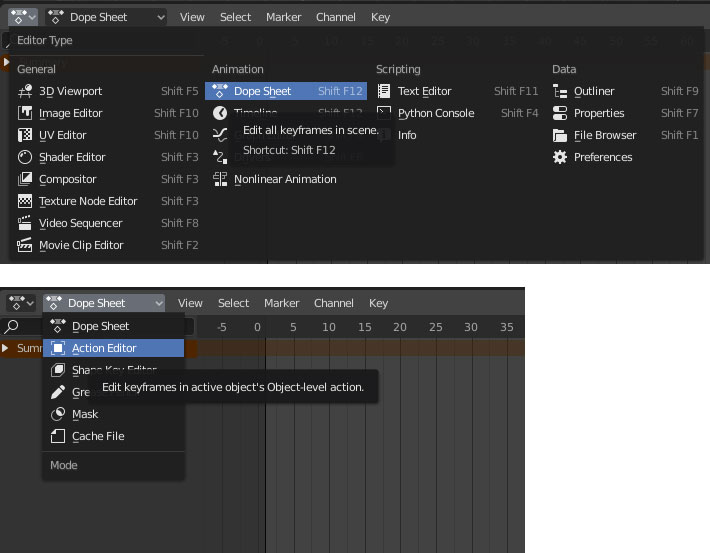
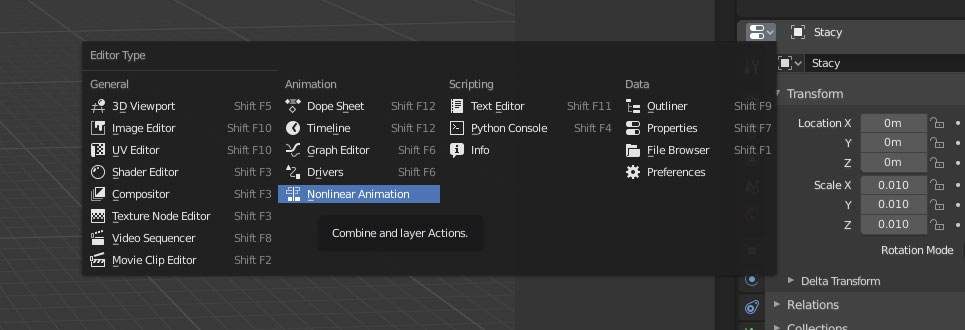
If you hit the play button (if you don’t have a timeline in your session, you can toggle the Editor Type on one of your panels, at this point I recommend an intro into Blenders interface if you get stuck).
如果您单击播放按钮(如果会话中没有时间轴,则可以在其中一个面板上切换“编辑器类型”,这时,如果遇到问题,我建议向Blenders界面进行介绍)。

At this point you want to rename the animation, so change to the Editor Type called Dope Sheet and the select Action Editor as the sub section.
此时,您想重命名动画,因此请更改为名为“摄影表”的“编辑器类型” ,然后选择“动作编辑器”作为子部分。
Click on the drop down next to + New and select the animation that Mixamo includes in this file. At this point you can rename it in the input field, lets call it ‘idle’.
单击+新建旁边的下拉菜单,然后选择Mixamo包含在此文件中的动画。 此时,您可以在输入字段中对其进行重命名,将其称为“ idle”。

Now if we exported this file as a GLTF, there will be an animation called idle in gltf.animations. Remember we have both gltf.animatons and gltf.scene in our file.
现在,如果我们将此文件导出为GLTF,则gltf.animations中将有一个名为idle的动画。 请记住,文件中同时包含gltf.animatons和gltf.scene。
Before we export though, we need to rename our character objects appropriately. My setup looks like this.
不过,在导出之前,我们需要适当地重命名角色对象。 我的设置如下所示。

Note that the bottom, child stacy is the object name referenced in our JavaScript.
请注意,最下面的子stacy是我们JavaScript中引用的对象名称。
Let’s not export yet, instead I’ll quickly show you how to add a new animation. Head back to Mixamo, I’ve selected the Shake Fist animation. Download this file too, we still want to keep the skin, others probably would mention that you don’t need to keep the skin this time, but I found that my skeleton did weird things when I didn’t.
现在我们不要导出,相反,我将快速向您展示如何添加新动画。 回到Mixamo,我选择了Shake Fist动画。 也下载此文件,我们仍然要保留皮肤,其他人可能会提到您这次不需要保留皮肤,但是我发现我的骨骼做了奇怪的事情,而我却没有。
Let’s import it into Blender.
让我们将其导入Blender。
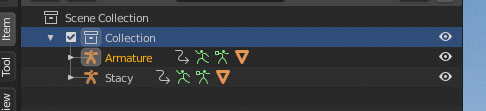
At this point we’ve got two Stacys, one called Armature, and the one we want to keep, Stacy. We’re going to delete the Armature one, but first we want to move its current Shake Fist animation to Stacy. Let’s head back to our Dope Sheet > Animation Editor.
在这一点上,我们有两个Stacy,一个叫做Armature,另一个我们想保留的Stacy。 我们将要删除“电枢”,但首先我们要将其当前的“摇拳”动画移到“ Stacy”。 让我们回到“摄影表”>“动画编辑器”。
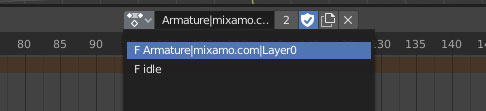
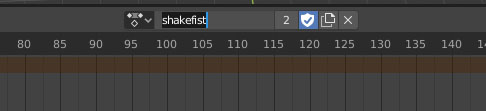
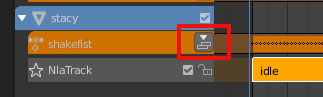
You’ll see we now have a new animation alongside idle, let’s select that, then rename it shakefist.
您会看到我们现在在空闲状态旁边有一个新动画,让我们选择它,然后将其重命名为shakefist 。
We want to bring up one last Editor Type, keep your Dope Sheet > Action Editor open, and in another unused panel (or split the screen to create a new one, again it helps if you get through an intro into Blenders UI).
我们要调出最后一个“编辑器类型”,保持“摄影表”>“动作编辑器”处于打开状态,并在另一个未使用的面板中(或拆分屏幕以创建一个新面板,再次进入Blenders UI入门会有所帮助)。
We want the new Editor Type to be Nonlinear Animation (NLA).
我们希望新的编辑器类型为非线性动画(NLA)。
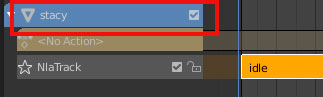
Click on stacy. Then click on the Push Down button next to the idle animation. We’ve now added idle as an animation, and created a new track to add our shakefist animation.
单击stacy 。 然后单击空闲动画旁边的下推按钮。 现在,我们添加了“ idle”作为动画,并创建了一条新轨道来添加我们的摇拳动画。
Confusingly, you want to click on stacy‘s name again before we we proceed.
令人困惑的是,您想在我们继续之前再次单击stacy的名称。
The way we do this is to head back to our Animation Editor and select shakefist from the drop down.
我们这样做的方法是回到动画编辑器,然后从下拉列表中选择“ shaffist ”。
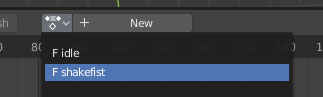
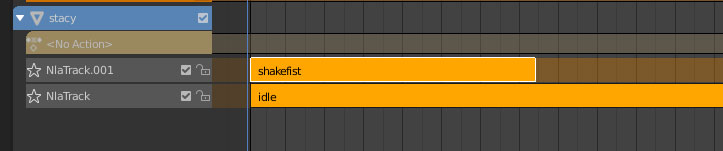
Finally, we can use the Push Down button next to shakefist in the NLA editor.
最后,我们可以在NLA编辑器中使用shaffist旁边的下推按钮。
You should be left with this:
您应该得到以下帮助:
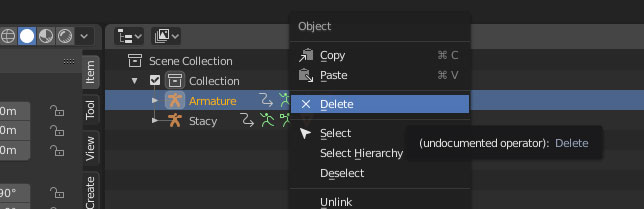
We’ve transferred the animation from Armature to Stacy, we can now delete Armature.
我们已经将动画从Armature转移到Stacy,我们现在可以删除Armature。

Annoyingly, Armature will drop its child mesh into the scene, delete this too
烦人的是,Armature会将其子网格物体放到场景中,也将其删除

You can now repeat these steps to add new animations (I promise you it gets less confusing and faster the more you do it).
现在,您可以重复这些步骤以添加新的动画(我保证您做得越多,混乱程度就越小,并且速度越快)。
I’m going to export my file though:
我将导出文件:

Here’s a pen from this tutorial except it’s using our new model! (Disclosure: Stacy’s scale was way different this time, so that’s been updated in this pen. I’ve had no success at all scaling models in Blender when Mixamo has already added the skeleton to it, it’s much easier to do it in Three.js after it’s loaded).
这是本教程中的一支笔,只是它使用的是我们的新模型! (公开:这次Stacy的缩放比例大不相同,因此在这支笔中进行了更新。当Mixamo已经向其添加骨架后,我在Blender中的所有缩放模型上都没有成功,在3中做起来要容易得多。 js)。
See the Pen Character Tutorial – Remix by Kyle Wetton (@kylewetton) on CodePen.
见钢笔字教程-混音由凯尔Wetton( @kylewetton )上CodePen 。
The end!
结束!
翻译自: https://tympanus.net/codrops/2019/10/14/how-to-create-an-interactive-3d-character-with-three-js/
three.js 交互
智能推荐
使用 arm-linux-androideabi-addr2line 工具定位 libunity.so 崩溃问题-程序员宅基地
文章浏览阅读710次,点赞13次,收藏7次。它的名称有点不同 - aarch64-linux-android-addr2line。尽管该实用程序的名称不包含单词arm,但它成功地解密了arm64-v8下的堆栈跟踪,并通常感知arm64-v8的字符。是 NDK 自带的调试工具,可以用来分析 so 崩溃时输出的的内存地址。之后就是通过 cmd 进入到这个路径。找到了 64 位所需的实用程序。_arm-linux-androideabi
javaweb-邮件发送_javaweb发送邮件-程序员宅基地
javaweb-邮件发送 摘要: 本文介绍了邮件传输协议(SMTP和POP3)以及电子邮件的发送和接收过程。还讨论了纯文本文件、带图片和附件的邮件发送方法,以及通过servlet方式注册邮箱和使用springboot框架发送邮件的实现。
element-ui table 设置表格滚动条位置_element table 滚动条位置-程序员宅基地
文章浏览阅读4.3k次,点赞6次,收藏11次。在切换不同页面时(被 keep-alive 缓存的组件间切换),页面中的element-ui table的滚动条位置没有停留在原来的位置。目前需要切换不同的页面返回来后,滚动条保持在原来的位置。_element table 滚动条位置
前端开发经验总结_属性值[session.getattribute("strpath")]引用["],在值内使用时必须-程序员宅基地
文章浏览阅读2.6k次。 我设置nowrap和不设置nowrap效果都一样。就是表格随着文字自动伸展,为什么? →回答问题:TD元素noWrap属性的行为与TD元素的width属性有关。 ◆如果未设置TD宽度,则noWrap属性是起作用的。◆如果设置了TD宽度,则noWrap属性是不起作用的。 http://www.blueidea.com/tech/web/2003/943.as_属性值[session.getattribute("strpath")]引用["],在值内使用时必须被转义。
JS如何把Object对象的数据输出到控制台中_前端怎么通过控制台查看字段取值-程序员宅基地
文章浏览阅读3.4k次,点赞2次,收藏3次。 前端时间在编写程序时遇到这样一个问题,即在前端页面通过一些js框架自带的异步请求返回的数据类型为Object数据类型,笔者根据网上查阅到的资料,找到以下这种简单的方式://把Object类型转为Json数据格式,再通过console命令在控制台中打印出来console.log("xhr的值为:"+JSON.st..._前端怎么通过控制台查看字段取值
8.cc.Button组件使用详解_cc button.start-程序员宅基地
文章浏览阅读556次。1. cc.Button添加按钮的方法 2种方式 (1)直接创建带Button组件的节点; (2) 先创建节点,再添加组件;按钮组件, 按钮是游戏中最常用的组件, 点击然后响应事件;按钮的过渡效果: 过渡: 普通状态, 鼠标滑动到物体上, 按下状态, 禁用状态 (1)没有过渡,只有响应事件; (2)颜色过渡, 过渡效果中使用颜色; (3)精灵..._cc button.start
随便推点
计算机专业游戏本推荐,2018高性价比游戏本推荐_游戏笔记本哪个好-太平洋电脑网...-程序员宅基地
文章浏览阅读245次。【PConline海选导购】晃眼间,秋风又起,让人振奋的开学季又要到来了!虽然说没有学习压力的暑假,在家着实悠哉,但想到回校后可以跟小伙伴们一起各种开黑吃鸡,是不是就感到很兴奋呢?说到“吃鸡”这种吃配置的游戏,就不得不说游戏本了,毕竟普通的笔记本电脑很难给我们带来畅快的游戏体验。而近年来游戏本市场俨然成为了各大厂商的必争之地,而随着开学季的到来,各大厂商更是推出了众多促销活动,下面就让我们一起来看..._计应专业游戏本
codePen按钮样式学习
看到codepen里面有的按钮搞得很炫酷,但其实也不是很难,就学习记录一下。
服务器维护中没法直播游戏,我的世界盒子显示维护中如何进入战堂服务器-程序员宅基地
文章浏览阅读408次。时间:2021-08-11编辑:hxh斗罗大陆魂师对决火雨队怎么搭配?火雨队是近期非常热门的一套阵容,不少玩家想了解该阵容,那么下面就让小编给大家带来斗罗大陆魂师对决火雨队阵容推荐,感兴趣的小伙伴们一起来看看吧。时间:2021-08-11编辑:hxh玩家在巅峰演武副本中不知道怎么打秦明,秦明的盾很厚不知道怎么破?那么下面就让小编给大家带来斗罗大陆魂师对决巅峰演武秦明破盾攻略,感兴趣的小伙伴们一起来...
GNU Radio之Schmidl & Cox OFDM synch.底层C++实现
在 GNU Radio OFDM 系统中,一个非常重要的环节是在接收端准确地同步和检测发送端发出的信号。这就是 Schmidl & Cox 同步算法发挥作用的地方。Schmidl & Cox 算法是一种用于 OFDM 信号的时间同步的技术。本文对其底层 C++ 源码进行学习记录。
项目开发规范
REST,表述性状态转换,他是一种软件架构风格使用URL定位资源,HTTP动词描述操作根据发出请求类型来区分操作此为风格,是约定方式,可以打破描述模块的功能通常使用复数,也就是加s的格式来描述,表示此类资源,而非单个资源。
3.8设计模式——State 状态模式(行为型)
允许一个对象在其内部状态改变时改变它的行为。对象看起来似乎修改了它的类。