18. JAVA 图形界面 Part 2(JTextComponent、事件处理、单选按钮、复选框、列表框、下拉列表框、菜单组件、文件选择) ----- 学习笔记_复选框、单选按钮及相应的事件处理的小结-程序员宅基地
技术标签: Java 监听器 学习笔记 图形界面 事件处理 AWT
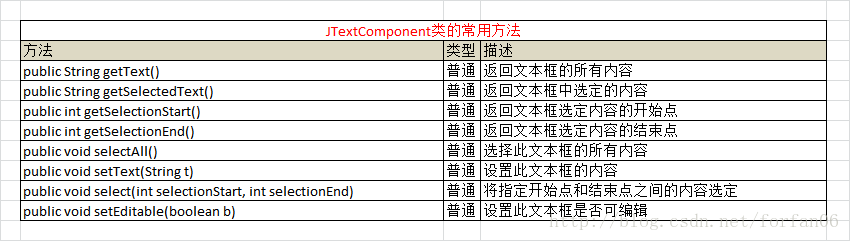
18.9 文本组件: JTextComponent
各个软件系统中都存在文本框,以方便用户输入数据。在Swing中也提供了同样的文本框组件,但是文本输入组件在Swing中也分为好几种:
- 单行文本框: JTextField
- 密码文本框: JPasswordField
- 多行文本框: JTextArea
在开发中JTextComponent(以上3种组件共用)的常用方法如下图所示:
18.9.1 单行文本输入组件:JTextField
如果要实现一个单行的输入文本,可以使用JTextField组件。此类除了可以使用JTextComponent类的方法外,还可以使用下图所示的几个方法

范例:使用JTextField定义普通文本框
package org.forfan06.jtextdemo;
import java.awt.GridLayout;
import javax.swing.JFrame;
import javax.swing.JLabel;
import javax.swing.JTextField;
public class JTextDemo01{
    public static void main(String args[]){
        JFrame jframe = new JFrame("Welcome to CSDN");
        JTextField name = new JTextField(30);   //定义文本框,并指定内容
        JTextField noed = new JTextField("CSDN", 10);   //定义文本框,指定内容和长度

        JLabel nameLabel = new JLabel("输入用户名:");    // 定义标签
        JLabel noedLabel = new JLabel("不可编辑文本:");

        noed.setEnabled(false);   //此文本框不可编辑
        name.setColumns(30);    //设置长度,但此时不起作用
        noed.setColumns(10);
        jframe.setLayout(new GridLayout(2, 2));   //设置容器的布局管理器
        jframe.add(nameLabel);
        jframe.add(name);
        jframe.add(noedLabel);
        jframe.add(noed);
        jframe.setSize(300, 100);
        jframe.setLocation(300, 200);
        jframe.setVisible(true);
    }
}
以上程序使用了GridLayout的排版格式,第一个文本框是可编辑的;第二个文本框是不可编辑的。在上面的程序中,虽然使用了setColumns()方法设置显示的行数,但是在显示上并没有任何的改变(主要原因是由于GirdLayout布局管理器在使用时会忽略这些设置值,让每一个格子都具有相同的大小。) 如果要解决这样的问题(设置行数无效的问题),可以取消布局管理器,而使用绝对定位的方式进行设置。
范例:使用绝对定位显示
package org.forfan06.jtextdemo;
import javax.swing.JFrame;
import javax.swing.JLabel;
import javax.swing.JTextField;
public class JTextDemo02{
    public static void main(String args[]){
        JFrame jframe = new JFrame("Welcome to CSDN");
        JTextField name = new JTextField(30);
        JTextField noed = new JTextField("CSDN", 10);

        JLabel nameLabel = new JLabel("输入用户名:");
        JLabel noedLabel = new JLabel("不可编辑文本:");

        noed.setEnabled(false);
        nameLabel.setBounds(10, 10, 100, 20);
        noedLabel.setBounds(10, 40, 100, 20);
        name.setBounds(110, 10, 80, 20);
        noed.setBounds(110, 40, 50, 20);

        jframe.setLayout(null);
        jframe.add(nameLabel);
        jframe.add(name);
        jframe.add(noedLabel);
        jframe.add(noed);
        jframe.setSize(300, 100);
        jframe.setLocation(300, 200);
        jframe.setVisible(true);
    }
}
上面程序使用了绝对定位的方法,对组件进行了显示设置,这样组件的大小、位置就可以根据用户需要自由定义!!!!
Problem:下面的Demo02没有setColumns()方法,记住自己加上这个方式运行后看出差别!!!!!!
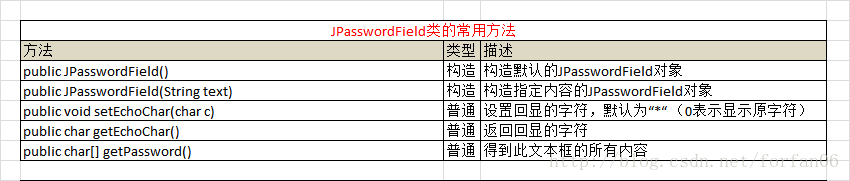
18.9.2 密文输入组件:JPasswordField
JTextField是使用明文方式进行数据显示的,如果现在需要将回显的内容设置成其他字符,则可以使用JPasswordField类。该类的常用方法如下图所示:
范例:设置密文显示框
package org.forfan06.jtextdemo;
import javax.swing.JFrame;
import javax.swing.JLabel;
import javax.swing.JPasswordField;
public class JPasswordDemo01{
    public static void main(String args[]){
        JFrame jframe = new JFrame("Welcome to CSDN");
        JPasswordField jpf1 = new JPasswordField();
        JPasswordField jpf2 = new JPasswordField();

        jpf2.setEchoChar('#');
        JLabel label1 = new JLabel("默认的回显示:");
        JLabel label2 = new JLabel("回显设置为“#”:");

        label1.setBounds(10, 10, 100, 20);
        label2.setBounds(10, 40, 100, 20);
        jpf1.setBounds(110, 10, 80, 20);
        jpf2.setBounds(110, 40, 50, 20);

        jframe.setLayout(null);
        jframe.add(label1);
        jframe.add(jpf1);
        jframe.add(label2);
        jframe.add(jpf2);
        jframe.setSize(300, 100);
        jframe.setLocation(300, 200);
        jframe.setVisible(true);
    }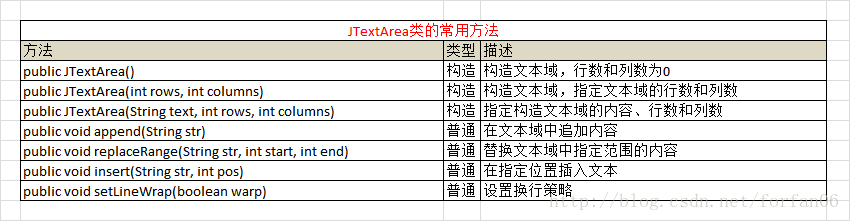
}18.9.3 多行文本输入组件:JTextArea
如果要输入多行文本,则可以使用JTextArea类来实现多行文本的输入。此类扩展了JTextComponent类,其常用方法如下图所示:
范例:使用JTextArea
package org.forfan06.jtextdemo;
import javax.swing.JFrame;
import javax.swing.JLabel;
import javax.swing.JTextArea;
public class JTextAreaDemo01{
    public static void main(String args[]){
        JFrame jframe = new JFrame("Welcome to CSDN");
        JTextArea jta = new JTextArea(3, 10);
        JLabel label = new JLabel("多行文本域:");
        label.setBounds(10, 10, 120, 20);
        jta.setBounds(130, 10, 150, 100);
        jframe.setLayout(null);
        jframe.add(label);
        jframe.add(jta);
        jframe.setSize(300, 150);
        jframe.setLocation(300, 200);
        jframe.setVisible(true);
    }
}
上面程序只是简单地构造了一个文本域。
但是如果一个文本域设置得过大,则肯定需要使用滚动条显示,此时就需要将文本域设置在带滚动条的 面板中,使用JScrollPane即可!!!
范例:为文本域加入滚动条
package org.forfan06.jtextdemo;
import java.awt.GridLayout;
import javax.swing.JFrame;
import javax.swing.JLabel;
import javax.swing.JScrollPane;
import javax.swing.JTextArea;
public class JTextAreaWithScrollbarDemo{
    public static void main(String args[]){
        JFrame jframe = new JFrame("Welcome to CSDN");
        JTextArea jta = new JTextArea(3, 20);
        jta.setLineWrap(true);
        //在文本域上加入滚动条,水平和垂直滚动条始终出现
        JScrollPane scr = new JScrollPane(jta, JScrollPane.VERTICAL_SCROLLBAR_ALWAYS, JScrollPane.HORIZONTAL_SCROLLBAR_ALWAYS);
        JLabel label = new JLabel("多行文本域:");
        jframe.setLayout(new GridLayout(2, 1));
        jframe.add(label);
        jframe.add(scr);
        jframe.setSize(300, 150);
        jframe.setLocation(300, 200);
        jframe.setVisible(true);
    }
}18.10 事件处理
一个图形界面制作完成了,但是在程序开发中这只是完成了起步的工作。因为要想让每一个组件都发挥其自身的作用,还需要对所有的组件进行事件处理!!
18.10.1 事件和监听器
要想清楚的认识事件处理。首先应该知道事件的定义是什么? 事件就是表示一个对象发生状态的变化!!!例如,每当一个按钮按下时,实际上按钮的状态就发生了改变。那么此时就会产生一个事件。如果要想处理此事件,就需要事件的监听者不断地监听事件的变化,并根据这些事件进行相应的处理。
在Swing编程中,依然使用了最早AWT的事件处理方式。所有的事件类(基本上任意的一个组件都有对应的事件)都是EventObject类的子类。如下图所示:
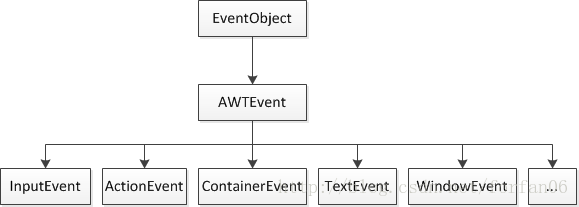
EventObject类的定义格式如下所示:
public class EventObject extends Object implements Serializable{
   public EventObject(Object source){  //构造一个发生事件的对象
   }
   public Object getSource(){   //返回一个事件对象
   }
   public String toString(){     //得到信息
   }
}当一个组件产生一个事件后,这些事件对象需要被接收!如果没有能够接收和处理事件的对象,图形界面程序所生成的一切事件都是无用的。 这些事件接收对象就称为事件监听器。所有的事件监听器都是以监听接口的形式出现的,处理时只需要实现此接口即可。
整个事件的处理流程如下图所示:
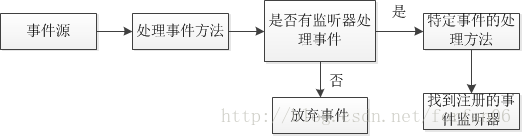
大部分图形界面的事件处理类和接口都保存在java.awt.event包中。
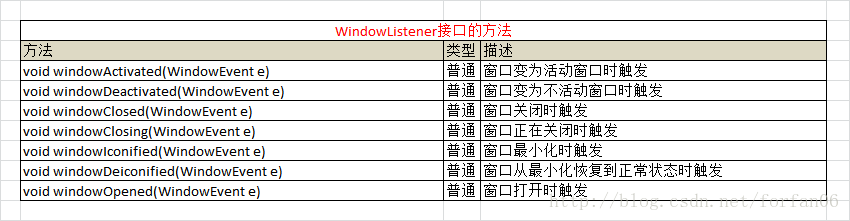
18.10.2 窗体事件
WindowListener是专门处理窗体的事件监听接口。一个窗体的所有变化,如窗口的打开、关闭等都可以使用这个接口进行监听。该接口定义的方法如下所示:
范例:实现WindowListener
package org.forfan06.windoweventdemo;
import java.awt.event.WindowListener;
import java.awt.event.WindowEvent;
public class MyWindowEventHandle implements WindowListener{  //实现窗口监听
    public void windowActivated(WindowEvent arg0){  //设置为活动窗口时触发
        System.out.println("windowActivated  -->  窗口被激活");
    }
    public void windowDeactivated(WindowEvent arg0){
        System.out.println("windowDeactivated  -->  取消窗口选中");
    }
    public void windowClosed(WindowEvent arg0){
        System.out.println("windowClosed  -->  窗口被关闭");
    }
    public void windowClosing(WindowEvent arg0){
        System.out.println("windowClosing  -->  窗口关闭");
        System.exit(1);    //系统退出
    }
    public void windowIconified(WindowEvent arg0){
        System.out.println("windowIconified  -->  窗口最小化");
    }
    public void windowDeiconified(WindowEvent arg0){
        System.out.println("windowDeiconified  -->  窗口从最小化恢复");
    }
    public void windowOpened(WindowEvent arg0){    //窗口打开时触发
        System.out.println("windowOpened  -->  窗口被打开");
    }
}范例:在窗体上注册事件监听器
package org.forfan06.windoweventdemo;
import java.awt.Color;
import javax.swing.JFrame;
import java.awt.event;
import java.awt.event.WindowEvent;
public class MyWindowEventJFrameDemo01{
    public static void main(String args[]){
        JFrame jframe = new JFrame("Welcome to CSDN"):
        //将此窗体加入到一个窗口事件监听器中,这样监听器就可以根据事件进行处理
        jframe.addWindowListener(new MyWindowEventHandle());
        jframe.setSize(300, 160);
        jframe.setBackground(Color.WHITE);
        jframe.setLocation(300, 200):
        jframe.setVisible(true);
    }
}
程序运行之后会显示一个窗体,此时对窗体进行相应的状态改变,则在后台会打印一些操作信息。
在关闭监听中编写了System.exit(1)语句,这样关闭按钮就真正起到了作用,可以让程序正常结束安全退出。
18.10.3 监听适配器
大概了解了事件处理的基本流程之后,可能会有这样一个问题:“如果现在只需要对关闭窗口的事件进行监听,其他的操作都忽略,那么还有必要覆写WindowListener接口中的其他方法吗?能不能根据个人的需要来进行覆写呢??”
如果要解决上面的问题,直接使用监听接口肯定不合适,因为一个类如果实现接口,则必须覆写接口中的全部抽象方法。现在想想之前讲到过的适配器设计模式!!!在实现类和接口中增加一个过渡的抽象类,子类继承抽象类就可以根据需要进行部分方法的覆写。所以在整个事件处理中提供了很多的Adapter(适配器)类,方便用户进行事件处理的实现。
以WindowAdapter类为例,用户只要继承了此类,就可以根据自己的需要覆写所需要的方法,如果现在只关心窗口关闭方法,则只需要在子类中覆写windowClosing()方法即可!!
范例:通过WindowAdapter实现监听
package org.forfan06.windoweventdemo;
import java.awt.event.WindowAdapter;
import java.awt.event.WindowEvent;
public class MyWindowAdapterEventHandle extends WindowAdapter{
    public void windowClosing(WindowEvent e){
        System.out.println("window -->  closing!!!");
        System.exit(1);
    }
}
窗体的操作代码:
package org.forfan06.windoweventdemo;
import java.awt.Color;
import javax.swing.JFrame;
import java.awt.event;
import java.awt.event.WindowEvent;
public class MyWindowEventJFrameDemo02{
    public static void main(String args[]){
        JFrame jframe = new JFrame("Welcome to CSDN"):
        //将此窗体加入到一个窗口事件监听器中,这样监听器就可以根据事件进行处理
        jframe.addWindowListener(new MyWindowAdapterEventHandle());
        jframe.setSize(300, 160);
        jframe.setBackground(Color.WHITE);
        jframe.setLocation(300, 200):
        jframe.setVisible(true);
    }
}
这样,当,单击关闭按钮时会自动进行监听处理,让系统退出。但是这样一来也会产生一个新的问题:
如果此监听处理只需要操作一次,那么还有必要将其设置成一个单独的类吗???很明显,将其设置成一个单独的类有些多余。此时可以使用匿名内部类来完成监听操作!!!!
范例:使用匿名内部类
package org.forfan06.windoweventdemo;
import java.awt.event.WindowListener;
import java.awt.event.WindowEvent;
import java.awt.event.WindowAdapter;
import javax.swing.JFrame;
import java.awt.Color;
public class MyWindowEventJFrameDemo03{
    public static void main(String args[]){
        JFrame jframe = new JFrame("Welcome to CSDN");

        jframe.addWindowListener(new WindowAdapter(){
            public void windowClosing(WindowEvent e){
                System.out.println("Window --> closing");
                System.exit(1);
            }
        });
        jframe.setSize(300, 160);
        jframe.setBackground(Color.WHITE);
        jframe.setLocation(300, 200);
        jframe.setVisible(true);
    }
}18.10.4 动作事件及监听处理
要想让一个按钮变得有意义,就必须使用事件处理。在Swing的事件处理中,可以使用ActionListener接口处理按钮的动作事件。
ActionListener接口只定义了一个方法:
interface ActionListener{
   void actionPerformed(ActionEvent e);
}
下面是使用以上监听接口监听按钮的单击事件。
范例:使用ActionListener监听
package org.forfan06.actioneventdemo;
import java.awt.Font;
import java.awt.GridLayout;
import java.awt.event.ActionEvent;
import java.awt.event.ActionListener;
import java.awt.event.WindowAdapter;
import java.awt.event.WindowEvent;
import javax.swing.JFrame;
import javax.swing.JLabel;
import javax.swing.JButton;
import javax.swing.JPanel;
import javax.swing.JTextField;
class ActionHandle{
    private JFrame jframe = new JFrame("Welcome to CSDN");

    private JButton button = new JButton("显示");
    private JLabel label = new JLabel();
    private JTextField text = new JTextField(10);
    private JPanel panel = new JPanel();
    public ActionHandle(){
        Font font = new Font("Serief", Font.ITALIC + Font.BOLD, 28);
        label.setFont(font);
        label.setText("等待用户输入信息");
        button.addActionListener(new ActionListener(){
            public void actionPerformed(ActionEvent e){
                if(e.getSource() == button){
                    label.setText(text.getText());
                }
            }
        });

        jframe.addWindowListener(new WindowAdapter(){
            public void windowClosing(WindowEvent e){
                System.exit(1);
            }
        });

        jframe.setLayout(new GridLayout(2, 1));
        panel.setLayout(new GridLayout(1, 2));
        panel.add(text);
        panel.add(button);
        jframe.add(panel);
        jframe.add(label);
        jframe.pack();
        jframe.setVisible(true);
    }
}

public class MyActionEventDemo01{
    public static void main(String args[]){
        new ActionHandle();
    }
}上面程序的事件操作也使用了匿名内部类的方式完成,因为动作事件有可能有多种事件源调用,所以为了保险起见,在代码操作之前增加了一下验证:
if(e.getSource() == button){  //判断触发源是否是按钮
}
直接使用了地址比较方式,如果操作的事件源是由按钮触发的。则执行语句。当然,此时代码是在一个类中完成,如果现在换成了两个类,则可以通过instanceof关键字来判断操作的数据源类型,如下所示:
if(e.getSource() instanceof JButton){  //判断触发源是否是按钮
}
了解了动作事件之后,下面实际上就可以此事件完成一个简单的用户登录操作。如果用户输入的用户名和密码都正确,则认为是合法用户,提示登录成功的信息;反之,则提示登录失败的信息。具体操作代码如下:
范例: 用户登录操作
(1) 编写登录验证类
class LoginCheck{   //编写登陆验证类
    private String name;
    private String password;
    public LoginCheck(String name, String password){
        this.name = name;
        this.password = password;
    }
    public boolean validate(){
        if("forfan06".equals(name) && "csdn".equals(password)){
            return true;
        }else{
            return false;
        }
    }
}
以上的类知识根据输入进来的用户名和密码进行验证,在奔雷中不涉及任何的显示操作,只是单单完成逻辑功能。使用时通过构造方法对name和password属性的内容进行赋值,之后调用validate()方法完成验证的操作。
============================================================================================
为什么字符串比较时,把字符串放在前面??? 为了避免空指向异常!!!
首先,String是一个引用数据类型,如果引用数据类型没有开辟空间,则内容为null,null调用方法肯定会出现空指向异常。
而,一个字符串就是String匿名对象,匿名对象永远不可能为空。上面的做法避免了空指向异常!!!
============================================================================================
(2) 编写图形界面:为简便,使用绝对定位的方式进行版面的布局
//package org.forfan06.actioneventdemo;
import java.awt.Font;
import java.awt.event.ActionEvent;
import java.awt.event.ActionListener;
import java.awt.event.WindowEvent;
import java.awt.event.WindowAdapter;
import javax.swing.JFrame;
import javax.swing.JLabel;
import javax.swing.JButton;
import javax.swing.JPasswordField;
import javax.swing.JTextField;

class LoginCheck{
    private String name;
    private String password;

    public LoginCheck(String name, String password){
        this.name = name;
        this.password = password;
    }

    public boolean validate(){
        if("forfan06".equals(name) && "csdn".equals(password)){
            return true;
        }else{
            return false;
        }
    }
}

class ActionHandle{
    private JFrame jframe = new JFrame("Welcome to CSDN");

    private JButton submit = new JButton("登陆");
    private JButton reset = new JButton("重置");
    private JLabel nameLab = new JLabel("用户名");
    private JLabel passLab = new JLabel("密  码");
    private JLabel infoLab = new JLabel("用户登录系统");
    private JTextField nameText = new JTextField();
    private JPasswordField passText = new JPasswordField();

    public ActionHandle(){
        Font font = new Font("Serief", Font.BOLD, 12);
        infoLab.setFont(font);
        submit.addActionListener(new ActionListener(){
            public void actionPerformed(ActionEvent e){
                if(e.getSource() == submit){
                    String tname = nameText.getText();
                    //得到输入的密码,此时通过getPassword()方法返回的是字符数组
                    String tpass = new String(passText.getPassword());
                    //实例化LoginCheck对象,传入输入的用户名和密码
                    LoginCheck log = new LoginCheck(tname, tpass);
                    //对用户名和密码进行验证
                    if(log.validate()){
                        infoLab.setText("登陆成功,欢迎光临!");
                    }else{
                        infoLab.setText("登陆失败,错误的用户名或密码!");
                    }
                }
                if(e.getSource() == reset){
                    nameText.setText("");
                    passText.setText("");
                    infoLab.setText("用户登录系统!");
                }
            }
        });

        jframe.addWindowListener(new WindowAdapter(){
            public void windowClosing(WindowEvent e){
                System.exit(1);
            }
        });

        jframe.setLayout(null);
        nameLab.setBounds(5, 5, 60, 20);
        passLab.setBounds(5, 30, 60, 20);
        infoLab.setBounds(5, 65, 220, 30);
        nameText.setBounds(65, 5, 100, 20);
        passText.setBounds(65, 30, 100, 20);
        submit.setBounds(165, 5, 60, 20);
        reset.setBounds(165, 30, 60, 20);

        jframe.add(nameLab);
        jframe.add(passLab);
        jframe.add(infoLab);
        jframe.add(nameText);
        jframe.add(passText);
        jframe.add(submit);
        jframe.add(reset);
        jframe.setSize(280, 130);
        jframe.setVisible(true);
    }
}

public class MyActionEventDemo03{
    public static void main(String args[]){
        new ActionHandle();
    }
}
(3)程序分析: 上面程序在窗体上使用了一个文本框和一个密码框接收输入的用户名和密码。
当单击按钮时会触发ActionEvent事件,并判断发生此事件的是哪个按钮。
如果是“登录”按钮触发的则从文本框中取出内容并通过LoginCheck类进行用户名和密码的验证;
如果是“重置”按钮,则将用户名和密码框的内容清除。
=======================================================================================
注意程序的分层。 要对程序的结构进行合理的划分。
在上面程序中有专门负责业务处理的LoginCheck类,也有完成界面显示的MyActioNEventDemo03类,很好地达到了显示和业务的分离。
当然,更加合理的做法是中间要加入一个控制端,即形成“视图 - 控制 - 模型” 的3层结构!!!!!!!!!!
=======================================================================================
18.10.5 键盘事件及监听处理
在Swing的事件处理中也可以对键盘的操作进行监听。需要使用KeyListener接口!!!
KeyListener接口的方法:

如果要取得键盘输入的内容,则可以通过KeyEvent取得。
KeyEvent类的常用方法:

范例:实现键盘监听
package org.forfan06.keyeventdemo;
import java.awt.event.KeyEvent;
import java.awt.event.KeyListener;
import java.awt.event.WindowAdapter;
import java.awt.event.WindowEvent;
import javax.swing.JFrame;
import javax.swing.JScrollPane;
import javax.swing.JTextArea;
//此类直接了JFrame类、实现KeyListener接口
class MyKeyHandle extends JFrame implements KeyListener{
	private JTextArea text = new JTextArea();
	public MyKeyHandle(){
		super.setTitle("Welcome to CSDN");
		JScrollPane scr = new JScrollPane(text);  //加入滚动条
		scr.setBounds(5, 5, 300, 200);
		super.add(scr);
		text.addKeyListener(this);
		super.setSize(310, 210);
		super.setVisible(true);
		super.addWindowListener(new WindowAdapter(){
			public void windowClosing(WindowEvent e){
				System.exit(1);
			}
		});
	}
	public void keyPressed(KeyEvent e){
		text.append("键盘:" + KeyEvent.getKeyText(e.getKeyCode()) + "键按下\n");
	}
	public void keyReleased(KeyEvent e){
		text.append("键盘" + KeyEvent.getKeyText(e.getKeyCode()) + "键按下");
	}
	public void keyTyped(KeyEvent e){
		text.append("输入的内容是:" + e.getKeyChar() + "\n");
	}
}
public class MyKeyEventDemo01{
	public static void main(String args[]){
		new MyKeyHandle();
	}
}========================================================================================
上面代码中this表示当前对象!! MyKeyHandle实现了KeyListener监听接口,所以MyKeyHandle类也是一个监听操作类,这样当JTextArea增加事件时直接使用了this关键字,如:
text.addKeyListener(this); //加入key监听========================================================================================
在键监听中,也可以使用KeyAdapter适配器来完成键盘事件的监听。
范例:使用KeyAdapter适配器监听键盘操作
package org.forfan06.keyeventdemo;
import java.awt.event.KeyAdapter;
import java.awt.event.KeyEvent;
import java.awt.event.WindowAdapter;
import java.awt.event.WindowEvent;
import javax.swing.JFrame;
import javax.swing.JScrollPane;
import javax.swing.JTextArea;
class MyKeyHandle extends JFrame{     //此类继承了JFrame类
	private JTextArea text = new JTextArea();
	public MyKeyHandle(){
		super.setTitle("Welcome to CSDN");
		JScrollPane scr = new JScrollPane(text);  //加入滚动条
		scr.setBounds(5, 5, 300, 200);
		super.add(scr);
		text.addKeyListener(new KeyAdapter(){
			public void keyTyped(KeyEvent e){
				text.append("输入内容是:" + e.getKeyChar() + "\n");
			}
		});
		super.setSize(310, 210);
		super.setVisible(true);
		super.addWindowListener(new WindowAdapter(){
			public void windowClosing(WindowEvent e){
				System.exit(1);
			}
		});
	}
}
public class MyKeyEventDemo02{
	public static void main(String args[]){
		new MyKeyHandle();
	}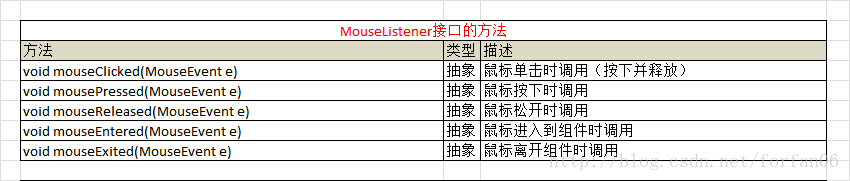
}18.10.6 鼠标事件及监听处理
MouseListener接口可以对一个鼠标的操作进行监听,如鼠标按下、松开等等操作。该接口定义了以下方法:
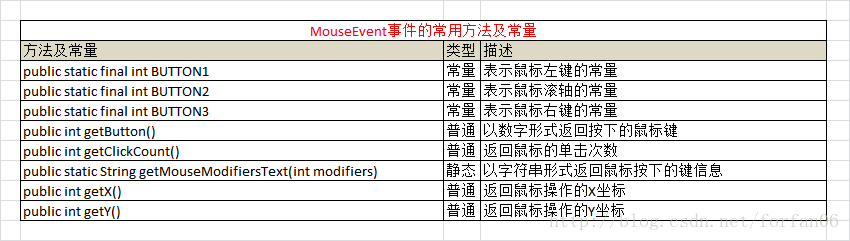
在每个事件触发后都会产生MouseEvent事件,此事件可以得到鼠标的相关操作。
MouseEvent类的常用方法及常量如下图所示:
范例:实现鼠标监听
package org.forfan06.mouseeventdemo;
import java.awt.event.MouseListener;
import java.awt.event.MouseEvent;
import java.awt.event.WindowAdapter;
import java.awt.event.WindowEvent;
import javax.swing.JFrame;
import javax.swing.JScrollPane;
import javax.swing.JTextArea;
//MyMouseHandle类直接继承了JFrame、并实现了MouseListener接口
class MyMouseHandle extends JFrame implements MouseListener{
	private JTextArea text = new JTextArea();
	public MyMouseHandle(){
		super.setTitle("Welcome to CSDN");
		JScrollPane scr = new JScrollPane(text);
		scr.setBounds(5, 5, 300, 200);
		super.add(scr);
		text.addMouseListener(this);
		super.setSize(310, 210);
		super.setVisible(true);
		super.addWindowListener(new WindowAdapter(){
			public void windowClosing(WindowEvent e){
				System.exit(1);
			}
		});
	}
	public void mouseClicked(MouseEvent e){  //鼠标单击事件
		int c = e.getButton();  //得到按下的鼠标键
		String mouseInfo = null;  //接收信息
		if( c == MouseEvent.BUTTON1){
			mouseInfo = "左键";
		}else if(c == MouseEvent.BUTTON3){
			mouseInfo = "右键";
		}else if(c == MouseEvent.BUTTON2){
			mouseInfo = "滚轴";
		}
		text.append("鼠标单击: " + mouseInfo + ".\n");
	}
	public void mouseReleased(MouseEvent e){
		text.append("鼠标松开。\n");
	}
	public void mouseEntered(MouseEvent e){
		text.append("鼠标进入组件。\n");
	}
	public void mouseExited(MouseEvent e){
		text.append("鼠标离开组件。\n");
	}
	public void mousePressed(MouseEvent e){
		text.append("鼠标按下。\n");
	}
}
public class MyMouseEventDemo01{
	public static void main(String args[]){
		new MyMouseHandle();
	}
}
此时,只要是进入或离开此组建,都会有鼠标事件触发;还可以通过单击事件取得鼠标哪个键被按下。
以上是实现了MouseListener接口,这样在子类中必须覆写5个抽象方法(mouseClicked()、mousePressed()、mouseReleased()、mouseEntered()、mouseExited())。
可以通过直接使用MouseAdapter类来完成鼠标指定事件的监听,来简化代码。
范例:通过MouseAdapter类实现对指定鼠标操作监听
package org.forfan06.mouseeventdemo;
import java.awt.event.MouseEvent;
import java.awt.event.MouseAdapter;
import java.awt.event.WindowAdapter;
import java.awt.event.WindowEvent;
import javax.swing.JFrame;
import javax.swing.JScrollPane;
import javax.swing.JTextArea;
//MyMouseHandle继承了JFrame类
class MyMouseHandle extends JFrame{
	private JTextArea text = new JTextArea();
	public MyMouseHandle(){
		super.setTitle("Welcome to CSDN");
		JScrollPane scr = new JScrollPane(text);
		scr.setBounds(5, 5, 300, 200);
		super.add(scr);
		text.addMouseListener(new MouseAdapter(){
			public void mouseClicked(MouseEvent e){
				int c = e.getButton();
				String mouseInfo = null;
				if(c == MouseEvent.BUTTON1){
					mouseInfo = "左键";
				}else if(c == MouseEvent.BUTTON3){
					mouseInfo = "右键";
				}else if(c == MouseEvent.BUTTON2){
					mouseInfo = "滚轴";
				}
				text.append("鼠标" + mouseInfo + "按下。\n");
			}
		});
		super.setSize(310, 210);
		super.setVisible(true);
		super.addWindowListener(new WindowAdapter(){
			public void windowClosing(WindowEvent e){
				System.exit(1);
			}
		});
	}
}
public class MyMouseEventDemo02{
	public static void main(String args[]){
		new MyMouseHandle();
	}
}18.10.7 鼠标拖拽事件及监听处理
在一般的图形界面中经常可以看到鼠标拖拽操作的情况。在Swing的事件处理中可以使用MouseMotionListener接口来完成鼠标的拖拽操作。
MouseMotionListener接口中定义了以下几个方法:

范例:观察鼠标拖拽操作
package org.forfan06.mouseeventdemo;
import java.awt.event.WindowAdapter;
import java.awt.event.WindowEvent;
import java.awt.event.MouseMotionListener;
import java.awt.event.MouseEvent;
import javax.swing.JFrame;
class MyMouseMotionHandle extends JFrame{
	public MyMouseMotionHandle(){
		super.setTitle("Welcome to CSDN");
		super.addMouseMotionListener(new MouseMotionListener(){
			public void mouseDragged(MouseEvent e){
				System.out.println("鼠标拖拽到: X = " + e.getX() + ", Y = " + e.getY());
			}
			public void mouseMoved(MouseEvent e){
				System.out.println("鼠标移动到窗体");
			}
		});
		super.setSize(310, 210);
		super.setVisible(true);
		super.addWindowListener(new WindowAdapter(){
			public void windowClosing(WindowEvent e){
				System.exit(1);
			}
		});
	}
}
public class MyMouseMotionEventDemo01{
	public static void main(String args[]){
		new MyMouseMotionHandle();
	}
}当然,在鼠标拖拽操作中也同样存在MouseMotionAdapter类来简化代码。
super.addMouseMotionListener(new MouseMotionAdapter(){
	public void mouseMoved(MouseEvent e){
		System.out.println("鼠标移动到窗体");
	}
});
18.11 单选按钮: JRadioButton
18.11.1 认识JRadioButton
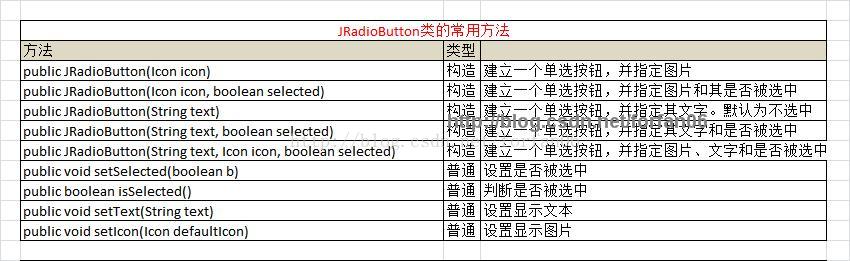
单选按钮就是在给出的多个显示信息中指定选择一个,在Swing中是通过JRadioButton来完成一组单选按钮的操作。
JRadioButton类的常用方法如下图所示:
范例:显示单选按钮
package org.forfan06.jradiobuttondemo;
import javax.swing.JRadioButton;
import javax.swing.JFrame;
import java.awt.GridLayout;
import java.awt.Container;
import javax.swing.JPanel;
import javax.swing.BorderFactory;
import java.awt.event.WindowAdapter;
import java.awt.event.WindowEvent;
class MyRadio{
	private JFrame jframe = new JFrame("Welcome to CSDN");
	private Container container = jframe.getContentPane();
	private JRadioButton jrb1 = new JRadioButton("baidu");
	private JRadioButton jrb2 = new JRadioButton("google");
	private JRadioButton jrb3 = new JRadioButton("bing");
	private JPanel pan = new JPanel();

	public MyRadio(){
		//定义一个面板的边框显示条
		pan.setBorder(BorderFactory.createTitledBorder("喜欢哪个搜索引擎"));
		pan.setLayout(new GridLayout(1, 3));

		pan.add(this.jrb1);
		pan.add(this.jrb2);
		pan.add(this.jrb3);
		container.add(pan);
		this.jframe.setSize(330, 80);
		this.jframe.setVisible(true);

		this.jframe.addWindowListener(new WindowAdapter(){
			public void windowClosing(WindowEvent e){
				System.exit(1);
			}
		});
	}
}
public class JRadioButtonDemo01{
	public static void main(String args[]){
		new MyRadio();
	}
}运行程序后发现,这里的单选按钮只是样式上像单选按钮而已,并没有实现真正的单选功能。可以同时选中3个JRadioButton按钮。形成”多选“的原因是:
没有把所有的单选按钮加入到一个组中!!!!使用ButtonGroup类将所有的单选按钮加入到一个组中。如下所示:
ButtonGroup group = new ButtonGroup();  //定义一个按钮组
group.add(this.jrb1);  //分别将jrb1、jrb2、jrb3加入到这个组中
group.add(this.jrb2);
group.add(this.jrb3);18.11.2 JRadioButton事件处理
在单选按钮操作中,可以使用ItemListener接口进行事件的监听。
ItemListener接口定义的方法:

此方法中存在ItemEvent事件,ItemEvent类的常用方法及常量

范例:单选按钮事件操作 --- 性别选择
现在按钮的状态使用两张图片来表示。如果已经选中,则显示right.png图片;如果没有被选中,则使用wrong.png图片。
package org.forfan06.jradiobuttondemo;
import java.io.*;
import java.awt.Container;
import java.awt.GridLayout;
import java.awt.event.ItemListener;
import java.awt.event.ItemEvent;
import java.awt.event.WindowAdapter;
import java.awt.event.WindowEvent;
import javax.swing.BorderFactory;
import javax.swing.ButtonGroup;
import javax.swing.ImageIcon;
import javax.swing.JFrame;
import javax.swing.JPanel;
import javax.swing.JRadioButton;
class MyRadio implements ItemListener{
	private String right = "D:" + File.separator + "right.png";
	private String wrong = "D:" + File.separator + "wrong.png";

	private JFrame jframe = new JFrame("Welcome to CSDN");
	private Container container = jframe.getContentPane();
	private JRadioButton jrb1 = new JRadioButton("男", new ImageIcon(right), true);
	private JRadioButton jrb2 = new JRadioButton("女", new ImageIcon(wrong), false);  //如果这两个都设置为true,会出现什么情况??
	private JPanel pan = new JPanel();  //定义一个面板

	public MyRadio(){
		//定义一个面板的边框显示条
		pan.setBorder(BorderFactory.createTitledBorder("选择性别"));
		pan.setLayout(new GridLayout(1, 3));
		ButtonGroup gourp = new ButtonGroup();  //定义一个按钮组
		group.add(this.jrb1);
		group.add(this.jrb2);

		pan.add(this.jrb1);
		pan.add(this.jrb2);
		jrb1.addItemListener(this);
		jrb2.addItemListener(this);

		container.add(pan);
		this.jframe.setSize(200, 100);
		this.jframe.setVisible(true);
		this.jframe.addWindowListener(new WindowAdapter(){
			public void windowClosing(WindowEvent e){
				System.exit(1);
			}
		});
	}
	public void itemStateChanged(ItemEvent e){
		if(e.getSource() == jrb1){
			jrb1.setIcon(new ImageIcon(right));
			jrb2.setIcon(new ImageIcon(wrong));
		}else{
			jrb1.setIcon(new ImageIcon(wrong));
			jrb2.setIcon(new ImageIcon(right));
		}
	}
}
public JRadioButtonDemo02{
	public static void main(String args[]){
		new MyRadio();
	}
}***************ItemEvent、itemStateChanged******************
18.12 复选框:JCheckBox
18.12.1 认识JCheckBox
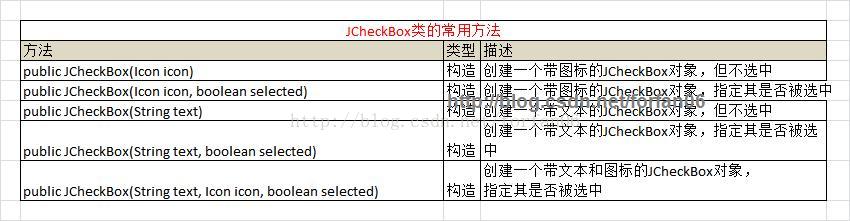
类似JRadioButton类实现了单选按钮的功能;JCheckBox类可以实现复选框的功能!!!
JCheckBox类的常用方法:
JCheckBox的其他使用方法和JRadioButton类的操作类似。
范例:复选框的操作 (注意这里为什么JCheckBox复选框不需要加入到一个组呢??!!)
package org.forfan06.jcheckboxdemo;
import java.awt.Container;
import java.awt.GridLayout;
import java.awt.event.WindowAdapter;
import java.awt.event.WindowEvent;
import javax.swing.BorderFactory;
import javax.swing.JFrame;
import javax.swing.JPanel;
import javax.swing.JCheckBox;
class MyCheckBox{
	private JFrame jframe = new JFrame("Welcome to CSDN");
	private Container container = jframe.getContentPane();
	private JCheckBox jcb1 = new JCheckBox("baidu");
	private JCheckBox jcb2 = new JCheckBox("google");
	private JCheckBox jcb3 = new JCheckBox("bing");
	private JPanel pan = new JPanel();  //定义一个面板
	public MyCheckBox(){
		//定义一个面板的边框显示条
		pan.setBorder(BorderFactory.createTitledBorder("请选择搜索引擎"));
		pan.setLayout(new GridLayout(1, 3));
		//为什么JCheckBox复选框不需要加入到一个组里面呢??!!!
		// ButtonGroup group = new ButtonGroup();
		// group.add(this.jcb1);
		// group.add(this.jcb2);
		// group.add(this.jcb3);
		pan.add(this.jcb1);
		pan.add(this.jcb2);
		pan.add(this.jcb3);
		container.add(pan);
		this.jframe.setSize(330, 80);
		this.jframe.setVisible(true);
		this.jframe.addWindowListener(new WindowAdapter(){
			public void windowClosing(WindowEvent e){
				System.exit(1);
			}
		});
	}
}
public class JCheckBoxDemo01{
	public static void main(String args[]){
		new MyCheckBox();
	}
}18.12.2 JCheckBox事件处理
JCheckBox和JRadioButton的事件处理监听接口是一样的,都是使用ItemListener接口。
范例:复选框事件操作
package org.forfan06.jcheckboxdemo;
import java.awt.Container;
import java.awt.GridLayout;
import java.awt.event.ItemListener;
import java.awt.event.ItemEvent;
import java.awt.event.WindowAdapter;
import java.awt.event.WindowEvent;
import java.io.File;
import javax.swing.BorderFactory;
import javax.swing.JFrame;
import javax.swing.JPanel;
import javax.swing.ImageIcon;
import javax.swing.JCheckBox;
class MyItemListener implements ItemListener{
	private String right = "D:" + File.separator + "right.png";
	private String wrong = "D:" + File.separator + "wrong.png";

	public void itemStateChanged(ItemEvent e){
		JCheckBox jcb = (JCheckBox) e.getItem();
		if(jcb.isSelected()){
			jcb.setIcon(new ImageIcon(right));
		}else{
			jcb.setIcon(new ImageIcon(wrong));
		}
	}
}
class MyCheckBox{
	private String wrong = "D:" + File.separator + "wrong.png";
	private JFrame jframe = new JFrame("Welcome to CSDN");
	private Container container = jframe.getContentPane();
	private JCheckBox jcb1 = new JCheckBox("baidu", new ImageIcon(wrong));
	private JCheckBox jcb2 = new JCheckBox("google", new ImageIcon(wrong));
	private JCheckBox jcb3 = new JCheckBox("bing", new ImageIcon(wrong));
	private JPanel pan = new JPanel();
	public MyCheckBox(){
		//定义一个面板的边框显示条
		pan.setBorder(BorderFactory.createTitledBorder("选择搜索引擎"));
		pan.setLayout(new GridLayout(1, 3));

		pan.add(this.jcb1);
		pan.add(this.jcb2);
		pan.add(this.jcb3);
		jcb1.addItemListener(new MyItemListener());
		jcb2.addItemListener(new MyItemListener());
		jcb3.addItemListener(new MyItemListener());

		container.add(pan);
		this.jframe.setSize(330, 100);
		this.jframe.setVisible(true);
		this.jframe.addWindowListener(new WindowAdapter(){
			public void windowClosing(WindowEvent e){
				System.exit(1);
			}
		});
	}
}
public class JCheckBoxDemo02{
	public static void main(String args[]){
		new MyCheckBox();
	}
}
18.13 列表框:JList
18.13.1 认识JList
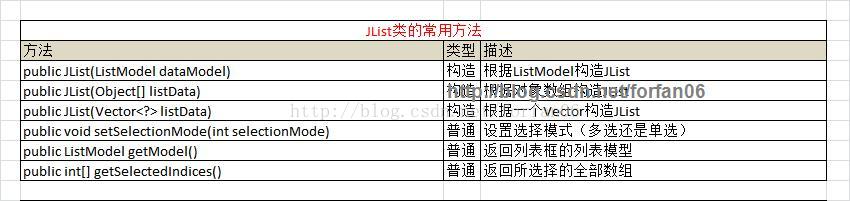
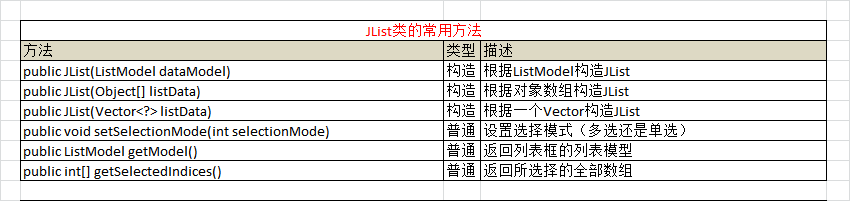
列表框可以同时将多个选项信息以列表的方式展示给用户,使用JList可以构建一个列表框。
JList类的常用方法:
对于列表框是多选还是单选,可以通过ListSelectionModel接口完成。
ListSelectionModel接口定义了如下的常量 :
范例:使用JList实现列表框的功能
package org.forfan06.jlistdemo;
import java.awt.Container;
import java.awt.GridLayout;
import java.awt.event.WindowAdapter;
import java.awt.event.WindowEvent;
import java.util.Vector;
import javax.swing.BorderFactory;
import javax.swing.JFrame;
import javax.swing.JList;
import javax.swing.ListSelectionModel;
class MyList{
	private JFrame jframe = new JFrame("Welcome to CSDN");
	private Container container = jframe.getContentPane();
	private JList list1 = null;
	private JList list2 = null;

	public MyList(){
		this.jframe.setLayout(new GridLayout(1, 3));
		String nations[] = {"中国", "美国", "英国", "德国", "意大利", "法国"};
		Vector<String> v = new Vector<String>();  //定义一个Vector集合
		v.add("baidu");
		v.add("google");
		v.add("bing");     //加入3个元素
		this.list1 = new JList(nations); //实例化JList    public JList(Object[] listData)
		this.list2 = new JList(v);  // public JList(Vector<?> listData)

		list1.setBorder(BorderFactory.createTitledBorder("最喜欢的国家"));
		list2.setBorder(BorderFactory.createTitledBorder("搜索引擎"));

		list1.setSelectionMode(ListSelectionModel.MULTIPLE_INTERVAL_SELECTION);  //每次可以选择多个选项
		list2.setSelectionMode(ListSelectionModel.SINGLE_SELECTION);  //每次只能选择一个选项

		container.add(this.list1);
		container.add(this.list2);

		this.jframe.setSize(330, 180);
		this.jframe.setVisible(true);
		this.jframe.addWindowListener(new WindowAdapter(){
			public void windowClosing(WindowEvent e){
				System.exit(1);
			}
		});
	}
}
public class JListDemo01{
	public static void main(String args[]){
		new MyList();
	}
}==================================================================================================
在JList中要使用JScrollPane才能出现滚动条
在JList显示时,如果内容过多不会将其加入滚动条显示。要想进行滚动条的显示,则必须将JList对象加入到一个JScrollPane中才可以!!!
==================================================================================================
18.13.2 使用ListModel构造JList
在JList对象的构造方法中有一个使用ListModel构造JList对象的操作。ListModel是一个专门用于创建JList列表内容操作的接口。ListModel接口中定义的方法:
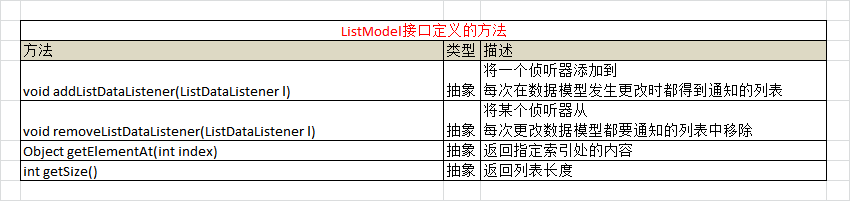
以上ListModel接口中虽然定义了4个方法,但是,在实际开发中比较常用的只有getElementAt(int index)和getSize()两个方法!!!所以一般在使用ListModel时都很少让子类直接实现此接口,而是通过继承AbstractListModel类来完成。。。下面使用AbstratListModel完成一个列表框的显示操作。
package org.forfan06.jlistdemo;
import java.awt.Container;
import java.awt.event.WindowAdapter;
import java.awt.event.WindowEvent;
import javax.swing.AbstractListModel;
import javax.swing.BorderFactory;
import javax.swing.JFrame;
import javax.swing.JList;
import javax.swing.ListSelectionModel;
class MyListModel extends AbstractListModel{
	private String nations[] = {"中国", "美国", "德国", "意大利", "英国", "法国"};
	public Object getElementAt(int index){
		if(index < this.nations.length){
			return this.nations[index];
		}else{
			return null;
		}
	}
	public int getSize(){
		return this.nations.length;
	}
}
class MyList{
	private JFrame jframe = new JFrame("Welcome to CSDN");
	private Container container = jframe.getContentPane();
	private JList list1 = null;
	public MyList(){
		this.list1 = new JList(new MyListModel());  //public JList(ListModel dataModel)
		list1.setBorder(BorderFactory.createTitledBorder("喜欢的国家"));
		list1.setSelectionMode(ListSelectionModel.MULTIPLE_INTERVAL_SELECTION);
		container.add(this.list1);
		this.jframe.setSize(330, 180);
		this.jframe.setVisible(true);
		this.jframe.addWindowListener(new WindowAdapter(){
			public void windowClosing(WindowEvent e){
				System.exit(1);
			}
		});
	}
}
public class JListDemo02{
	public static void main(String args[]){
		new MyList();
	}
}
18.13.3 JList事件处理
JList中可以使用ListSelectionListener的监听接口,来实现对JList中的选项进行监听。
ListSelectionListener接口定义的方法:

valueChanged()方法会产生ListSelectionEvent事件!!!!ListSelectionEvent事件中常用的方法如下:

范例:对JList进行监听
package org.forfan06.jlistdemo;
import java.awt.Container;
import java.awt.event.WindowAdapter;
import java.awt.event.WindowEvent;
import javax.swing.AbstractListModel;
import javax.swing.BorderFactory;
import javax.swing.JFrame;
import javax.swing.JList;
import javax.swing.JScrollPane;
import javax.swing.event.ListSelectionEvent;
import javax.swing.event.ListSelectionListener;
class MyListModel extends AbstractListModel{
	private String nations[] = {"中国", "美国", "德国", "意大利", "英国", "法国"};
	public Object getElementAt(int index){
		if(index < this.nations.length){
			return this.nations[index];
		}else{
			return null;
		}
	}
	public int getSize(){
		return this.nations.length;
	}
}
class MyList implements ListSelectionListener{
	private JFrame jframe = new JFrame("Welcome to forfan06's blog");
	private Container container = jframe.getContentPane();
	private JList list1 = null;
	public MyList(){
		this.list1 = new JList(new MyListModel());
		list1.setBorder(BorderFactory.createTitledBorder("喜欢哪个国家"));
		list1.addListSelectionListener(this);
		container.add(new JScrollPane(this.list1));
		this.jframe.setSize(330, 180);
		this.jframe.setVisible(true);
		this.jframe.addWindowListener(new WindowAdapter(){
			public void windowClosing(WindowEvent e){
				System.exit(1);
			}
		});
	}
	public void valueChanged(ListSelectionEvent e){
		int[] temp = list1.getSelectedIndices();  //取得全部选定索引
		System.out.print("所选中的内容是:");
		for(int i = 0; i < temp.length; i++){
			System.out.print(list1.getModel().getElementAt(i) + "、");
		}
		System.out.println();
	}
}
public class MyListDemo03{
	public static void main(String args[]){
		new MyList();
	}
}
18.14 下拉列表框:JComboBox
18.14.1 认识JComboBox
JList是以列表框的形式进行显示的。而下拉列表框则是通过JComboBox完成的!!!
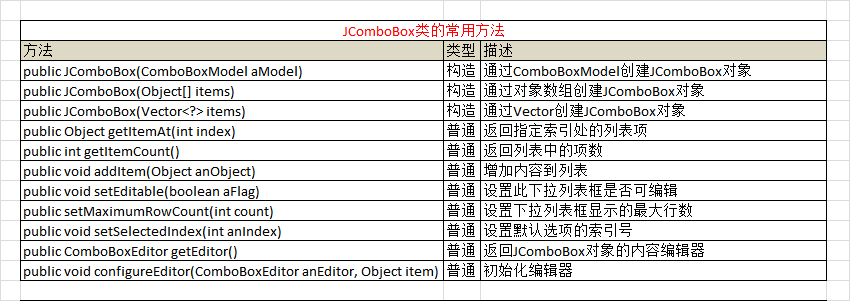
JComboBox类的常用方法如下图所示:
范例:建立下拉列表框
package org.forfan06.jcomboboxdemo;
import java.awt.Container;
import java.awt.GridLayout;
import java.awt.event.WindowAdapter;
import java.awt.event.WindowEvent;
import java.util.Vector;
import javax.swing.BorderFactory;
import javax.swing.JComboBox;
import javax.swing.JFrame;
import javax.swing.JLabel;
class MyComboBox{
	private JFrame jframe = new JFrame("Welcome to my blog");
	private Container container = jframe.getContentPane();
	private JComboBox jcb1 = null;
	private JComboBox jcb2 = null;
	public MyComboBox(){
		this.jframe.setLayout(new GridLayout(2, 2));
		String nations[] = {"中国", "美国", "英国", "法国", "德国", "意大利"};
		Vector<String> v = new Vector<String>();
		v.add("baidu");
		v.add("google");
		v.add("bing");
		this.jcb1 = new JComboBox(nations);
		this.jcb2 = new JComboBox(v);

		jcb1.setBorder(BorderFactory.createTitledBorder("喜欢哪个国家?"));
		jcb2.setBorder(BorderFactory.createTitledBorder("搜索引擎"));
		jcb1.setMaximumRowCount(3);
		jcb2.setMaximumRowCount(3);
		container.add(jcb1);
		container.add(jcb2);
		container.add(new JLabel("下拉列表框"));

		this.jframe.setSize(300, 150);
		this.jframe.setVisible(true);
		this.jframe.addWindowListener(new WindowAdapter(){
			public void windowClosing(WindowEvent e){
				System.exit(1);
			}
		});
	}
}

public class JComboBoxDemo01{
	public static void main(String args[]){
		new MyComboBox();
	}
}在JComboBox中没有必要设置选项的选项数!!!!!! 在JList中可以通过setSelectionMode()方法设置选择的选项数;但是在JComboBox中因为每次只能选择一次,所以没有必要进行此种设置!!!
================================================================================================
18.14.2 使用ComboBoxModel构造JComboBox
JComboBox也可以使用ComboBoxModel接口来创建JComboBox中的列表内容。与JList通过ListModel来创建一样!!!
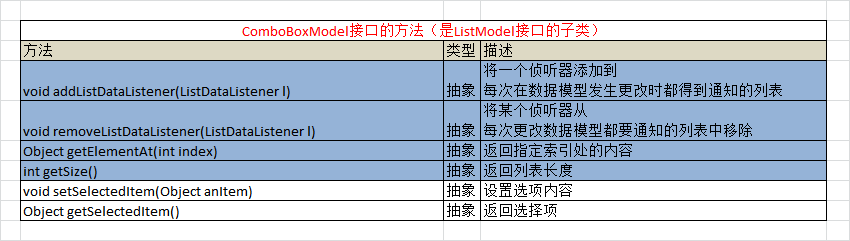
ComboBoxModel接口是ListModel接口的一个子类!!!除了继承ListModel中的所有操作之外,还增加了两个方法。具体如下:
范例:使用ComboBoxModel、AbstractListModel创建可编辑的JComboBox
package org.forfan06.jcomboboxdemo;
import java.awt.Container;
import java.awt.GridLayout;
import java.awt.event.WindowAdapter;
import java.awt.event.WindowEvent;
import javax.swing.AbstractListModel;
import javax.swing.BorderFactory;
import javax.swing.ComboBoxEditor;
import javax.swing.ComboBoxModel;
import javax.swing.JComboBox;
import javax.swing.JFrame;
import javax.swing.JLabel;
class MyComboBoxModel extends AbstractListModel implements ComboBoxModel{
	String nations[] = {"中国", "美国", "英国", "法国", "德国", "意大利"};
	String item = null;
	public Object getSelectedItem(){
		return this.item;
	}
	public void setSelectedItem(Object arg){
		this.item = (String) arg;
	}
	public int getSize(){
		return this.nations.length;
	}
	public Object getElementAt(int index){
		return this.nations[index];
	}
}
class MyComboBox{
	private String defaultMsg = "请选择或输入国家名称:";
	private JFrame jframe = new JFrame("Welcome to my blog");
	private Container container = jframe.getContentPane();
	private JComboBox jcb1 = null;
	public MyComboBox(){
		this.jframe.setLayout(new GridLayout(2, 1));
		this.jcb1 = new JComboBox(new MyComboBoxModel());

		jcb1.setBorder(BorderFactory.createTitledBorder("喜欢哪个国家"));
		jcb1.setMaximumRowCount(3);
		jcb1.setEditable(true);
		ComboBoxEditor editor = null;
		editor = jcb1.getEditor();
		jcb1.configureEditor(editor, defaultMsg);

		container.add(this.jcb1);
		container.add(new JLabel("下拉列表框"));

		this.jframe.setSize(180, 150);
		this.jframe.setVisible(true);
		this.jframe.addWindowListener(new WindowAdapter(){
			public void windowClosing(WindowEvent e){
				System.exit(1);
			}
		});
	}
}
public class JComboBoxDemo02{
	public static void main(String args[]){
		new MyComboBox();
	}
}18.14.3 JComboBox事件处理
JComboBox可以通过ItemListener作为事件的监听接口!!另外,因为JComboBox可以在文本框内输入文本,所以在处理时也要处理文本的行为事件(还要使用ActionListener接口来监听接口事件)!!!
范例:JComboBox事件处理
package org.forfan06.jcomboboxdemo;
import java.awt.Container;
import java.awt.Font;
import java.awt.GridLayout;
import java.awt.event.WindowAdapter;
import java.awt.event.WindowEvent;
import java.awt.event.ItemListener;
import java.awt.event.ItemEvent;
import java.awt.event.ActionEvent;
import java.awt.event.ActionListener;
import javax.swing.BorderFactory;
import javax.swing.JComboBox;
import javax.swing.JFrame;
import javax.swing.JLabel;
class MyComboBox implements ActionListener, ItemListener{
	private JFrame jframe = new JFrame("Welcome to my blog");
	private Container container = jframe.getContentPane();
	private JComboBox jcb1 = null;
	private JLabel label = new JLabel("www.csnd.net");
	private String fontSize[] = {"10", "12", "14", "16", "18", "20", "22", "24", "26", "48", "72"};
	public MyComboBox(){
		this.jframe.setLayout(new GridLayout(2, 1));
		this.jcb1 = new JComboBox(this.fontSize);
		jcb1.setBorder(BorderFactory.createTitledBorder("请选择显示文字大小"));
		jcb1.addItemListener(this);
		jcb1.addActionListener(this);
		jcb1.setMaximumRowCount(3);;
		jcb1.setEditable(true);
		jcb1.configureEditor(jcb1.getEditor(), "12");
		this.changeFontSize(12);

		container.add(this.jcb1);
		container.add(label);
		this.jframe.setSize(300, 150);
		this.jframe.setVisible(true);
		this.jframe.addWindowListener(new WindowAdapter(){
			public void windowClosing(WindowEvent e){
				System.exit(1);
			}
		});
	}

	public void itemStateChanged(ItemEvent e){
		if(e.getStateChange() == ItemEvent.SELECTED){
			String itemSize = (String) e.getItem();
			try{
				System.out.println("---ItemEvent action performed:" + e.paramString() + "---");
				this.changeFontSize(Integer.parseInt(itemSize));
			}catch(Exception ex){

			}
		}
	}

	public void actionPerformed(ActionEvent e){
		//如果没有if判断来过滤的话,这个ActionListener会监听到两个事件:comboBoxChanged 和 comboBoxEdited
		if(e.getActionCommand().equals("comboBoxChanged")){
			String itemSize = (String) this.jcb1.getSelectedItem();
			int size = 12;
			try{
				size = Integer.parseInt(itemSize);
			}catch(Exception ex){
				this.jcb1.getEditor().setItem("输入的不是数字。");
			}
			System.out.println("---action performed " +e.getActionCommand() + "---");
			this.changeFontSize(size);
			if(!this.isExists(itemSize)){
				this.jcb1.addItem(jcb1.getSelectedItem());
			}
		}
	}
	public boolean isExists(String item){
		boolean flag = false;

		for(int i = 0; i < this.jcb1.getItemCount(); i++){
			if(item.equals(this.jcb1.getItemAt(i))){
				flag = true;
			}
		}
		return flag;
	}

	public void changeFontSize(int size){
		Font fnt = new Font("Serief", Font.BOLD, size);
		this.label.setFont(fnt);
	}
}
public class JComboBoxDemo03 {
	public static void main(String args[]){
		MyComboBox myComboBox = new MyComboBox();
	}
}18.15 菜单组件
18.15.1 JMenu与JMenuBar
Java是通过JMenu组件来实现菜单类的。而JMenuBar组件则用来摆放JMenu组件! 当建立完许多JMenu组件之后,需要通过JMenuBar组件来讲JMenu组件加入到窗口中。
JMenu、JMenuBar的常用方法如下图所示:


范例:使用JMenu和JMenuBar构建简单的菜单
package org.forfan06.jmenudemo;
import java.awt.event.WindowAdapter;
import java.awt.event.WindowEvent;
import java.io.File;
import javax.swing.ImageIcon;
import javax.swing.JFrame;
import javax.swing.JMenu;
import javax.swing.JMenuBar;
import javax.swing.JScrollPane;
import javax.swing.JTextArea;
public class JMenuDemo01{
	public static void main(String args[]){
		JFrame jframe = new JFrame("welcome page");
		JTextArea text = new JTextArea();
		text.setEditable(true);

		jframe.getContentPane().add(new JScrollPane(text));

		JMenu menuFile = new JMenu("File");
		menuFile.setIcon(new ImageIcon("D:" + File.separator + "file.png"));
		JMenuBar menuBar = new JMenuBar();
		menuBar.add(menuFile);
		jframe.addWindowListener(new WindowAdapter(){
			public void windowClosing(WindowEvent e){
				System.exit(1);
			}
		});
		jframe.setJMenuBar(menuBar);

		jframe.setSize(300, 100);
		jframe.setLocation(300, 200);
		jframe.setVisible(true);
	}
}18.15.1 JMenuItem
上面的程序只是简单的构建了一个菜单。但是,该菜单中并没有任何的菜单项,如果需要加入菜单项,则需要使用JMenuItem组件来完成!!!
JMenuItem继承AbstractButton类。因此,JMenuItem可以理解为一种特殊的JButton组件!!当选择某个菜单项时也会触发ActionEvent事件。
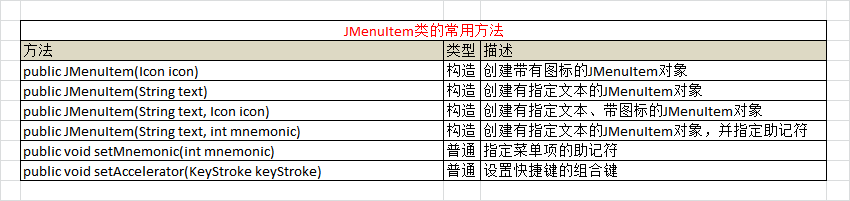
JMenuItem类的常用方法如下图所示:
范例:构建菜单项
package org.forfan06.jmenudemo;
import java.awt.event.WindowAdapter;
import java.awt.event.WindowEvent;
import java.io.File;
import javax.swing.ImageIcon;
import javax.swing.JFrame;
import javax.swing.JMenu;
import javax.swing.JMenuBar;
import javax.swing.JMenuItem;
import javax.swing.JScrollPane;
import javax.swing.JTextArea;
import javax.swing.KeyStroke;
public class JMenuDemo02{
	public static void main(String args[]){
		JFrame jframe = new JFrame("Welcome page");
		JTextArea text = new JTextArea();
		text.setEditable(true);
		jframe.getContentPane().add(new JScrollPane(text));

		JMenu menuFile = new JMenu("File");
		menuFile.setIcon(new ImageIcon("D:" + File.separator + "file.png"));
		JMenuBar menuBar = new JMenuBar();

		JMenuItem newItem = new JMenuItem("new", new ImageIcon("D:" + File.separator + "new.png"));
		JMenuItem openItem = new JMenuItem("open", new ImageIcon("D:" + File.separator + "open.png"));
		JMenuItem closeItem = new JMenuItem("close", new ImageIcon("D:" + File.separator + "close.png"));
		JMenuItem exitItem = new JMenuItem("exit", new ImageIcon("D:" + File.separator + "exit.png"));
		newItem.setMnemonic('N');
		openItem.setMnemonic('O');
		closeItem.setMnemonic('C');
		exitItem.setMnemonic('E');

		newItem.setAccelerator(KeyStroke.getKeyStroke('N', java.awt.Event.CTRL_MASK));  // 快捷键 Ctrl + N
		openItem.setAccelerator(KeyStroke.getKeyStroke('O', java.awt.Event.CTRL_MASK));
		closeItem.setAccelerator(KeyStroke.getKeyStroke('C', java.awt.Event.CTRL_MASK));
		exitItem.setAccelerator(KeyStroke.getKeyStroke('E', java.awt.Event.CTRL_MASK));

		menuFile.add(newItem);  // method in JMenu: public JMenuItem add(JMenuItem menuItem)
		menuFile.add(openItem);
		menuFile.add(closeItem);
		menuFile.addSeparator();    //加入一个分割线!!!
		menuFile.add(exitItem);

		menuBar.add(menuFile);          //加入JMenu

		jframe.addWindowListener(new WindowAdapter(){
			public void windowClosing(WindowEvent e){
				System.exit(1);
			}
		});

		jframe.setJMenuBar(menuBar);
		jframe.setSize(300, 180);
		jframe.setLocation(300, 200);
		jframe.setVisible(true);
	}
}18.15.2 事件处理
JMenuItem与JButton都是AbstractButton类的子类。它们的事件处理机制完全一样。选择一个菜单项实际上与单击一个按钮的效果完全一样!!!
ActionListener接口监听定义的抽象方法如下图所示:

范例:JMenu加入事件监听处理
package org.forfan06.jmenudemo;
import java.awt.event.ActionListener;
import java.awt.event.ActionEvent;
import java.awt.event.WindowAdapter;
import java.awt.event.WindowEvent;
import java.io.File;
import javax.swing.ImageIcon;
import javax.swing.JFrame;
import javax.swing.JMenu;
import javax.swing.JMenuBar;
import javax.swing.JMenuItem;
import javax.swing.JScrollPane;
import javax.swing.JTextArea;
import javax.swing.KeyStroke;
public class JMenuDemo03{
	public static void main(String args[]){
		JFrame jframe = new JFrame("Welcome page");
		final JTextArea text = new JTextArea();
		text.setEditable(true);
		jframe.getContentPane().add(new JScrollPane(text));

		JMenu menuFile = new JMenu("File");
		menuFile.setIcon(new ImageIcon("D:" + File.separator + "file.png"));
		JMenuBar menuBar = new JMenuBar();

		JMenuItem newItem = new JMenuItem("new", new ImageIcon("D:" + File.separator + "new.png"));
		JMenuItem openItem = new JMenuItem("open", new ImageIcon("D:" + File.separator + "open.png"));
		JMenuItem closeItem = new JMenuItem("close", new ImageIcon("D:" + File.separator + "close.png"));
		JMenuItem exitItem = new JMenuItem("exit", new ImageIcon("D:" + File.separator + "exit.png"));
		newItem.setMnemonic('N');
		openItem.setMnemonic('O');
		closeItem.setMnemonic('C');
		exitItem.setMnemonic('E');

		newItem.setAccelerator(KeyStroke.getKeyStroke('N', java.awt.Event.CTRL_MASK));  // 快捷键 Ctrl + N
		openItem.setAccelerator(KeyStroke.getKeyStroke('O', java.awt.Event.CTRL_MASK));
		closeItem.setAccelerator(KeyStroke.getKeyStroke('C', java.awt.Event.CTRL_MASK));
		exitItem.setAccelerator(KeyStroke.getKeyStroke('E', java.awt.Event.CTRL_MASK));

		menuFile.add(newItem);  // method in JMenu: public JMenuItem add(JMenuItem menuItem)
		menuFile.add(openItem);
		menuFile.add(closeItem);
		menuFile.addSeparator();    //加入一个分割线!!!
		menuFile.add(exitItem);

		menuBar.add(menuFile);          //加入JMenu

		newItem.addActionListener(new ActionListener(){
			public void actionPerformed(ActionEvent e){
				text.append("===choose \"new\" option===\n");
			}
		});
		openItem.addActionListener(new ActionListener(){
			public void actionPerformed(ActionEvent e){
				text.append("===choose \"open\" option===\n");
			}
		});
		closeItem.addActionListener(new ActionListener(){
			public void actionPerformed(ActionEvent e){
				text.append("===choose \"close\" option===\n");
			}
		});
		exitItem.addActionListener(new ActionListener(){
			public void actionPerformed(ActionEvent e){
				text.append("===choose \"exit\" option===\n");
			}
		});
		jframe.addWindowListener(new WindowAdapter(){
			public void windowClosing(WindowEvent e){
				System.exit(1);
			}
		});

		jframe.setJMenuBar(menuBar);
		jframe.setSize(300, 180);
		jframe.setLocation(300, 200);
		jframe.setVisible(true);
	}
}
此时是通过鼠标选择菜单项还是使用快捷键选择菜单项,操作都会触发事件操作。这点与JButton的事件处理是完全一样的!!!
18.16 文件选择框:JFileChooser
在Swing中可以使用JFileChooser组件实现通过文件选择框选择要打开或保存的文件的功能。
JFileChooser类的常用方法如下所示:
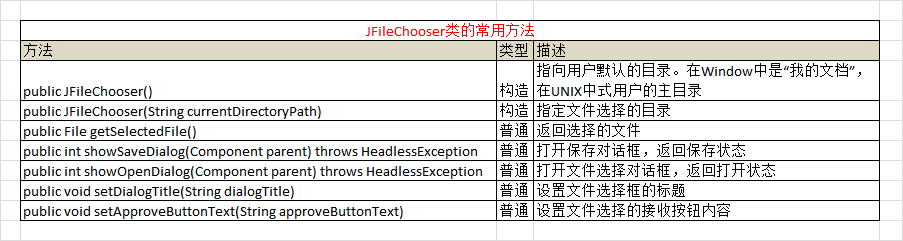
对于打开文件框及文件保存框有3种状态返回,这3种状态分别对应着JFileChooser类中定义的3个常量。如下所示:

下面使用JFileChooser完成文件的读取和保存操作。读取时通过文件选择框选择要显示的文件,并将内容显示在文本区中;如果需要保存文件,则通过文件选择框选择文件的保存路径。
范例:打开和保存文件
package org.forfan06.jfilechooserdemo;
import java.awt.BorderLayout;
import java.awt.event.ActionListener;
import java.awt.event.ActionEvent;
import java.awt.event.WindowAdapter;
import java.awt.event.WindowEvent;
import java.io.File;
import java.io.FileInputStream;
import java.io.FileOutputStream;
import java.io.PrintStream;
import java.util.Scanner;
import javax.swing.JButton;
import javax.swing.JFileChooser;
import javax.swing.JFrame;
import javax.swing.JTextArea;
import javax.swing.JLabel;
import javax.swing.JPanel;
import javax.swing.JScrollPane;
class Note implements ActionListener{
	private JTextArea area = new JTextArea(8, 10);
	private JFrame jframe = new JFrame("Welcome page");
	private JButton open = new JButton("打开文件");
	private JButton save = new JButton("保存文件");
	private JLabel label = new JLabel("现在没有打开的文件");

	private JPanel butPan = new JPanel();   //定义面板
	public Note(){
		this.butPan.add(open);
		this.butPan.add(save);
		//设置窗体中的布局管理器
		jframe.setLayout(new BorderLayout(3, 3));
		jframe.add(this.label, BorderLayout.NORTH);
		jframe.add(this.butPan, BorderLayout.SOUTH);
		jframe.add(new JScrollPane(this.area), BorderLayout.CENTER);

		this.jframe.setSize(330, 180);
		this.jframe.setVisible(true);
		this.jframe.addWindowListener(new WindowAdapter(){
			public void windowClosing(WindowEvent e){
				System.exit(1);
			}
		});

		this.open.addActionListener(this);
		this.save.addActionListener(this);

		//jframe.setSize(300, 200);
		//jframe.setVisible(true);
	}

	public void actionPerformed(ActionEvent e){
		File file = null;
		int result = 0;
		JFileChooser fileChooser = new JFileChooser();
		if(e.getSource() == this.open){
			this.area.setText("");

			fileChooser.setApproveButtonText("确定");

			fileChooser.setDialogTitle("打开文件");
			result = fileChooser.showOpenDialog(this.jframe);  //显示打开对话框

			if(result == JFileChooser.APPROVE_OPTION){
				file = fileChooser.getSelectedFile();  //得到选择的File对象
				this.label.setText("打开的文件名称是:" + file.getName());
			}else if(result == JFileChooser.CANCEL_OPTION){
				this.label.setText("没有选择任何文件");
			}else{
				//result == JFileChooser.ERROR_OPTION
				this.label.setText("操作错误");
			}

			if(file != null){   //选择选择的文件不为空
				try{
					Scanner scan = new Scanner(new FileInputStream(file));  //设置输入流
					scan.useDelimiter("\n");  //设置分隔符
					while(scan.hasNext()){
						this.area.append(scan.next());
						this.area.append("\n");
					}
					scan.close();
				}catch(Exception e1){
					this.label.setText("文件读取错误");
				}
			}
		}
		if(e.getSource() == this.save){
			result = fileChooser.showSaveDialog(this.jframe);  //显示保存文件框
			if(result == JFileChooser.APPROVE_OPTION){
				file = fileChooser.getSelectedFile();   //选择要保存的文件
				this.label.setText("选择的保存文件名称是:" + file.getName());
			}else if(result == JFileChooser.CANCEL_OPTION){
				this.label.setText("没有选择任何文件");
			}else{
				//result == JFileChooser.ERROR_OPTION
				this.label.setText("操作错误");
			}

			if(file != null){
				try{
					PrintStream out = new PrintStream(new FileOutputStream(file));
					out.print(this.area.getText());  //输出全部内容
					out.close();
				}catch(Exception e2){
					this.label.setText("文件保存失败");
				}
			}
		}
	}
}
public class JFileChooserDemo01{
	public static void main(String args[]){
		new Note();
	}
}
程序在执行时,首先通过〖打开文件〗按钮触发了一个事件,之后在此事件中使用JFileChooser打开了一个文件的选择框,并使用Scanner类将内容全部显示到文本区中。当单击〖保存文件〗按钮时会打开保存的文件选择框,可以输入文件名称,之后会通过打印流将全部的内容输出到文件中。
智能推荐
5个超厉害的资源搜索网站,每一款都可以让你的资源满满!_最全资源搜索引擎-程序员宅基地
文章浏览阅读1.6w次,点赞8次,收藏41次。生活中我们无时不刻不都要在网站搜索资源,但就是缺少一个趁手的资源搜索网站,如果有一个比较好的资源搜索网站可以帮助我们节省一大半时间!今天小编在这里为大家分享5款超厉害的资源搜索网站,每一款都可以让你的资源丰富精彩!网盘传奇一款最有效的网盘资源搜索网站你还在为找网站里面的资源而烦恼找不到什么合适的工具而烦恼吗?这款网站传奇网站汇聚了4853w个资源,并且它每一天都会持续更新资源;..._最全资源搜索引擎
Book类的设计(Java)_6-1 book类的设计java-程序员宅基地
文章浏览阅读4.5k次,点赞5次,收藏18次。阅读测试程序,设计一个Book类。函数接口定义:class Book{}该类有 四个私有属性 分别是 书籍名称、 价格、 作者、 出版年份,以及相应的set 与get方法;该类有一个含有四个参数的构造方法,这四个参数依次是 书籍名称、 价格、 作者、 出版年份 。裁判测试程序样例:import java.util.*;public class Main { public static void main(String[] args) { List <Book>_6-1 book类的设计java
基于微信小程序的校园导航小程序设计与实现_校园导航微信小程序系统的设计与实现-程序员宅基地
文章浏览阅读613次,点赞28次,收藏27次。相比于以前的传统手工管理方式,智能化的管理方式可以大幅降低学校的运营人员成本,实现了校园导航的标准化、制度化、程序化的管理,有效地防止了校园导航的随意管理,提高了信息的处理速度和精确度,能够及时、准确地查询和修正建筑速看等信息。课题主要采用微信小程序、SpringBoot架构技术,前端以小程序页面呈现给学生,结合后台java语言使页面更加完善,后台使用MySQL数据库进行数据存储。微信小程序主要包括学生信息、校园简介、建筑速看、系统信息等功能,从而实现智能化的管理方式,提高工作效率。
有状态和无状态登录
传统上用户登陆状态会以 Session 的形式保存在服务器上,而 Session ID 则保存在前端的 Cookie 中;而使用 JWT 以后,用户的认证信息将会以 Token 的形式保存在前端,服务器不需要保存任何的用户状态,这也就是为什么 JWT 被称为无状态登陆的原因,无状态登陆最大的优势就是完美支持分布式部署,可以使用一个 Token 发送给不同的服务器,而所有的服务器都会返回同样的结果。有状态和无状态最大的区别就是服务端会不会保存客户端的信息。
九大角度全方位对比Android、iOS开发_ios 开发角度-程序员宅基地
文章浏览阅读784次。发表于10小时前| 2674次阅读| 来源TechCrunch| 19 条评论| 作者Jon EvansiOSAndroid应用开发产品编程语言JavaObjective-C摘要:即便Android市场份额已经超过80%,对于开发者来说,使用哪一个平台做开发仍然很难选择。本文从开发环境、配置、UX设计、语言、API、网络、分享、碎片化、发布等九个方面把Android和iOS_ios 开发角度
搜索引擎的发展历史
搜索引擎的发展历史可以追溯到20世纪90年代初,随着互联网的快速发展和信息量的急剧增加,人们开始感受到了获取和管理信息的挑战。这些阶段展示了搜索引擎在技术和商业模式上的不断演进,以满足用户对信息获取的不断增长的需求。
随便推点
控制对象的特性_控制对象特性-程序员宅基地
文章浏览阅读990次。对象特性是指控制对象的输出参数和输入参数之间的相互作用规律。放大系数K描述控制对象特性的静态特性参数。它的意义是:输出量的变化量和输入量的变化量之比。时间常数T当输入量发生变化后,所引起输出量变化的快慢。(动态参数) ..._控制对象特性
FRP搭建内网穿透(亲测有效)_locyanfrp-程序员宅基地
文章浏览阅读5.7w次,点赞50次,收藏276次。FRP搭建内网穿透1.概述:frp可以通过有公网IP的的服务器将内网的主机暴露给互联网,从而实现通过外网能直接访问到内网主机;frp有服务端和客户端,服务端需要装在有公网ip的服务器上,客户端装在内网主机上。2.简单的图解:3.准备工作:1.一个域名(www.test.xyz)2.一台有公网IP的服务器(阿里云、腾讯云等都行)3.一台内网主机4.下载frp,选择适合的版本下载解压如下:我这里服务器端和客户端都放在了/usr/local/frp/目录下4.执行命令# 服务器端给执_locyanfrp
UVA 12534 - Binary Matrix 2 (网络流‘最小费用最大流’ZKW)_uva12534-程序员宅基地
文章浏览阅读687次。题目:http://acm.hust.edu.cn/vjudge/contest/view.action?cid=93745#problem/A题意:给出r*c的01矩阵,可以翻转格子使得0表成1,1变成0,求出最小的步数使得每一行中1的个数相等,每一列中1的个数相等。思路:网络流。容量可以保证每一行和每一列的1的个数相等,费用可以算出最小步数。行向列建边,如果该格子是_uva12534
免费SSL证书_csdn alphassl免费申请-程序员宅基地
文章浏览阅读504次。1、Let's Encrypt 90天,支持泛域名2、Buypass:https://www.buypass.com/ssl/resources/go-ssl-technical-specification6个月,单域名3、AlwaysOnSLL:https://alwaysonssl.com/ 1年,单域名 可参考蜗牛(wn789)4、TrustAsia5、Alpha..._csdn alphassl免费申请
测试算法的性能(以选择排序为例)_算法性能测试-程序员宅基地
文章浏览阅读1.6k次。测试算法的性能 很多时候我们需要对算法的性能进行测试,最简单的方式是看算法在特定的数据集上的执行时间,简单的测试算法性能的函数实现见testSort()。【思想】:用clock_t计算某排序算法所需的时间,(endTime - startTime)/ CLOCKS_PER_SEC来表示执行了多少秒。【关于宏CLOCKS_PER_SEC】:以下摘自百度百科,“CLOCKS_PE_算法性能测试
Lane Detection_lanedetectionlite-程序员宅基地
文章浏览阅读1.2k次。fromhttps://towardsdatascience.com/finding-lane-lines-simple-pipeline-for-lane-detection-d02b62e7572bIdentifying lanes of the road is very common task that human driver performs. This is important ..._lanedetectionlite