一、FFmpeg简介-程序员宅基地
一、FFmpeg简介
1. ffmpeg/ffplay/ffprobe
1.1 概念
- ffmpeg: Hyper fast Audio and Video encoder 超快音视频编码器
- ffplay: Simple media player 简单媒体播放器
- ffprobe: Simple multimedia streams analyzer简单多媒体流分析器
1.2 帮助文档
-
ffmpeg
基本信息:ffmpeg -h
高级信息:ffmpeg -h long
所有信息:ffmpeg -h full -
ffplay:ffplay -h
-
ffprobe:ffprobe -h
2. ffmpeg八大模块

- AVUtil:核心工具库,许多其他模块都会依赖该库做一些基本的音视频处理操作,如log信息、版本信息等。
- AVFormat:文件格式和协议库,封装了Protocol层和Demuxer、Muxer层
- AVCodec:编解码库,封装了Codec库,默认不会添加libx264、libfdk_aac等三方库的,但可以插件形式添加,然后提供统一接口
- AVFilter:音视频滤镜库,该模块提供了包括音频特效和视频特效的处理
- AVDevice:输入输出设备库,音/视频的输入输出需要确保该模块已经打开
- SwrRessample:该模块可用于音频重采样,可以对数字音频进行声道数、数据格式、采样率等多种基本信息的转换。
- SWScale:该模块是将图像进行格式转换的模块,比如,可以将YUV的数据转换为RGB的数据,缩放尺寸由1280x720变为800x480。
- PostProc:该模块可用于进行后期处理,当我们使用AVFilter的时 候需要打开该模块的开关,因为Filter中会使用到该模块的一些基 础函数。
二、常用命令
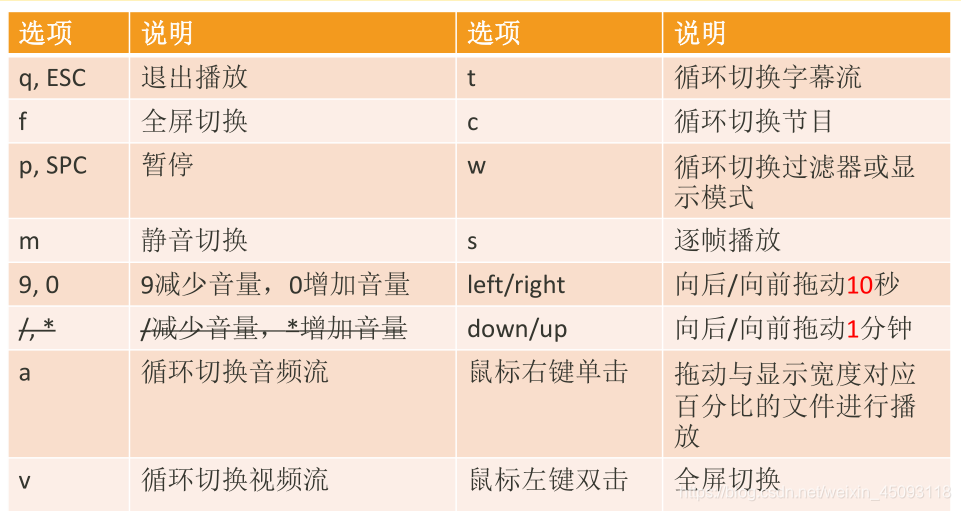
1. ffplay命令
1.1 播放控制
1.2 参数选项
主要选项
-x width:强制显示宽度
-y height:强制显示高度
-video_size size: 设置显示帧存储WxH格式,仅用于YUV等未包含尺寸的视频
-pixel_format format:设置像素格式。
-fs:以全屏模式启动。
-an/vn/sn:禁用音频/视频/字幕
-ss pos:设置的时间进行拖动,时间单位:‘12:03:45’ 12h 03m 45s, ‘23.189’ 23.189s
-t duration: 设置播放视频/音频长度,时间单位如 -ss选项
-t bytes:按照字节进行定位拖动(0=off 1=on -1=auto)
-seek_interval interval: 自定义左/右定位拖动间隔,默认10s
-nodisp:关闭图形化显示窗口,视频将不显示
-noborder:无边框窗口
-volume vol:设置起始音量,范围0~100
-f fmt:强制使用设置的格式进行解析。如-f s16le
-window_title title: 设置窗口标题,默认文件名
-loop number:始值播放循环次数
-showmode mode:设置显示模式,可用 的模式值:0显示视频(默认),1显示音频波形,2显示音频频谱
-vf filtergraph:设置视频滤镜
-af filtergraph:设置音频滤镜
高级选项
-stats:打印多个回放统计信息,包括显示流持续时间,编解码器参数, 流中的当前位置,以及音频/视频同步差值。默认启用状,禁用-nostats
-fast: 非标准化规范的多媒体兼容优化。
-genpts:生成pts。
-sync type同步类型:将主时钟设置为audio(默认)/video/external, 如type=ext
-ast audio_stream_specifier:指定音频流索引, 如-ast 3 播放流索引为3的音频流
-vst video_stream_specifier:指定视频流索引, 如-vst 4播放流索引为4的视频流
-sst subtitle_stream_specifier:指定字幕流索引, 如-sst 5播放流索引5的字幕流
-autoexit 视频播放完毕后退出。
-exitonkeydown 键盘按下任何键退出播放
-exitonmousedown 鼠标按下任何键退出播放
-codec:media_specifier codec_name 强制使用设置的多媒体解码器, media_specifier可用值为a(音频), v(视频)和s字幕。比如- codec:v h264_qsv 强制视频采用h264_qsv解码
-acodec codec_name 强制使用设置的音频解码器进行音频解码
-vcodec codec_name 强制使用设置的视频解码器进行视频解码
-scodec codec_name 强制使用设置的字幕解码器进行字幕解码
-autorotate 根据文件元数据自动旋转视频。值为0或1 ,默认为1。
-framedrop 如果视频不同步则丢弃视频帧。当主时钟非视频时钟时 默认开启。若需禁用则使用 -noframedrop
-infbuf 不限制输入缓冲区大小。尽可能快地从输入中读取尽可能多的数据。
播放实时流时默认启用,如果未及时读取数据,则可能会丢弃数据。此选项
将不限制缓冲区的大小。若需禁用则使用-noinfbuf
1.3 播放命令
- 播放YUV数据
ffplay -pix_format yuv420p -video_size 320x240 -framerate 5 -i yuv420p_320x240.yuv
- 播放RBG数据
ffplay -pix_format rtb24 -video_size 320x240 -framerate 5 -i rgb24_320x240.rgb
ffplay -pix_format rtb24 -video_size 320x240 -i rgb24_320x240.rgb
- 播放PCM数据
ffplay -ar 48000 -ac 2 -f32le 48000_2_f32l2.pcm
1.4 简单过滤器
# 视频旋转
ffplay -i test.mp4 -vf transpose=1
# 视频反转
ffplay test.mp4 -vf hflip
ffplay test.mp4 -vf vflip
# 视频旋转和反转
ffplay test.mp4 -vf hflip,transpose=1
# 音频变速播放
ffplay -i test.mp4 -af atempo=2
# 视频变速播放
ffplay -i test.mp4 -vf setpts=PTS/2
# 音视频同时变速
ffplay -i test.mp4 -vf setpts=PTS/2 -af atempo=2
2. ffmpeg命令
2.1 基本信息查询命令
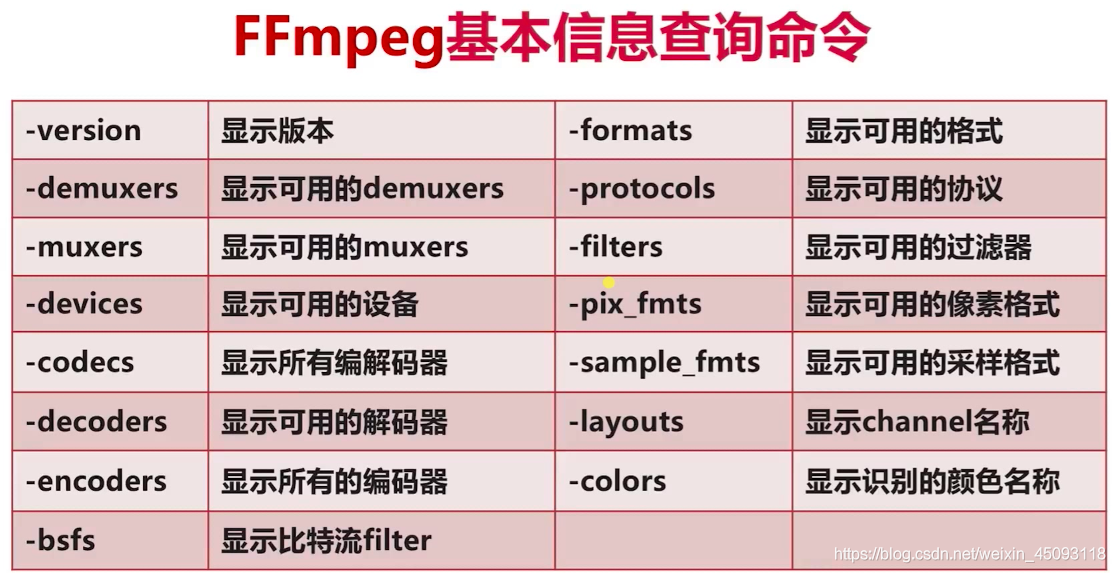
查看具体分类所支持的参数:
ffmpeg -h type=name

如:
ffmpeg -h echoder=libx264
2.2 提取音视频
- 提取音频
#保留编码格式
ffmpeg -i test.mp4 -acodec copy -vn audio.mp4	#保留封装格式
ffmpeg -i test.mp4 -acodec copy -vn test.aac	#保留编码格式
ffmpeg -i test.mp4 -acodec libmp3lame -vn test.mp3	#强制格式
#提取原始数据
ffmpeg -i test.mp3 -ar 44100 -ac 2 -f s16le test.pcm
ffmpeg -i test.mp3 -ar 44100 -ac 2 -sample_fmt s16 test.wav		#采样格式
ffmpeg -i test.mp3 -ar 44100 -ac 2 -codec:a pacm_s16le  test.wav#编码格式
- 提取视频
#保留编码格式
ffmpeg -i test.mp4 -acodec copy -aan audio.mp4	#保留封装格式
ffmpeg -i test.mp4 -vcodec copy -an test.h264	#保留编码h264
ffmpeg i test.mp4 -vcodec libx264 -an test.h264	#强制格式
#提取原始数据
ffmpeg -i test.mp4 -t 3 -pix_fmt yuv420p -s 320x240 test.yuv	#提取3s 320x240的yuv420p数据
ffmpeg -i test.mp3 -t 3 -pix_fmt rgb24 -s 320x240 test.rgb		#提取rgb数据
ffmpeg -s 320x240 -pix_fmt yuv420p -i test.yuv -pix_fmt rgb24 test.rgb	#yuv转rgb数据
2.3 格式转封装
#保持编码格式
ffmpeg -i test.mp4 -vcodec copy -acodec copy test.ts
ffmpeg -i test.mp4 -codec copy test.ts

#改变编码格式
ffmpeg -i test.mp4 =vcodec libx265 -acodec libmp3lame test.mkv

#修改帧率
ffmpeg -i test.mp4 -r 15 out.mp4

#修改码率
ffmpeg -i test.mp4 -b 400k test.mkv	#音视频同时被重新编码
Ffmpeg -i test.mp4 -b:v 400k -b:a 192k test.mp4

ffmpeg -i test.mp4 -b:v 400k -acodec copy test.mkv	#视频重新编码
ffmpeg -i test.mp4 -b:a 192k -vcodec copy test.mp4	#音频重新编码

#修改视频分辨率
ffmpeg -i test.mp4 -s 320x240 test.mp4

#修改音频采样率
ffmpeg -i test.mp4 -ar 48000 test.mp4
2.4 裁剪/合并
- 裁剪视频
ffmpeg -i test.mp4 -ss 00:00:10 -t 10 -codec copy 1.mp4
ffmpeg -i test.mp4 -ss 00:00:10 =t 20 -vcodec libx264 -acodec aac 2.mp4
- 合并视频
#mp4List.txt文件
file 'test_ss1.mp4'
file 'test_ss2.mp4'
ffmpeg -f concat -i mp4List.txt -codec copy test.mp4
ffmpeg -i "concat:1.ts|2.ts|3.ts" -codec copy out_ts.mp4 #仅限于ts等部分封装格式
注意:合并的视频分辨率可以不同,编码格式必须统一,音频参数(ar/ac/sample_fmt)和编码格式都必须统一。
2.5 图片/视频转换
- 视频转图片
#视频转jpeg
ffmpeg -i test.mp4 -f image2 image_%3d.jpeg				#每帧自己的参数
ffmpeg -i test.mp4 -t 5 -s 640x360 -r 15 image%03d.jpeg	#指定转换的参数
#视频转gif
ffmpeg -i test.mp4 -t 5 -r 1 image1.gif
ffmpeg -i test.mp4 -t 5 -r 25 -s 640x360 image2.gif
- 图片转视频
ffmpeg -i image_%3d.jpeg test_img.mp4
ffmpeg -f gif -i image2.gif image2.mp4
2.6 录制音视频
- 安装 Screen Capturer Recorder
ffmpeg -list_devices true -f dshow -i dummy查看可用设备的名字
[dshow @ 03221440] DirectShow video devices (some may be both video and audio devices)
[dshow @ 03221440]  "Integrated Camera"						##笔记本摄像头
[dshow @ 03221440]     Alternative name "@device_pnp_\\?\usb#vid_04f2&pid_b61e&mi_00#6&10400b6&0&0000#{65e8773d-8f56-11d0-a3b9-00a0c9223196}\global"
[dshow @ 03221440]  "screen-capture-recorder"				##录屏
[dshow @ 03221440]     Alternative name "@device_sw_{860BB310-5D01-11D0-BD3B-00A0C911CE86}\{4EA6930A-2C8A-4AE6-A561-56E4B5044439}"
[dshow @ 03221440] DirectShow audio devices
[dshow @ 03221440]  "麦克风阵列 (Realtek(R) Audio)"			##麦克风
[dshow @ 03221440]     Alternative name "@device_cm_{33D9A762-90C8-11D0-BD43-00A0C911CE86}\wave_{D3AF43CB-ECC4-410E-925D-E850F1C96C66}"
[dshow @ 03221440]  "virtual-audio-capturer"				##本机声音
[dshow @ 03221440]     Alternative name "@device_sw_{33D9A762-90C8-11D0-BD43-00A0C911CE86}\{8E14549B-DB61-4309-AFA1-3578E927E935}"
默认参数
#录制视频
ffmpeg -f dshow -i video="screen-capture-recorder" v-out.mp4		#录制屏幕
ffmpeg -f dshow -i video="Integrated Camera" -y v-out2.flv 			#摄像头

#录制音频
ffmpeg -f dshow -i audio="virtual-audio-capturer" a-out.aac			#系统声音
ffmpeg -f dshow -i audio="virtual-audio-capturer" -f dshow -i audio="麦克风阵列 (Realtek(R) Audio)" -filter_complex amix=inputs=2:duration=first:dropout_transition=2 a-out2.aac			#系统+麦克风声音

#同时录制视频和音频
ffmpeg -f dshow -i audio="麦克风 (Realtek Audio)" -f dshow -i audio="virtual-
audio-capturer" -filter_complex amix=inputs=2:duration=first:dropout_transition=2 -f
dshow -i video="screen-capture-recorder" -y av-out.flv
可选参数
- 查看录制视频 可选参数
ffmpeg -f dshow -list_options true -i video="screen-capture-recorder"
[dshow @ 032d1440] DirectShow video device options (from video devices)
[dshow @ 032d1440]  Pin "Capture" (alternative pin name "1")
[dshow @ 032d1440]   pixel_format=bgr0  min s=1x1 fps=0.02 max s=1280x720 fps=30
[dshow @ 032d1440]   pixel_format=bgr0  min s=1x1 fps=0.02 max s=1280x720 fps=30
[dshow @ 032d1440]   pixel_format=bgr24  min s=1x1 fps=0.02 max s=1280x720 fps=30
[dshow @ 032d1440]   pixel_format=rgb555le  min s=1x1 fps=0.02 max s=1280x720 fps=30
[dshow @ 032d1440]   pixel_format=rgb555le  min s=1x1 fps=0.02 max s=1280x720 fps=30
[dshow @ 032d1440]   pixel_format=rgb8  min s=1x1 fps=0.02 max s=1280x720 fps=30
[dshow @ 032d1440]   pixel_format=yuv420p  min s=1x1 fps=0.02 max s=1280x720 fps=30
- 查看录制音频 可选参数
ffmpeg -f dshow -list_options true -i audio="virtual-audio-capturer“
[dshow @ 01471440] DirectShow audio only device options (from audio devices)
[dshow @ 01471440]  Pin "Capture Virtual Audio Pin" (alternative pin name "1")
[dshow @ 01471440]   min ch=2 bits=16 rate= 48000 max ch=2 bits=16 rate= 48000
录制音视频
#指定参数录制
ffmpeg -f dshow -i audio="麦克风阵列 (Realtek(R) Audio)" -f dshow -i audio="virtual-audio-capturer" -filter_complex amix=inputs=2:duration=first:dropout_transition=2 -f dshow -video_size 1920x1080 -framerate 15 -pixel_format yuv420p -i video="screen-capture- recorder" -vcodec h264_qsv -b:v 3M -y av-out.flv

ffmpeg -f dshow -i audio="麦克风阵列 (Realtek(R) Audio)" -f dshow -i audio="virtual-audio-capturer" -filter_complex amix=inputs=2:duration=first:dropout_transition=2 -f dshow -i
video="screen-capture-recorder" -vcodec h264_qsv -b:v 3M -r 15 -y av- out2.mp4

ffmpeg -f dshow -i audio="麦克风阵列 (Realtek(R) Audio)" -f dshow -i audio="virtual-audio-capturer" -filter_complex amix=inputs=2:duration=first:dropout_transition=2 -f dshow -framerate 15 -pixel_format yuv420p -i video="screen-capture-recorder" -vcodec h264_qsv -b:v 3M -r 15 -y av-out3.mp4
2.7 直播命令
#拉流
ffmpeg -i rtmp://58.200.131.2:1935/livetv/cctv1 -c copy test_rtmp.mp4
#推流
ffmpeg -re -i test_rtmp.mp4 -c copy -f flv rtmp//:localhost/live/room
2.8 过滤器
- 裁剪
ffmpeg -i test.mp4 -vf crop=iw/3:ih:0:0 out.mp4		#视频裁剪宽度原来的1/3
ffmpeg -i test.mp4 -vf crop=iw/3:ih:iw/3:0 out.mp4	#从1/3处裁剪宽度原来1/3
ffplay -i test.mp4 -vf crop=iw/3:ih:iw/3:0			#预览裁剪的结果
- 水印
- 画中画
- 多宫格
三、FFmpeg初级使用
1. ffmpeg数据结构
AVFormatContext:封装格式上下文,保存了音视频文件封装格式相关信息。
struct AVFormatContext {

	iformat:		输入媒体的AVInputFormat
	nb_streams:	输入媒体的AVStream 个数
	streams:		输入媒体的AVStream []数组
	duration:		输入媒体的时长(以微秒为单位),计算方式可以参考 av_dump_format()函数。
	bit_rate:		输入媒体的码率
};
AVInputFormat / AVOutoutFormat:每种封装格式(MP4/FLV等)对应一个该结构体
struct AVInputFormat {

	name:			封装格式名称
	extensions:	封装格式的扩展名
	id:			封装格式ID一些封装格式处理的接口函数,比如read_packet()
}
AVStream:视频文件中每个音/视频流对应一个该结构体
struct AVStream {

	index:				标识该视频/音频流
	time_base:			该流的时基,PTS*time_base=真正的时间(秒)
	avg_frame_rate: 	该流的帧率
	duration:			该视频/音频流长度
	codecpar:			编解码器参数属性
}
AVCodecContext:编解码器上下文结构体,保存了音视频编解码相关信息
struct AVCodecContext {

	codec:			编解码器的AVCodec
	width, height:	图像的宽高(只针对视频)
	pix_fmt:		像素格式(只针对视频)
	sample_rate:	采样率(只针对音频)
	channels:		声道数(只针对音频)
	sample_fmt:	采样格式(只针对音频)
}
AVCodec:每种音视频编解码器(如h264)对应一个该结构体
struct AVCodec {

	name:	编解码器名称
	type:	编解码器类型
	id:	编解码器ID
	一些编解码的接口函数,比如int (*decode)()
}
AVPacket:存储一阵压缩数据
struct AVPakcet {

	pts:			显示时间戳
	dts:			解码时间戳
	data:			压缩编码数据
	size:			压缩编码数据大小
	pos:			数据的偏移地址
	stream_index:	所属的AVStream
}
AVFrame:存储一阵解码后的像素/采样数据
struct AVFrame {

	data:			解码后的图像像素数据(音频采样数据)
	linesize:		对视频来说是图像中一行像素的大小;对音频来说是整个音频帧的大小
	width, height:	图像的宽高(只针对视频)
	key_frame:		是否为关键帧(只针对视频) 。
	pict_type:		帧类型(只针对视频) 。例如I/P/B
	sample_rate:	音频采样率(只针对音频)
	nb_samples:	音频每通道采样数(只针对音频)
	pts:			显示时间戳
}
1.1 ffmpeg内存模型
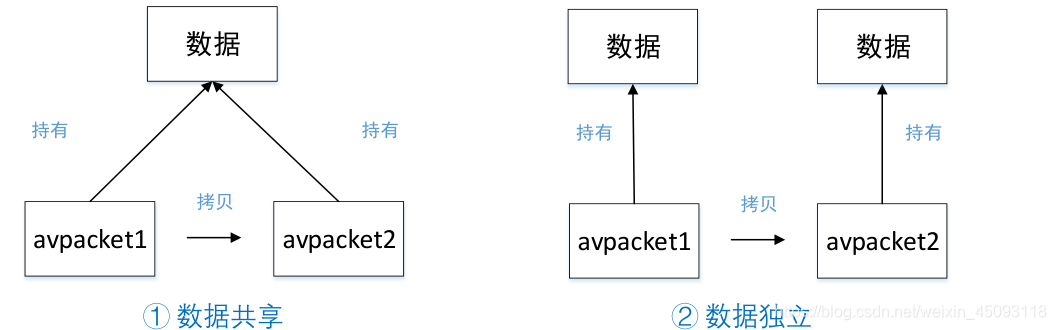
从现有的packet拷贝到另一个packet的时候,有两种情况:
- 两个Packet的buf引用的是同一数据缓存空间,这时候要注意数据缓存空间的释放问题;
- 两个Packet的buf引用不同的数据缓存空间,每个Packet都有数据缓存空间的copy;
实际上AVPacket中采用的是第一种内存模型。
对于多个AVPacket / AVFrame共享同一个缓存空间,ffmpeg使用的引用计数的机制:
- 初始化引用计数为0,只有真正分配AVBuffer的时候,引用计数初始化为1;
- 当有新的Packet引用共享的缓存空间时,就将引用计数+1
- 当释放了引用共享空间的Packet,就将引用计数-1;引用计数为0时,就释放掉引用的缓存空间AVBuffer。
1.2 AVPacket和AVFrame
AVPacket API
//分配 / 释放AVPacket
AVPacket *av_packet_alloc(void);		//内部不会分配buf空间
void av_packet_free(AVPacket **pkt);	//内部会调用av_packet_unref();

//初始化AVPacket
void av_init_packet(AVPacket *pkt); 	//会初始化pkt内部的buf_ref指向NULL,误用会导致内存泄漏

//new一个packet并分配AVPacket中的buf内存,引用计数初始化为1
int av_new_packet(AVPacket *pkt, int size);

//增加 / 减少 / 转移引用计数
int av_packet_ref(AVPacket *dst, const AVPacket *src); 	//增加引用计数
void av_packet_unref(AVPacket *pkt); 					//减少引用计数,调用unref函数次数必须>=ref函数次数,否则会导致内存泄漏
void av_packet_move_ref(AVPacket *dst, AVPacket *src); 	//转移引用计数,内部调用了av_init_packet()

//复制引用计数av_packet_alloc()+av_packet_ref()
AVPacket *av_packet_clone(const AVPacket *src); 	//内部调用了av_packet_alloc()+av_packet_ref()
AVFrame API
//分配 / 释放AVFrame
AVFrame *av_frame_alloc(void); / void av_frame_free(AVFrame **frame);

// 增加 / 减少 / 转移引用计数
int av_frame_ref(AVFrame *dst, const AVFrame *src); 	//增加引用计数
void av_frame_unref(AVFrame *frame); 					//减少引用计数
void av_frame_move_ref(AVFrame *dst, AVFrame *src); 	//转移引用计数

//根据AVFrame分配内存
int av_frame_get_buffer(AVFrame *frame, int align);

//等于av_frame_alloc()+av_frame_r
AVFrame *av_frame_clone(const AVFrame *src);  ef()
2. 音视频处理流程
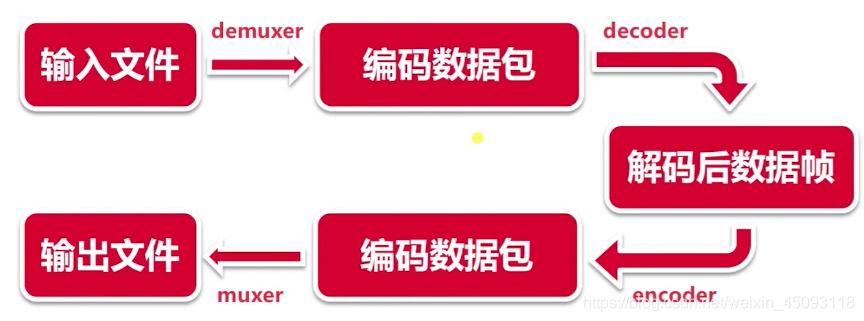

复用器/解复用器:视频/音频/字幕流等按照以顶的规则组合/拆分而成得到mp4/flv等视频文件,复用器如mp4/flv
编解码器:视频:YUV图像<——>H264帧,音频:PCM音频<——>AAC帧
2.1 初始化相关
//注册设备
avdevice_register_all();

//初始化网络库以及网络加密协议相关 的库(比如openssl)
avformat_network_init();
2.2 格式封装相关
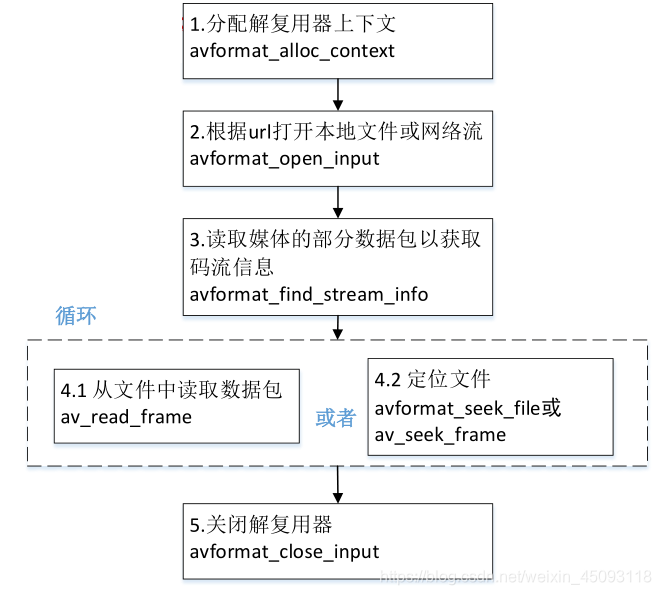
//申请一个AVFormatContext并初始化 / 释放AVFormatContext
avformat_alloc_context(); / avformat_Free_context();

//打开输入音视频文件	/ 关闭输入音视频文件
avformat_open_input(); / avformat_close_input();

//获取音视频文件信息
avformat_find_stream_info()

//读取音视频包
avformat_read_frame();

定位文件
avformat_seek_file();
av_seek_frame();
2.3 编解码器相关

//分配 / 释放解码器上下文
avcodec_alloc_context3(); / avcodec_free_context();

//根据ID / 名字查找解码器
avcodec_find_decoder(); / avcodec_find_decoder_by_name();

//打开编解码器 / 关闭解码器
avcodec_open2(); /avcodec_close();

//发送编码数据包
avcodec_send_packet();

//接受编码后数据
avcodec_receive_frame();
根据ID / 名字查找编码器的区别:ffmpeg内部编码器是交互存储,同种编码方式有多种编码器,不同编码器之间编码方式ID是相同的,但编码器名字不同。通过ID会默认找到第一个编码器,通过名字查找则指定编码器。
2.3 文件操作
void ffmpeg_test() {

    av_log_set_level(AV_LOG_DEBUG);
    AVIODirContext *dir_ctx = NULL;
    AVIODirEntry *next = NULL;
    //打开目录
    avio_open_dir(&dir_ctx, "/Users/mac/AVTest", NULL);
    //获取目录信息
    int count = 0;
    while (avio_read_dir(dir_ctx, &next)) {

        //打印目录信息
        if(!next) {

            break;
        }
        av_log(NULL, AV_LOG_DEBUG, "%s    %lld\n", next->name, next->size);
    }

    //删除文件
    avpriv_io_delete("/Users/mac/AVTest/test.flv");
    //重命名文件
    avpriv_io_move("/Users/mac/AVTest/test.pcm", "/Users/mac/AVTest/tt.pcm");
}
2.4 抽取音频
- 相关API
//输出文件的流信息
void av_dump_format(AVFormatContext *ic,
                    int index,
                    const char *url,
                    int is_output);
//找到最合适的流数据
int av_find_best_stream(AVFormatContext *ic,
                        enum AVMediaType type,
                        int wanted_stream_nb,
                        int related_stream,
                        AVCodec **decoder_ret,
                        int flags);
- 实例
void cut_audio() {

    AVFormatContext *fmt_ctx = NULL;
    const char *src_path = "/Users/mac/AVTest/test.mp4";
    const char *dst_path = "/Users/mac/AVTest/test.aac";
    FILE *dst_fd = NULL;
    AVPacket *packet NULL;
    int ret = -1;

    /*输出文件的信息*/
    avdevice_register_all();
    //打开音频文件
    avformat_open_input(&fmt_ctx, src_path, NULL, NULL);
    av_dump_format(fmt_ctx, 0, src_path, 0);
    //选择最合适的流
    ret = av_find_best_stream(fmt_ctx, AVMEDIA_TYPE_AUDIO, -1, -1, NULL, 0);
    //读取数据流
    dst_fd = fopen(dst_path, "wb+");
    packet = av_packet_alloc();
    av_init_packet(packet);
    while (0 == av_read_frame(fmt_ctx, packet)) {

        //转存入文件
        char szAdtsHeader[ADTS_HEADER_LEN] = {
    0};

        adts_header(szAdtsHeader, packet->size);
        fwrite(szAdtsHeader, 1, ADTS_HEADER_LEN, dst_fd);
        fwrite(packet->data, 1, packet->size, dst_fd);
    }
    fclose(dst_fd);
    avformat_close_input(&fmt_ctx);
    av_packet_free(&packet);
}
2.5 抽取视频
#include <stdio.h>
#include <libavutil/log.h>
#include <libavformat/avio.h>
#include <libavformat/avformat.h>

#ifndef AV_WB32
#   define AV_WB32(p, val) do {
                       \
        uint32_t d = (val);                     \
        ((uint8_t*)(p))[3] = (d);               \
        ((uint8_t*)(p))[2] = (d)>>8;            \
        ((uint8_t*)(p))[1] = (d)>>16;           \
        ((uint8_t*)(p))[0] = (d)>>24;           \
    } while(0)
#endif

#ifndef AV_RB16
#   define AV_RB16(x)                           \
    ((((const uint8_t*)(x))[0] << 8) |          \
      ((const uint8_t*)(x))[1])
#endif

//根据NALU_type不同添加不同的startcode
static int alloc_and_copy(AVPacket *out,
                          const uint8_t *sps_pps, uint32_t sps_pps_size,
                          const uint8_t *in, uint32_t in_size)
{

    //判断startcode的字节数:若out中有数据,则说明当前不是第一帧,即非sps/pps/IDR帧;若size为0,则说明当前为第一帧,startcode为4byte
    uint32_t offset         = out->size;
    uint8_t nal_header_size = offset ? 3 : 4;
    int err;
    //扩充out的空间:NALU_size + SPS_size + startcode_size
    //alloc_and_copy(out, spspps_pkt->data, spspps_pkt->size, buf, nal_size);
    err = av_grow_packet(out, sps_pps_size + in_size + nal_header_size);

    //若是sps/pps
    if (sps_pps) {

        //拷贝 sps/pps的data到out_data
        memcpy(out->data + offset, sps_pps, sps_pps_size);
    }
    //拷贝 packet中的size追加到out中sps/pps数据及预留的startcode位置的后面
    memcpy(out->data + sps_pps_size + nal_header_size + offset, in, in_size);
    //设置00000001
    if (!offset) {

        AV_WB32(out->data + sps_pps_size, 1);
    } else {
        //设置000001
        (out->data + offset + sps_pps_size)[0] =
        (out->data + offset + sps_pps_size)[1] = 0;
        (out->data + offset + sps_pps_size)[2] = 1;
    }

    return 0;
}

//从codec中获取sps/pps数据
//h264_extradata_to_annexb(fmt_ctx->stream[in->stream_index]->codec->extradata, in->stream_index]->codec->extradata——size, &spspps_pkt, AV_INPUT_BUFFER_PADDING_SIZE);
int h264_extradata_to_annexb(const uint8_t *codec_extradata, const int codec_extradata_size, AVPacket *out_extradata, int padding)
{

    uint16_t unit_size;
    uint64_t total_size                 = 0;
    uint8_t *out                        = NULL, unit_nb, sps_done = 0,
             sps_seen                   = 0, pps_seen = 0, sps_offset = 0, pps_offset = 0;
    //跳过无用的前4byte
    const uint8_t *extradata            = codec_extradata + 4;
    static const uint8_t nalu_header[4] = {
     0, 0, 0, 1 };
    //获取第一个字节的后2bit:sps/pps所占用的空间
    int length_size = (*extradata++ & 0x3) + 1;

    sps_offset = pps_offset = -1;

    //获取第二个字节的后5bit:sps/pps的个数,一般一个sps/pps
    unit_nb = *extradata++ & 0x1f;
    if (!unit_nb) {

        goto pps;
    }else {

        sps_offset = 0;
        sps_seen = 1;
    }

    //遍历每一个sps/pps
    while (unit_nb--) {

        int err;

        //获取sps/pps的长度
        unit_size   = AV_RB16(extradata);
        //添加startcode的长度
        total_size += unit_size + 4;
        //对空间进行扩展
        if ((err = av_reallocp(&out, total_size + padding)) < 0)
            return err;
        //拷贝startcode
        memcpy(out + total_size - unit_size - 4, nalu_header, 4);
        //拷贝sps/pps数据
        memcpy(out + total_size - unit_size, extradata + 2, unit_size);
        extradata += 2 + unit_size;
pps:
        if (!unit_nb && !sps_done++) {

            unit_nb = *extradata++; /* number of pps unit(s) */
            if (unit_nb) {

                pps_offset = total_size;
                pps_seen = 1;
            }
        }
    }

    if (out)
        memset(out + total_size, 0, padding);
    //返回获取的数据
    out_extradata->data      = out;
    out_extradata->size      = total_size;

    return length_size;
}

int h264_mp4toannexb(AVFormatContext *fmt_ctx, AVPacket *in, FILE *dst_fd)
{


    AVPacket *out = NULL;
    AVPacket spspps_pkt;

    int len;
    uint8_t unit_type;
    int32_t nal_size;
    uint32_t cumul_size    = 0;
    const uint8_t *buf;
    const uint8_t *buf_end;
    int            buf_size;
    int ret = 0, i;

    out = av_packet_alloc();

    buf      = in->data;
    buf_size = in->size;
    buf_end  = in->data + in->size;

    do {

        //获取data的前4个byte并转为大端,代表NALU的大小
        for (nal_size = 0, i = 0; i<4; i++)
            nal_size = (nal_size << 8) | buf[i];
        buf += 4; //跳过NALU_size
        //第一个字节为NALU_header:后5bit代表NALU_type
        unit_type = *buf & 0x1f;
        //若当前帧是关键帧
        if (unit_type == 5)
            //获取sps/pps的数据
            h264_extradata_to_annexb(fmt_ctx->stream[in->stream_index]->codec->extradata, &spspps_pkt, AV_INPUT_BUFFER_PADDING_SIZE);
            //添加startcode
            alloc_and_copy(out, spspps_pkt->data, spspps_pkt->size, buf, nal_size);

        } else {

            //直接添加startcode
            alloc_and_copy(out, NULL, 0, buf, nal_size);
        }

        //将annexb格式的NALU写到输出文件
        fwrite( out->data, 1, out->size, dst_fd);
        fflush(dst_fd);

        //获取当前从pakcet中读出了多少数据数据:NALU+NALU_size
        buf        += nal_size;
        cumul_size += nal_size + 4;
    //若没有读完,说明不只存了一帧
    } while (cumul_size < buf_size);

    return ret;
}

int main()
{

    int video_stream_index = -1;
    AVFormatContext *fmt_ctx = NULL;
    AVPacket pkt;

    /*register all formats and codec*/
    av_register_all();

    FILE *dst_fd = fopen(dst_filename, "test.mp4");

    /*open input media file, and allocate format context*/
    avformat_open_input(&fmt_ctx, src_filename, NULL, NULL);

    /*dump input information*/
    av_dump_format(fmt_ctx, 0, src_filename, 0);

    /*initialize packet*/
    av_init_packet(&pkt);
    pkt.data = NULL;
    pkt.size = 0;

    /*find best video stream*/
    video_stream_index = av_find_best_stream(fmt_ctx, AVMEDIA_TYPE_VIDEO, -1, -1, NULL, 0);
    /*read frames from media file*/
    while(av_read_frame(fmt_ctx, &pkt) >=0 ){

        if(pkt.stream_index == video_stream_index){

             h264_mp4toannexb(fmt_ctx, &pkt, dst_fd);
        }
        //release pkt->data
        av_packet_unref(&pkt);
    }
    /*close input media file*/
    avformat_close_input(&fmt_ctx);
    if(dst_fd) {

        fclose(dst_fd);
    }
    return 0;
}
2.6 格式转换
- API
//打开/释放输出文件
avformat_alloc_output_context2();
avformat_free_context();
//创建新的流数据
avformat_new_stream();
//复制流数据的编解码参数
avcodec_parameters_copy();

//写入多媒体文件头
avformat_write_header();
//写入流数据
av_write_frame();av_interleaved_write_fream();
//写入流数据尾部
av_write_trailer();
- 实例
/*将mp4转成flv格式*/

#include <libavutil/timestamp.h>
#include <libavformat/avformat.h>

int main(int argc, char **argv)
{

    AVOutputFormat *ofmt = NULL;  // 输出格式
    AVFormatContext *ifmt_ctx = NULL, *ofmt_ctx = NULL; // 输入、输出是上下文环境
    AVPacket pkt;
    const char *in_filename, *out_filename;
    int ret, i;
    int stream_index = 0;
    int *stream_mapping = NULL; // 数组用于存放输出文件流的Index
    int stream_mapping_size = 0; // 输入文件中流的总数量

    if (argc < 3) {

        printf("usage: %s input output\n"
               "API example program to remux a media file with libavformat and libavcodec.\n"
               "The output format is guessed according to the file extension.\n"
               "\n", argv[0]);
        return 1;
    }

    in_filename  = argv[1];
    out_filename = argv[2];

    // 打开输入文件为ifmt_ctx分配内存
    if ((ret = avformat_open_input(&ifmt_ctx, in_filename, 0, 0)) < 0) {

        fprintf(stderr, "Could not open input file '%s'", in_filename);
        goto end;
    }

    // 检索输入文件的流信息
    if ((ret = avformat_find_stream_info(ifmt_ctx, 0)) < 0) {

        fprintf(stderr, "Failed to retrieve input stream information");
        goto end;
    }

    // 打印输入文件相关信息
    av_dump_format(ifmt_ctx, 0, in_filename, 0);

    // 为输出上下文环境分配内存
    avformat_alloc_output_context2(&ofmt_ctx, NULL, NULL, out_filename);
    if (!ofmt_ctx) {

        fprintf(stderr, "Could not create output context\n");
        ret = AVERROR_UNKNOWN;
        goto end;
    }

    // 输入文件流的数量
    stream_mapping_size = ifmt_ctx->nb_streams;

    // 分配stream_mapping_size段内存,每段内存大小是sizeof(*stream_mapping)
    stream_mapping = av_mallocz_array(stream_mapping_size, sizeof(*stream_mapping));
    if (!stream_mapping) {

        ret = AVERROR(ENOMEM);
        goto end;
    }

    // 输出文件格式
    ofmt = ofmt_ctx->oformat;

    // 遍历输入文件中的每一路流,对于每一路流都要创建一个新的流进行输出
    for (i = 0; i < ifmt_ctx->nb_streams; i++) {

        AVStream *out_stream; // 输出流
        AVStream *in_stream = ifmt_ctx->streams[i]; // 输入流
        AVCodecParameters *in_codecpar = in_stream->codecpar; // 输入流的编解码参数

        // 只保留音频、视频、字幕流,其他的流不需要
        if (in_codecpar->codec_type != AVMEDIA_TYPE_AUDIO &&
            in_codecpar->codec_type != AVMEDIA_TYPE_VIDEO &&
            in_codecpar->codec_type != AVMEDIA_TYPE_SUBTITLE) {

            stream_mapping[i] = -1;
            continue;
        }

        // 对于输出的流的index重写编号
        stream_mapping[i] = stream_index++;

        // 创建一个对应的输出流
        out_stream = avformat_new_stream(ofmt_ctx, NULL);
        if (!out_stream) {

            fprintf(stderr, "Failed allocating output stream\n");
            ret = AVERROR_UNKNOWN;
            goto end;
        }

        // 直接将输入流的编解码参数拷贝到输出流中
        ret = avcodec_parameters_copy(out_stream->codecpar, in_codecpar);
        if (ret < 0) {

            fprintf(stderr, "Failed to copy codec parameters\n");
            goto end;
        }
        out_stream->codecpar->codec_tag = 0;
    }

    // 打印要输出的多媒体文件的详细信息
    av_dump_format(ofmt_ctx, 0, out_filename, 1);

    if (!(ofmt->flags & AVFMT_NOFILE)) {

        ret = avio_open(&ofmt_ctx->pb, out_filename, AVIO_FLAG_WRITE);
        if (ret < 0) {

            fprintf(stderr, "Could not open output file '%s'", out_filename);
            goto end;
        }
    }

    // 写入新的多媒体文件的头
    ret = avformat_write_header(ofmt_ctx, NULL);
    if (ret < 0) {

        fprintf(stderr, "Error occurred when opening output file\n");
        goto end;
    }

    while (1) {

        AVStream *in_stream, *out_stream;

        // 循环读取每一帧数据
        ret = av_read_frame(ifmt_ctx, &pkt);
        if (ret < 0) // 读取完后退出循环
            break;

        in_stream  = ifmt_ctx->streams[pkt.stream_index];
        if (pkt.stream_index >= stream_mapping_size ||
            stream_mapping[pkt.stream_index] < 0) {

            av_packet_unref(&pkt);
            continue;
        }

        pkt.stream_index = stream_mapping[pkt.stream_index]; // 按照输出流的index给pkt重新编号
        out_stream = ofmt_ctx->streams[pkt.stream_index]; // 根据pkt的stream_index获取对应的输出流

        // 对pts、dts、duration进行时间基转换,不同格式时间基都不一样,不转换会导致音视频同步问题
        pkt.pts = av_rescale_q_rnd(pkt.pts, in_stream->time_base, out_stream->time_base, AV_ROUND_NEAR_INF|AV_ROUND_PASS_MINMAX);
        pkt.dts = av_rescale_q_rnd(pkt.dts, in_stream->time_base, out_stream->time_base, AV_ROUND_NEAR_INF|AV_ROUND_PASS_MINMAX);
        pkt.duration = av_rescale_q(pkt.duration, in_stream->time_base, out_stream->time_base);
        pkt.pos = -1;

        // 将处理好的pkt写入输出文件
        ret = av_interleaved_write_frame(ofmt_ctx, &pkt);
        if (ret < 0) {

            fprintf(stderr, "Error muxing packet\n");
            break;
        }
        av_packet_unref(&pkt);
    }

    // 写入新的多媒体文件尾
    av_write_trailer(ofmt_ctx);
end:

    avformat_close_input(&ifmt_ctx);

    /* close output */
    if (ofmt_ctx && !(ofmt->flags & AVFMT_NOFILE))
        avio_closep(&ofmt_ctx->pb);
    avformat_free_context(ofmt_ctx);

    av_freep(&stream_mapping);

    if (ret < 0 && ret != AVERROR_EOF) {

        fprintf(stderr, "Error occurred: %s\n", av_err2str(ret));
        return 1;
    }

    return 0;
四、ffmpeg处理常见问题
1. 像素尺寸有问题
1.视频画面跳来跳去且画面渲染的不完整

2. 画面渲染的不完整

2. 像素格式有问题
- 颜色偏红/绿/蓝,应该是RGB分量排序问题,RGB格式不对

- 画面乱闪完全看不清楚,应该是像素格式问题,是不是YUV错选成RGB了

智能推荐
5个超厉害的资源搜索网站,每一款都可以让你的资源满满!_最全资源搜索引擎-程序员宅基地
文章浏览阅读1.6w次,点赞8次,收藏41次。生活中我们无时不刻不都要在网站搜索资源,但就是缺少一个趁手的资源搜索网站,如果有一个比较好的资源搜索网站可以帮助我们节省一大半时间!今天小编在这里为大家分享5款超厉害的资源搜索网站,每一款都可以让你的资源丰富精彩!网盘传奇一款最有效的网盘资源搜索网站你还在为找网站里面的资源而烦恼找不到什么合适的工具而烦恼吗?这款网站传奇网站汇聚了4853w个资源,并且它每一天都会持续更新资源;..._最全资源搜索引擎
Book类的设计(Java)_6-1 book类的设计java-程序员宅基地
文章浏览阅读4.5k次,点赞5次,收藏18次。阅读测试程序,设计一个Book类。函数接口定义:class Book{}该类有 四个私有属性 分别是 书籍名称、 价格、 作者、 出版年份,以及相应的set 与get方法;该类有一个含有四个参数的构造方法,这四个参数依次是 书籍名称、 价格、 作者、 出版年份 。裁判测试程序样例:import java.util.*;public class Main { public static void main(String[] args) { List <Book>_6-1 book类的设计java
基于微信小程序的校园导航小程序设计与实现_校园导航微信小程序系统的设计与实现-程序员宅基地
文章浏览阅读613次,点赞28次,收藏27次。相比于以前的传统手工管理方式,智能化的管理方式可以大幅降低学校的运营人员成本,实现了校园导航的标准化、制度化、程序化的管理,有效地防止了校园导航的随意管理,提高了信息的处理速度和精确度,能够及时、准确地查询和修正建筑速看等信息。课题主要采用微信小程序、SpringBoot架构技术,前端以小程序页面呈现给学生,结合后台java语言使页面更加完善,后台使用MySQL数据库进行数据存储。微信小程序主要包括学生信息、校园简介、建筑速看、系统信息等功能,从而实现智能化的管理方式,提高工作效率。
有状态和无状态登录
传统上用户登陆状态会以 Session 的形式保存在服务器上,而 Session ID 则保存在前端的 Cookie 中;而使用 JWT 以后,用户的认证信息将会以 Token 的形式保存在前端,服务器不需要保存任何的用户状态,这也就是为什么 JWT 被称为无状态登陆的原因,无状态登陆最大的优势就是完美支持分布式部署,可以使用一个 Token 发送给不同的服务器,而所有的服务器都会返回同样的结果。有状态和无状态最大的区别就是服务端会不会保存客户端的信息。
九大角度全方位对比Android、iOS开发_ios 开发角度-程序员宅基地
文章浏览阅读784次。发表于10小时前| 2674次阅读| 来源TechCrunch| 19 条评论| 作者Jon EvansiOSAndroid应用开发产品编程语言JavaObjective-C摘要:即便Android市场份额已经超过80%,对于开发者来说,使用哪一个平台做开发仍然很难选择。本文从开发环境、配置、UX设计、语言、API、网络、分享、碎片化、发布等九个方面把Android和iOS_ios 开发角度
搜索引擎的发展历史
搜索引擎的发展历史可以追溯到20世纪90年代初,随着互联网的快速发展和信息量的急剧增加,人们开始感受到了获取和管理信息的挑战。这些阶段展示了搜索引擎在技术和商业模式上的不断演进,以满足用户对信息获取的不断增长的需求。
随便推点
控制对象的特性_控制对象特性-程序员宅基地
文章浏览阅读990次。对象特性是指控制对象的输出参数和输入参数之间的相互作用规律。放大系数K描述控制对象特性的静态特性参数。它的意义是:输出量的变化量和输入量的变化量之比。时间常数T当输入量发生变化后,所引起输出量变化的快慢。(动态参数) ..._控制对象特性
FRP搭建内网穿透(亲测有效)_locyanfrp-程序员宅基地
文章浏览阅读5.7w次,点赞50次,收藏276次。FRP搭建内网穿透1.概述:frp可以通过有公网IP的的服务器将内网的主机暴露给互联网,从而实现通过外网能直接访问到内网主机;frp有服务端和客户端,服务端需要装在有公网ip的服务器上,客户端装在内网主机上。2.简单的图解:3.准备工作:1.一个域名(www.test.xyz)2.一台有公网IP的服务器(阿里云、腾讯云等都行)3.一台内网主机4.下载frp,选择适合的版本下载解压如下:我这里服务器端和客户端都放在了/usr/local/frp/目录下4.执行命令# 服务器端给执_locyanfrp
UVA 12534 - Binary Matrix 2 (网络流‘最小费用最大流’ZKW)_uva12534-程序员宅基地
文章浏览阅读687次。题目:http://acm.hust.edu.cn/vjudge/contest/view.action?cid=93745#problem/A题意:给出r*c的01矩阵,可以翻转格子使得0表成1,1变成0,求出最小的步数使得每一行中1的个数相等,每一列中1的个数相等。思路:网络流。容量可以保证每一行和每一列的1的个数相等,费用可以算出最小步数。行向列建边,如果该格子是_uva12534
免费SSL证书_csdn alphassl免费申请-程序员宅基地
文章浏览阅读504次。1、Let's Encrypt 90天,支持泛域名2、Buypass:https://www.buypass.com/ssl/resources/go-ssl-technical-specification6个月,单域名3、AlwaysOnSLL:https://alwaysonssl.com/ 1年,单域名 可参考蜗牛(wn789)4、TrustAsia5、Alpha..._csdn alphassl免费申请
测试算法的性能(以选择排序为例)_算法性能测试-程序员宅基地
文章浏览阅读1.6k次。测试算法的性能 很多时候我们需要对算法的性能进行测试,最简单的方式是看算法在特定的数据集上的执行时间,简单的测试算法性能的函数实现见testSort()。【思想】:用clock_t计算某排序算法所需的时间,(endTime - startTime)/ CLOCKS_PER_SEC来表示执行了多少秒。【关于宏CLOCKS_PER_SEC】:以下摘自百度百科,“CLOCKS_PE_算法性能测试
Lane Detection_lanedetectionlite-程序员宅基地
文章浏览阅读1.2k次。fromhttps://towardsdatascience.com/finding-lane-lines-simple-pipeline-for-lane-detection-d02b62e7572bIdentifying lanes of the road is very common task that human driver performs. This is important ..._lanedetectionlite